
Setting up your Svitgrid Gateway
You have the box in your hands. Here is everything from unpacking to the first reading: which board you have, where it goes, the cable if it needs one, and the setup in the app.
Setup takes about 10 minutes. Keep your phone within a few metres of the board the whole time.
Print this page
Printing any page of this documentation leaves out the menus, so it fits on paper.
Which board you have
There are two boards. They set up the same way in the app; only step 2 differs.
| Board | How to tell | How it reads your inverter | |
|---|---|---|---|
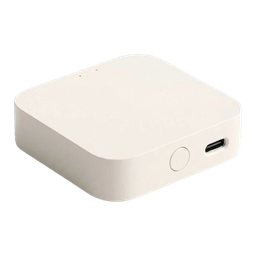 | ED-1 | A cream box with a USB-C port and a button. No other socket. | Over your home Wi‑Fi, through the Wi‑Fi module (the logger, or "stick") already plugged into your inverter. Nothing to wire. |
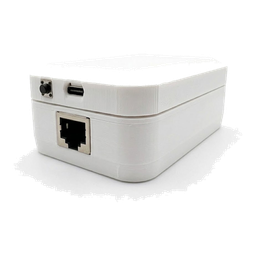 | ED-1.1 | A white box with a USB-C port, a button, and an RJ-45 socket that looks like a network socket. | Through a cable from its RJ-45 socket to the inverter's communication port (RS-485). It still uses your Wi‑Fi to reach the Svitgrid cloud. |
The box holds the board and a USB-C cable. There is no charger in the box: any phone charger rated 5 V works.
The RJ-45 socket is not a network port
Never plug an ED-1.1 cable into a router, a switch, or a computer. The socket carries RS-485 signals and DC power, not Ethernet. See the RJ-45 pinout.
Before you start
- The Svitgrid app is installed, and you are signed in. See Download and install and Create an account.
- Bluetooth is on. The app finds the board over Bluetooth.
- Location access is allowed when the app asks, on Android. Android shows the name of your Wi‑Fi network only to apps with location access.
- Your home Wi‑Fi password is at hand. The board joins 2.4 GHz networks only. A router that shows one name for both 2.4 GHz and 5 GHz usually works.
- ED-1 only: the inverter's Wi‑Fi module is on the same home network. If the inverter manufacturer's app shows live data, it is.
Step 1 — Place the board and power it
- Put the board near the inverter, indoors and dry, where your phone shows good Wi‑Fi. An ED-1.1 goes within reach of its cable.
- Plug the USB-C cable into the board and into a phone charger.
The light on the board stays off for now. That is normal: it comes on only once the first readings reach the cloud, in step 7.
Step 2 — Connect the cable (ED-1.1 only)
Skip this step for an ED-1.
Run a cable from the board's RJ-45 socket to the inverter's RS-485 communication port.
- Go by signal, never by pin number. Every inverter brand numbers its port differently. Match A+ to A+, B− to B−, and ground to ground, using the RJ-45 pinout.
- Huawei is described step by step in Huawei over RS-485.
- Reversed A and B does no damage. The bus stays silent, and the app finds no inverter. Swapping the two wires is the first thing to try.
Leave the inverter cabinet to an electrician
The communication port is low voltage, but on some inverters it sits in the same compartment as mains and battery wiring. If reaching it means opening a cover, ask your installer. It takes them about 15 minutes.
Step 3 — Start setup in the app
- A new account: after you sign in and swipe through the short introduction, the app starts setup by itself.
- You already have a station in Svitgrid, for example from collecting with your phone: open the station, go to the Settings tab, then Edge Device → Add a board.
- The board's label has a QR code: scan it with the phone camera. It opens setup for that exact board.
Step 4 — Check what the app found
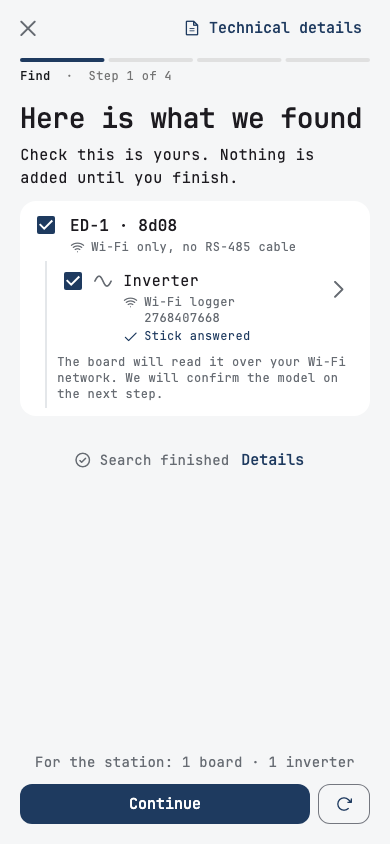
The app searches over Bluetooth and on your network. It lists the board by its model and the last four characters of its code, and the inverter under it.
An ED-1, with the inverter's Wi‑Fi logger found on the network:
An ED-1.1, with the inverter found on the cable:
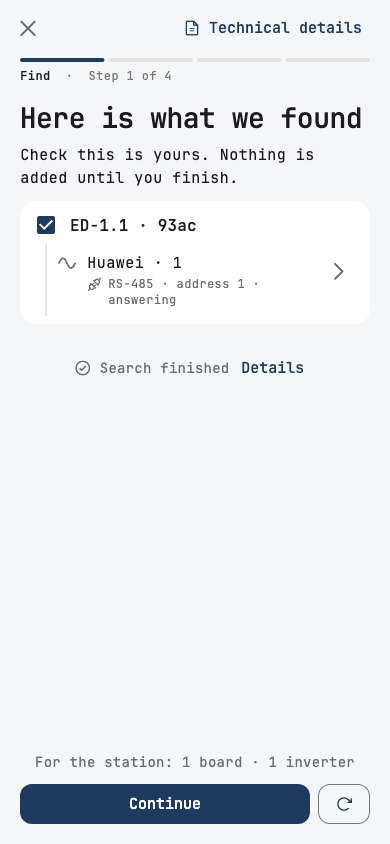
Leave everything that is yours ticked, and tap Continue. Nothing is added until the last step.
If the list is empty, see the table at the end of this page.
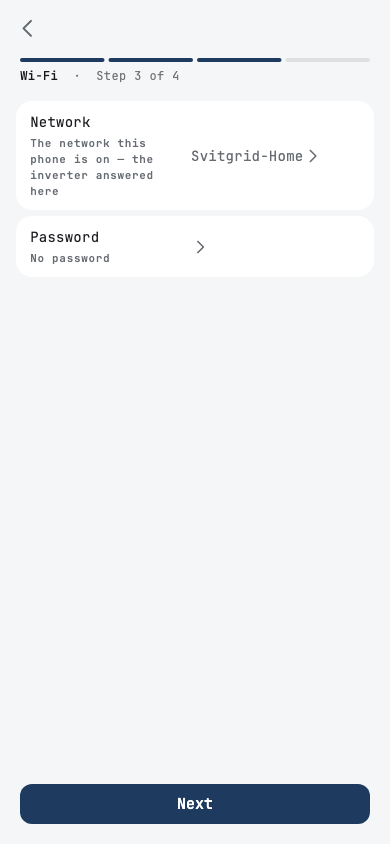
Step 5 — Give the board your Wi‑Fi
The app fills in the network your phone is on. Check that it is your home network, not a guest network or a mobile hotspot.
- Tap Password and type your Wi‑Fi password.
- Tap Done, then Next.
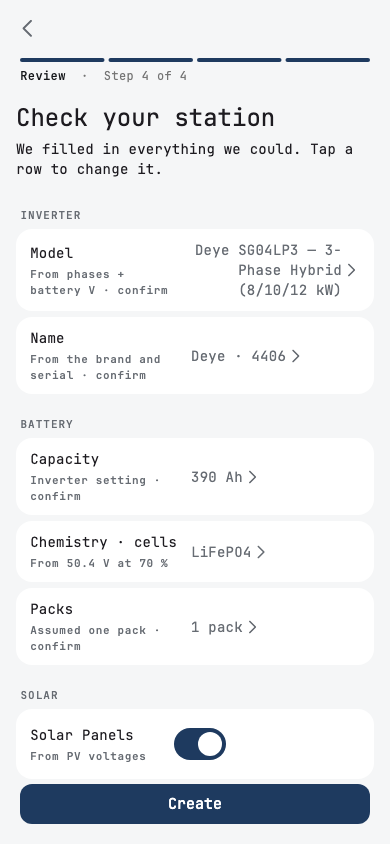
Step 6 — Check your station, then create it
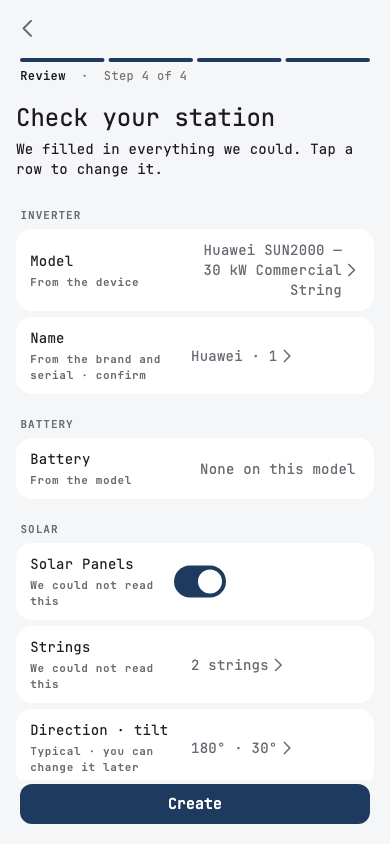
One page shows everything the app read: the inverter model, its name, the battery, and the solar panels. A row marked confirm is the app's best guess. Tap any row to change it.
On an ED-1.1 the board often reads the model straight from the inverter. The row then says From the device.
At the bottom, give the station a name and its location. The location drives the solar forecast and the outage schedules.
Tap Create.
Step 7 — Wait for the first readings
The app creates the station, sends your Wi‑Fi to the board, and waits for the board to come online and send its first readings. This takes about a minute.
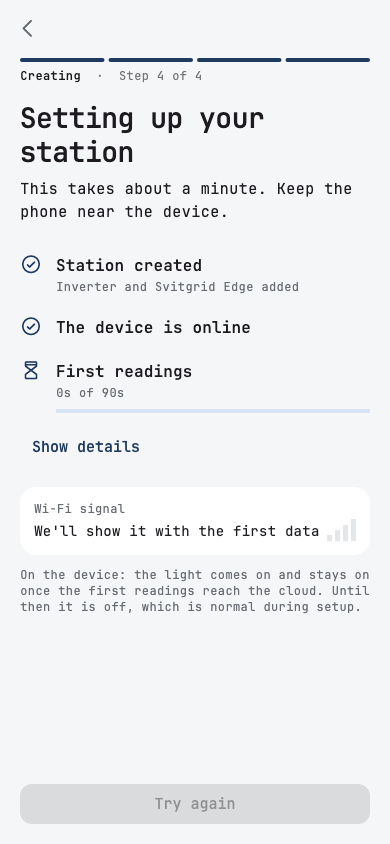
When the first reading arrives, the app opens your dashboard, and the light on the board comes on and stays on. Setup is done.
If the board cannot join your Wi‑Fi, the app says The device could not join that Wi-Fi. Most often the password has a typo. Tap Change the password and retry. The app continues from where it stopped and creates nothing twice.
The status light
The board has one light, and no blink codes.
- On — a reading reached the Svitgrid cloud in the last 12 minutes. Everything works.
- Off — nothing reached the cloud in the last 12 minutes, or nothing yet since it was switched on.
See Svitgrid Gateway for the button, pausing, and everything else the board does after setup.
If something goes wrong
| What you see | What to do |
|---|---|
| The app does not find the board | Check that Bluetooth is on and the phone is within a few metres. Unplug the board for 10 seconds, plug it back in, and tap the search button (↻) beside Continue. |
| An ED-1 is found, but no inverter | The inverter's Wi‑Fi module must be on the same network as your phone. Open the inverter manufacturer's app and check it shows live data. See Connecting to your inverter. |
| An ED-1.1 is found, but no inverter | Check both ends of the cable, then swap A and B. Some inverters need their RS-485 port set to Modbus in their own menu first. See Huawei over RS-485. |
| The device could not join that Wi-Fi | The password is wrong, or the network is 5 GHz only. Tap Change the password and retry. |
| Readings stop later | See Troubleshooting. |
Still stuck? Write to us from the app: Settings → Send feedback.