Welcome to Svitgrid
Your complete guide to monitoring solar energy with Svitgrid.
Svitgrid is a free solar energy monitoring app that connects to your home inverter and shows real-time data about your solar production, battery storage, grid usage, and home consumption — plus historical reports, day-ahead forecasts, and a planner that runs schedules on your inverter automatically.
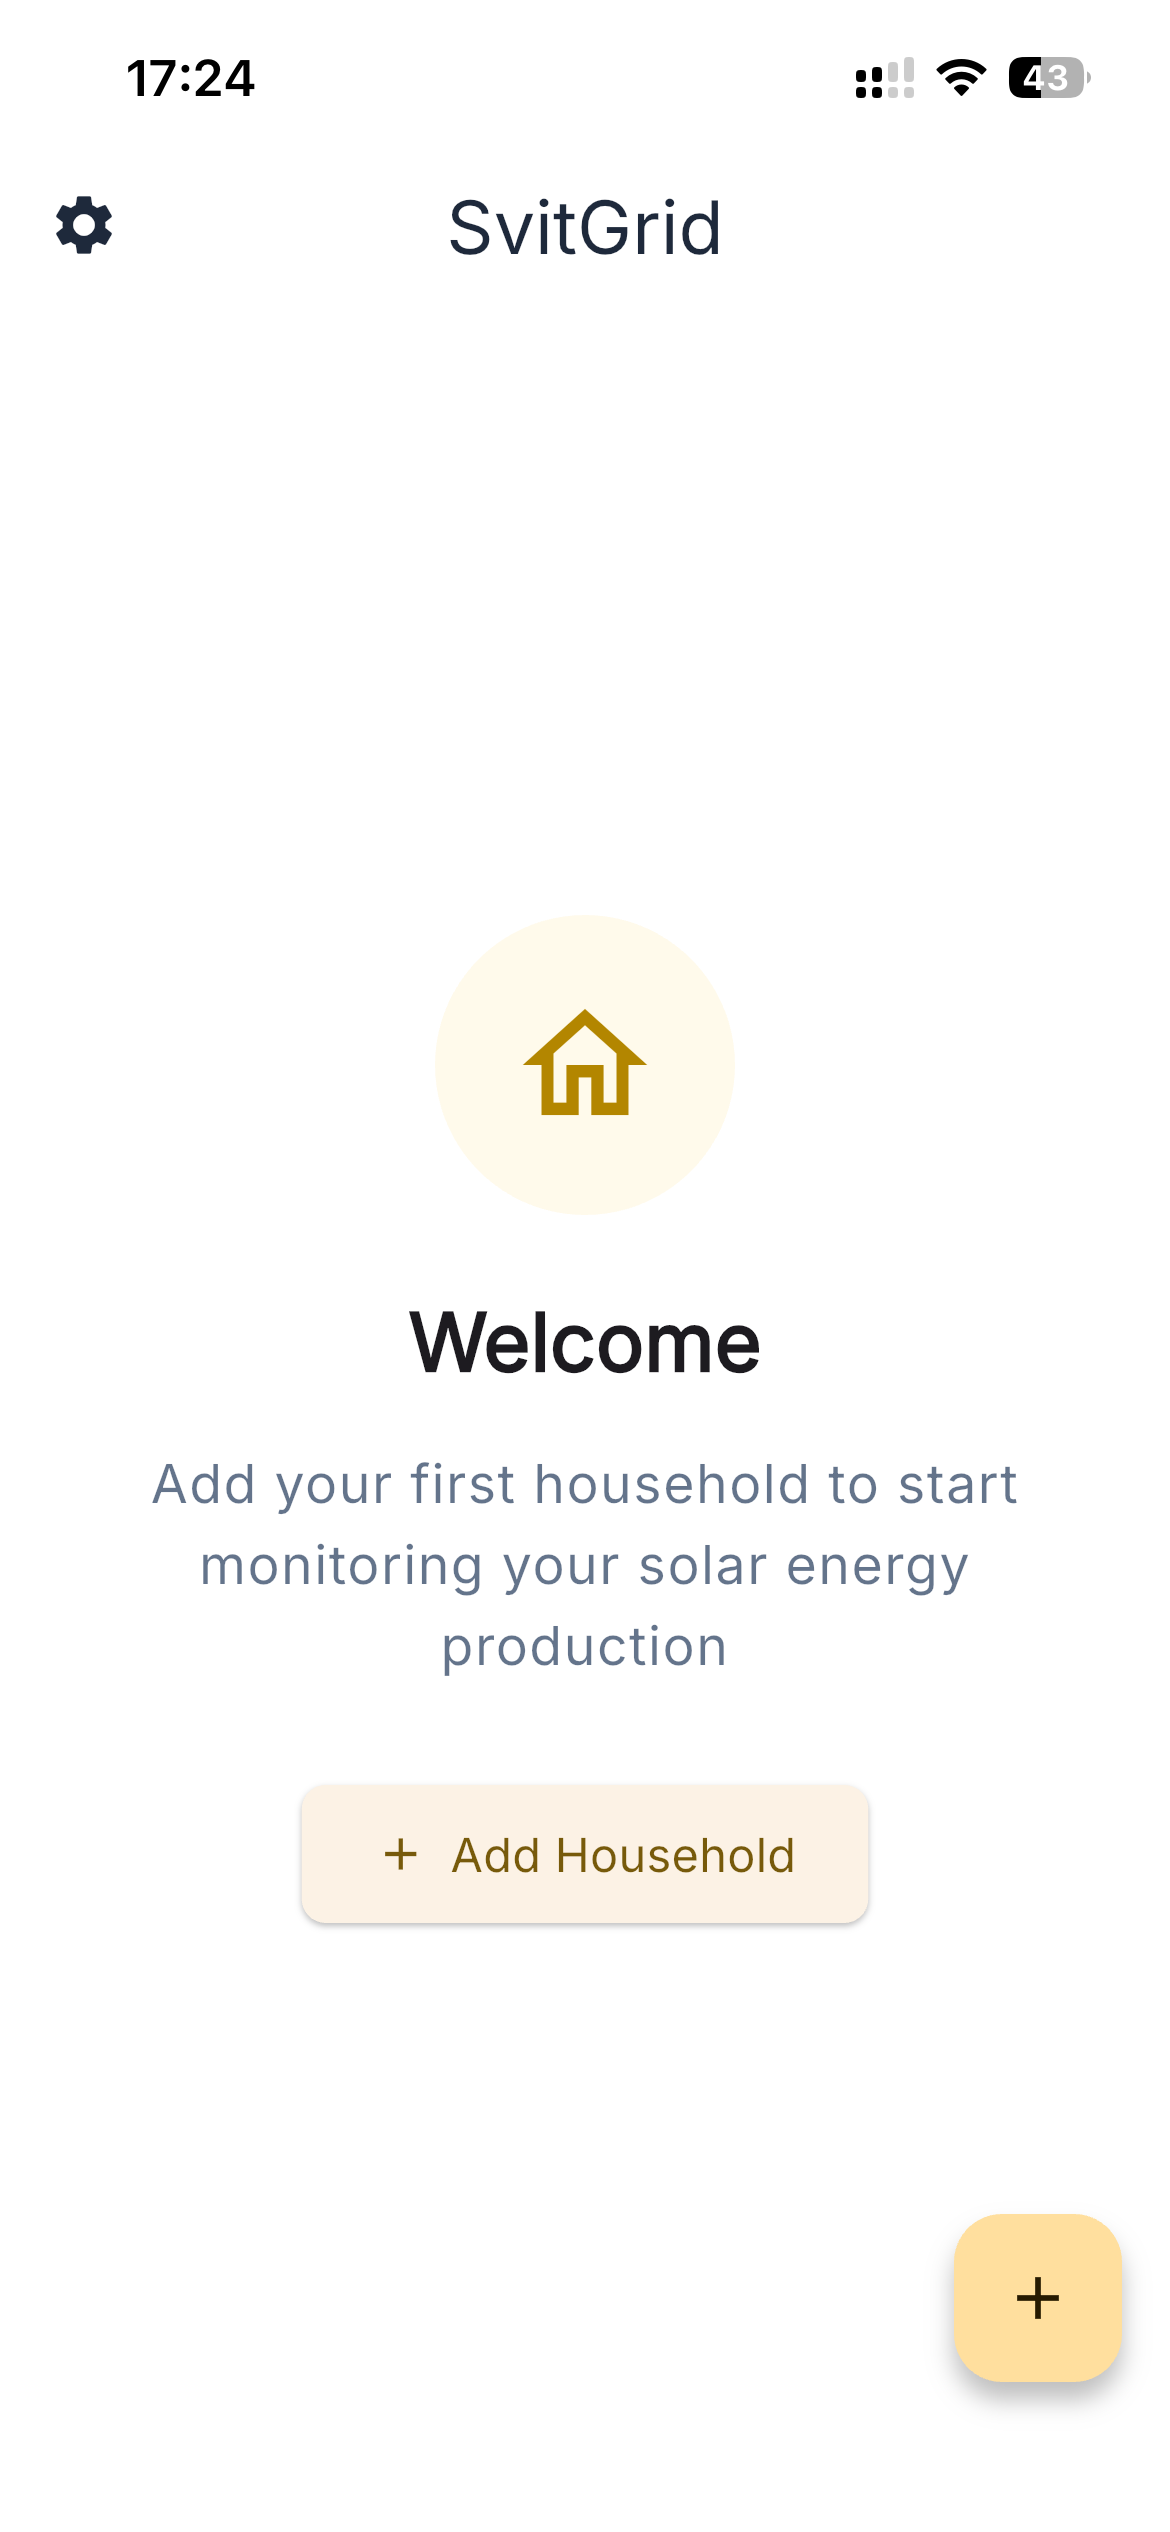
Welcome screen — add your first household to get started
What can Svitgrid do?
- Live dashboard — PV strings, battery SOC/voltage/temperature, grid import/export, home load, and outages — all on one screen
- Energy charts — Day, month, year, and all-time totals, with battery cycles and per-phase voltage
- Reports — Green-tariff revenue, CO₂ saved, daily production history, and weekly energy totals
- Calendar & Planner — Hour-by-hour view of forecast vs. actual, with a planner that runs charge / sell-to-grid / lower-consumption schedules on your inverter
- Solar forecast — Day-ahead production prediction based on panel orientation and weather
- Outage schedule — Planned blackout schedule for your Ukrainian region and group
- Multi-property — Manage several households from one account, invite family members
- 24/7 collection — A small Svitgrid Edge device collects data from your inverter around the clock
How it works
Svitgrid reads register values from your inverter's data logger (Wi-Fi stick) using the Solarman V5 protocol, or — for Victron — raw Modbus TCP. There are two collection modes:
- Phone mode — Your phone (or a spare phone left at home) reads the inverter directly over your local network.
- Edge mode — A small Svitgrid Edge device sits on your network, reads the inverter every few seconds, and uploads to the cloud. Works around the clock without a phone at home.
Release Notes
What's new in the Svitgrid app, by version.
Version 1.0.12
Available on: iOS 1.0.201 (201) · Android 1.0.12 (201) — July 2026
Inverter troubleshooting
- When your inverter stops reporting while your gateway is still online — usually because the data logger's IP address changed — the "data may be outdated" banner is now tappable and opens a guided troubleshooting screen.
- A new "Scan for logger" action re-discovers a logger whose IP has moved and re-points your device to it automatically, with no manual setup.
- Retry a reading on demand, or edit the inverter's IP address by hand if you prefer.
Battery
- Schedule automatic battery maintenance windows (fill / drain) to keep your pack healthy.
- A quick one-time control to set the grid charge current for your inverter.
- The battery card now shows charging / discharging current in amps, alongside power, voltage and temperature.
Home screen
- Tapping the home-screen widget now always opens the app on your dashboard, instead of an occasional "page not found".
- The widget refreshes more reliably in the background.
Fleet view (for operators)
- Tap a status card (Online / Offline / In alarm) to jump straight to the stations list with that filter already applied.
Home Assistant (Island mode)
- Dashboard charts read from your Home Assistant are now fine-grained (5-minute), roll over correctly at midnight, and show per-phase grid voltage.
Fixes & polish
- The cooperative settlement card shows a balance you owe as a positive amount, with the direction in the heading — no more confusing double negative.
- Turning off the "Power Outage" alert now also silences the app's own on-screen outage notification.
- Signing up no longer sends several "verify your email" messages in a row.
- Fixed a stray back arrow in the dashboard header after visiting settings, overlapping chart labels, and double-counted generator power in multi-inverter homes.
Version 1.0.11
Available on: iOS 1.0.11 (160) · Android 1.0.11 (161, 162) — June 2026
Fleet view for operators
- Manage many sites at once from a new fleet dashboard — overview KPIs, a live station list, and a fleet-wide alarm feed.
- A day-ahead market (РДН) battery-arbitrage projection and a fleet analytics tab (energy, station ranking, estimated revenue).
- Invite households into your organisation and manage operators and their roles.
New "Active consumer (РДН)" tariff
- Settle at the day-ahead market price: a monthly settlement card shows what you sold, the average price, revenue, and your net balance.
- The calendar now overlays day-ahead (РДН) hourly prices for this tariff.
Calendar & Planner
- New "Professional" event mode — build a custom event from inverter settings plus trigger conditions (battery level, solar, load, grid up/down, scheduled outage, forecast, market price).
- Pause any event for the rest of the day with one tap; it resumes automatically tomorrow.
- "Consume from sun" now tells you why it's waiting and lets you set the turn-off power level.
Dashboard
- See up to 6 solar strings on the energy-flow diagram (6-MPPT inverters).
- The EV charger now shows as an animated charging node while it draws power.
- Each inverter shows an "offline" badge if it stops reporting, so one dead unit in a multi-inverter home is no longer hidden.
- Swipe the outage banner away to dismiss it, with a new toggle to hide it for good.
Forecast
- New "Solar utilisation" card — an hour-by-hour view of how much available sunlight you actually captured.
Reports
- The electricity-cost card now breaks costs down by day / night / peak zones, so the cheaper night rate is visible.
Notifications
- Opt out of product-update and promotional notifications, separately from safety alerts.
Outage schedules
- 12 more regions now show live blackout schedules.
Fixes & polish
- Removed phantom solar, PV-string, and generator readings that could appear when nothing was connected.
- Clearer micro-inverter details, readable chart value tooltips, and the calendar week strip now follows the day you swipe to.
Download & Install
Get Svitgrid on your device.
iOS (iPhone / iPad)
- Open the App Store on your device
- Search for "Svitgrid"
- Tap Get to download (free)
- Open the app once installed
Requires iOS 15.0 or later.
Android
- Open Google Play Store
- Search for "Svitgrid"
- Tap Install (free)
- Open the app once installed
Requires Android 8.0 (API 26) or later.
Permissions
Svitgrid may request the following permissions:
| Permission | Why |
|---|---|
| Local Network | To communicate with your inverter on your Wi-Fi network |
| Bluetooth | To configure the Svitgrid Edge device via BLE during onboarding |
| Location | For solar-forecast accuracy (panel location) and BLE scanning (Android requirement) |
| Notifications | For energy alerts, planner runs, and system status updates |
Create Your Account
Sign up in seconds.
Registration
- Open Svitgrid and tap "Create Account"
- Enter your name, email, and password
- Tap "Sign Up"
- Check your email for a verification link and tap it to verify your account
- You're in!
Sign in with Google / Apple
The login screen also offers single-sign-on with Google and Apple. The first sign-in creates the account; later ones just log you in.
Forgot Password
On the login screen, tap "Forgot Password?" to receive a password-reset link via email. Tap the link to set a new password.
Two-Factor Authentication
Once signed in, you can turn on app-based two-factor (TOTP) under Settings → Security. After enabling, you'll be asked for a 6-digit code on each new login.
Onboarding Wizard
Set up your first household step by step.
After creating your account, the onboarding wizard guides you through setting up your solar system. The flow takes about 3–5 minutes.
The whole wizard in one take — serial number and Wi-Fi password are blurred for privacy.
Step 1 — Household Name
Give your property a name (e.g., "Home", "Country House", "Office"). This helps you identify it if you have multiple properties.
Step 2 — Location
Set your property's location on the map. This is used for:
- Solar-forecast calculations (sun position depends on latitude/longitude)
- Weather data for forecast accuracy
- Outage schedule (Ukrainian regions)
- Timezone detection for daily totals
Step 3 — Connection Mode
Choose between Phone mode and Edge mode (24/7 monitoring)
| Mode | How it works | Best for |
|---|---|---|
| Phone | Phone reads the inverter over your local Wi-Fi | Trying it out, or pairing with a spare phone left at home |
| Edge Device | Dedicated Svitgrid Edge collects data 24/7 | Continuous monitoring, planner schedules, multiple users, remote access |
Step 4 — Inverter Brand & Model
Pick your inverter brand (Deye, Sunsynk, Sol-Ark, Victron) and the specific model. This tells Svitgrid which register map to use. See Supported Inverters for the full list.
Step 5 — Inverter Connection
Enter your inverter's connection details:
- IP Address — local IP of the data logger (e.g., 192.168.1.100)
- Port — usually 8899 for Solarman, 502 for Victron Modbus TCP
- Logger Serial — 10-digit serial of the Wi-Fi stick (printed on the stick or shown in SolarmanSmart)
Scan your network automatically, or enter inverter details manually
Battery & Solar Configuration
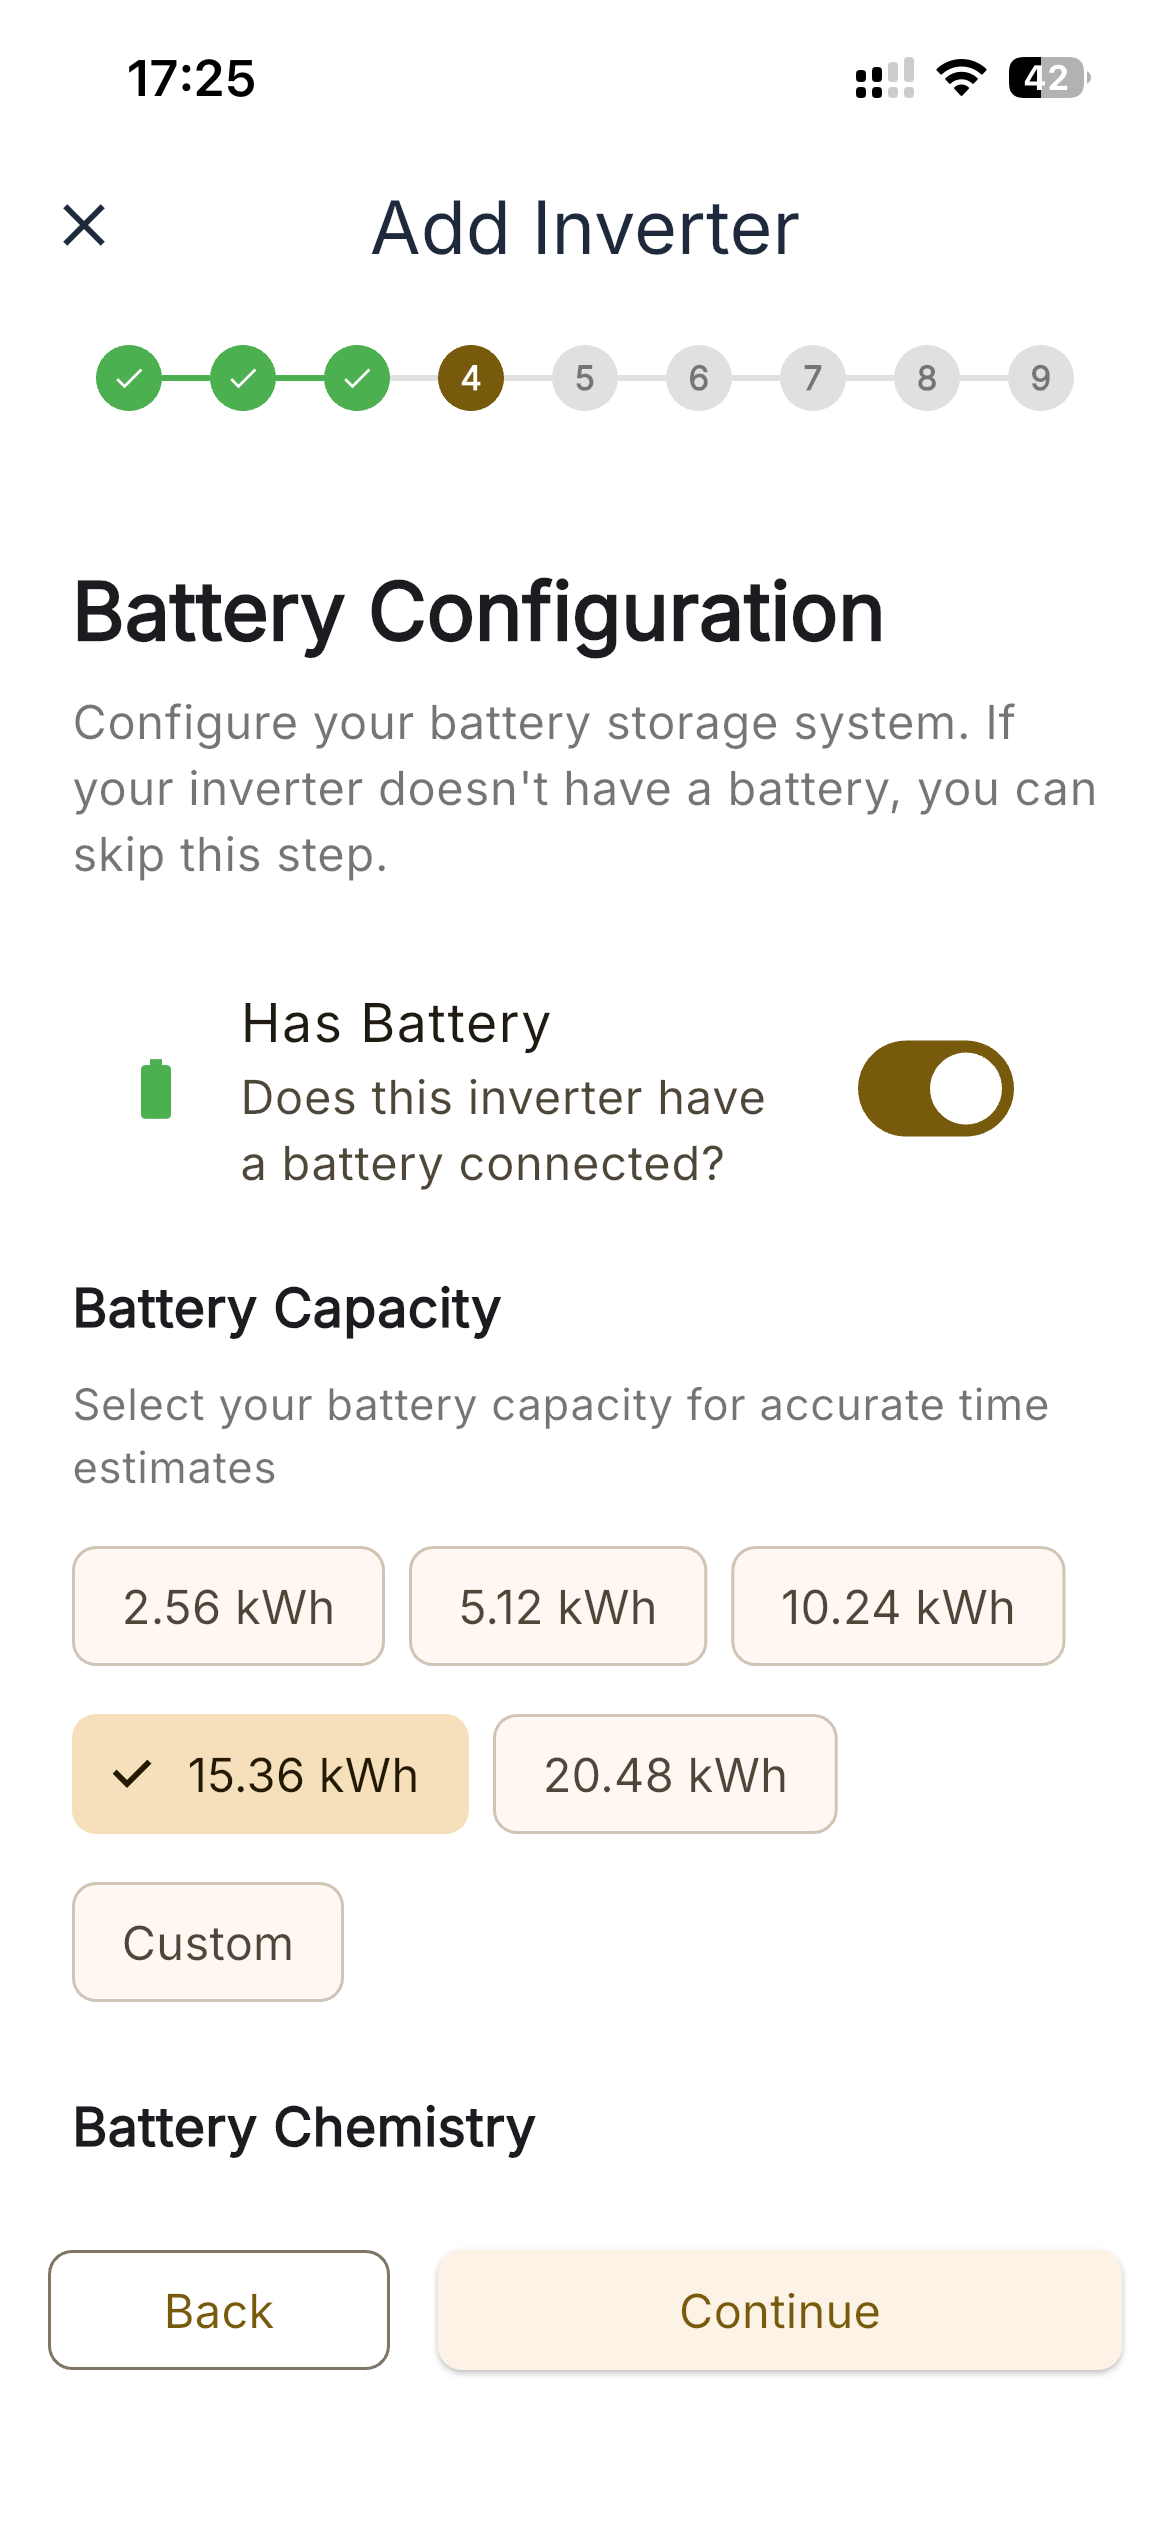
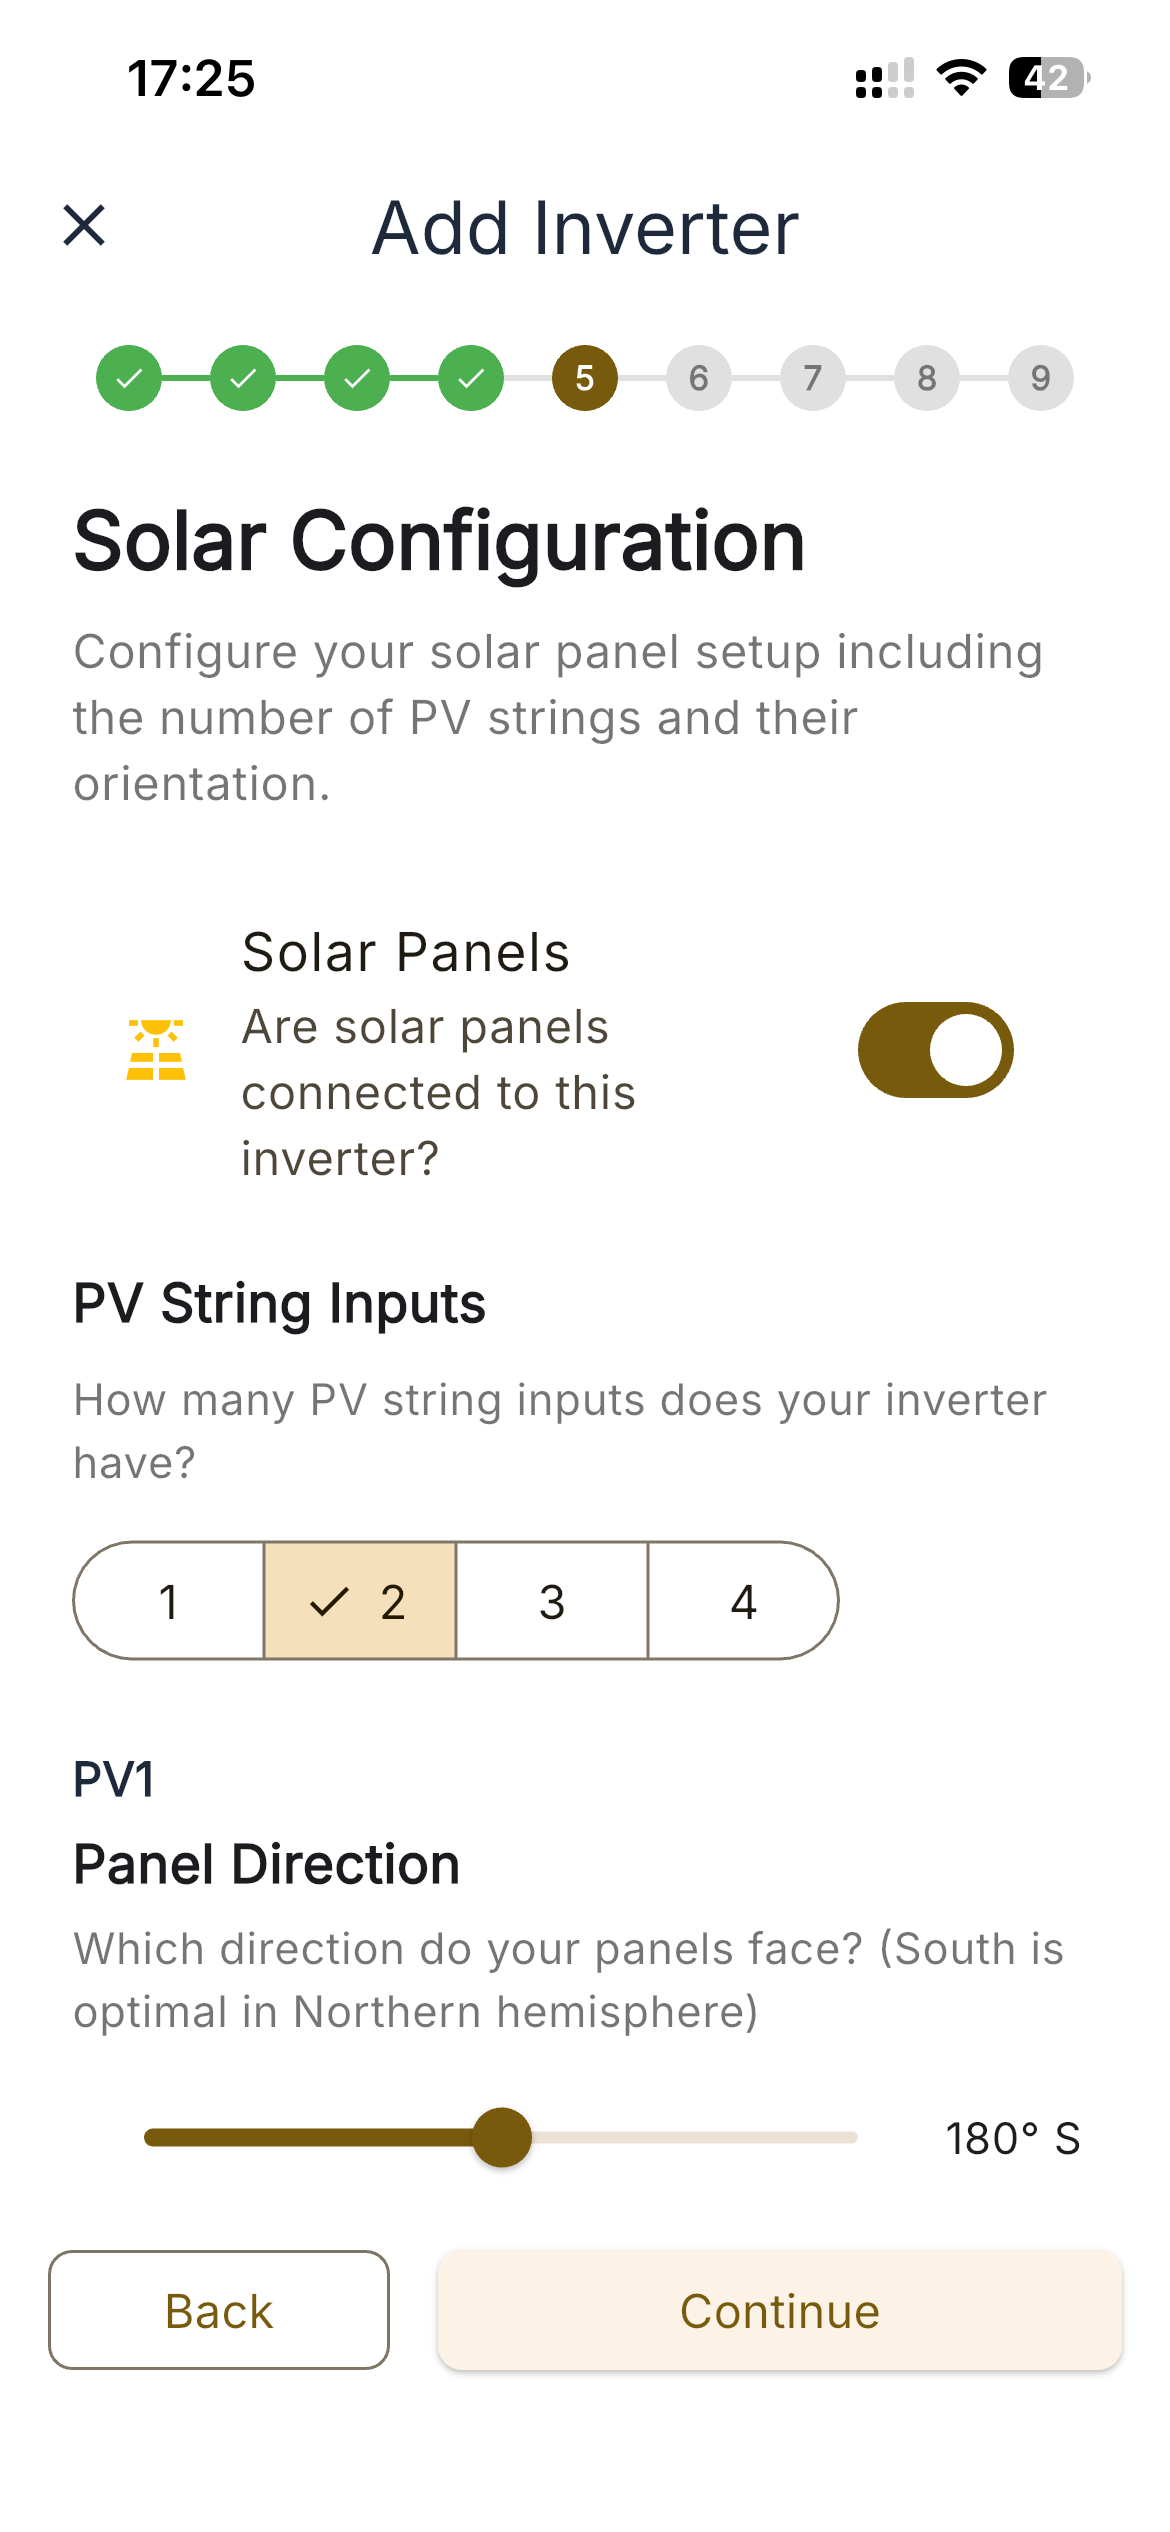
Configure battery capacity and the solar-string layout (kWp, tilt, azimuth per string)
Step 6 — Pair the Edge Device (if Edge mode)
If you chose Edge mode, this step finds your Svitgrid Edge over Bluetooth and configures its Wi-Fi.
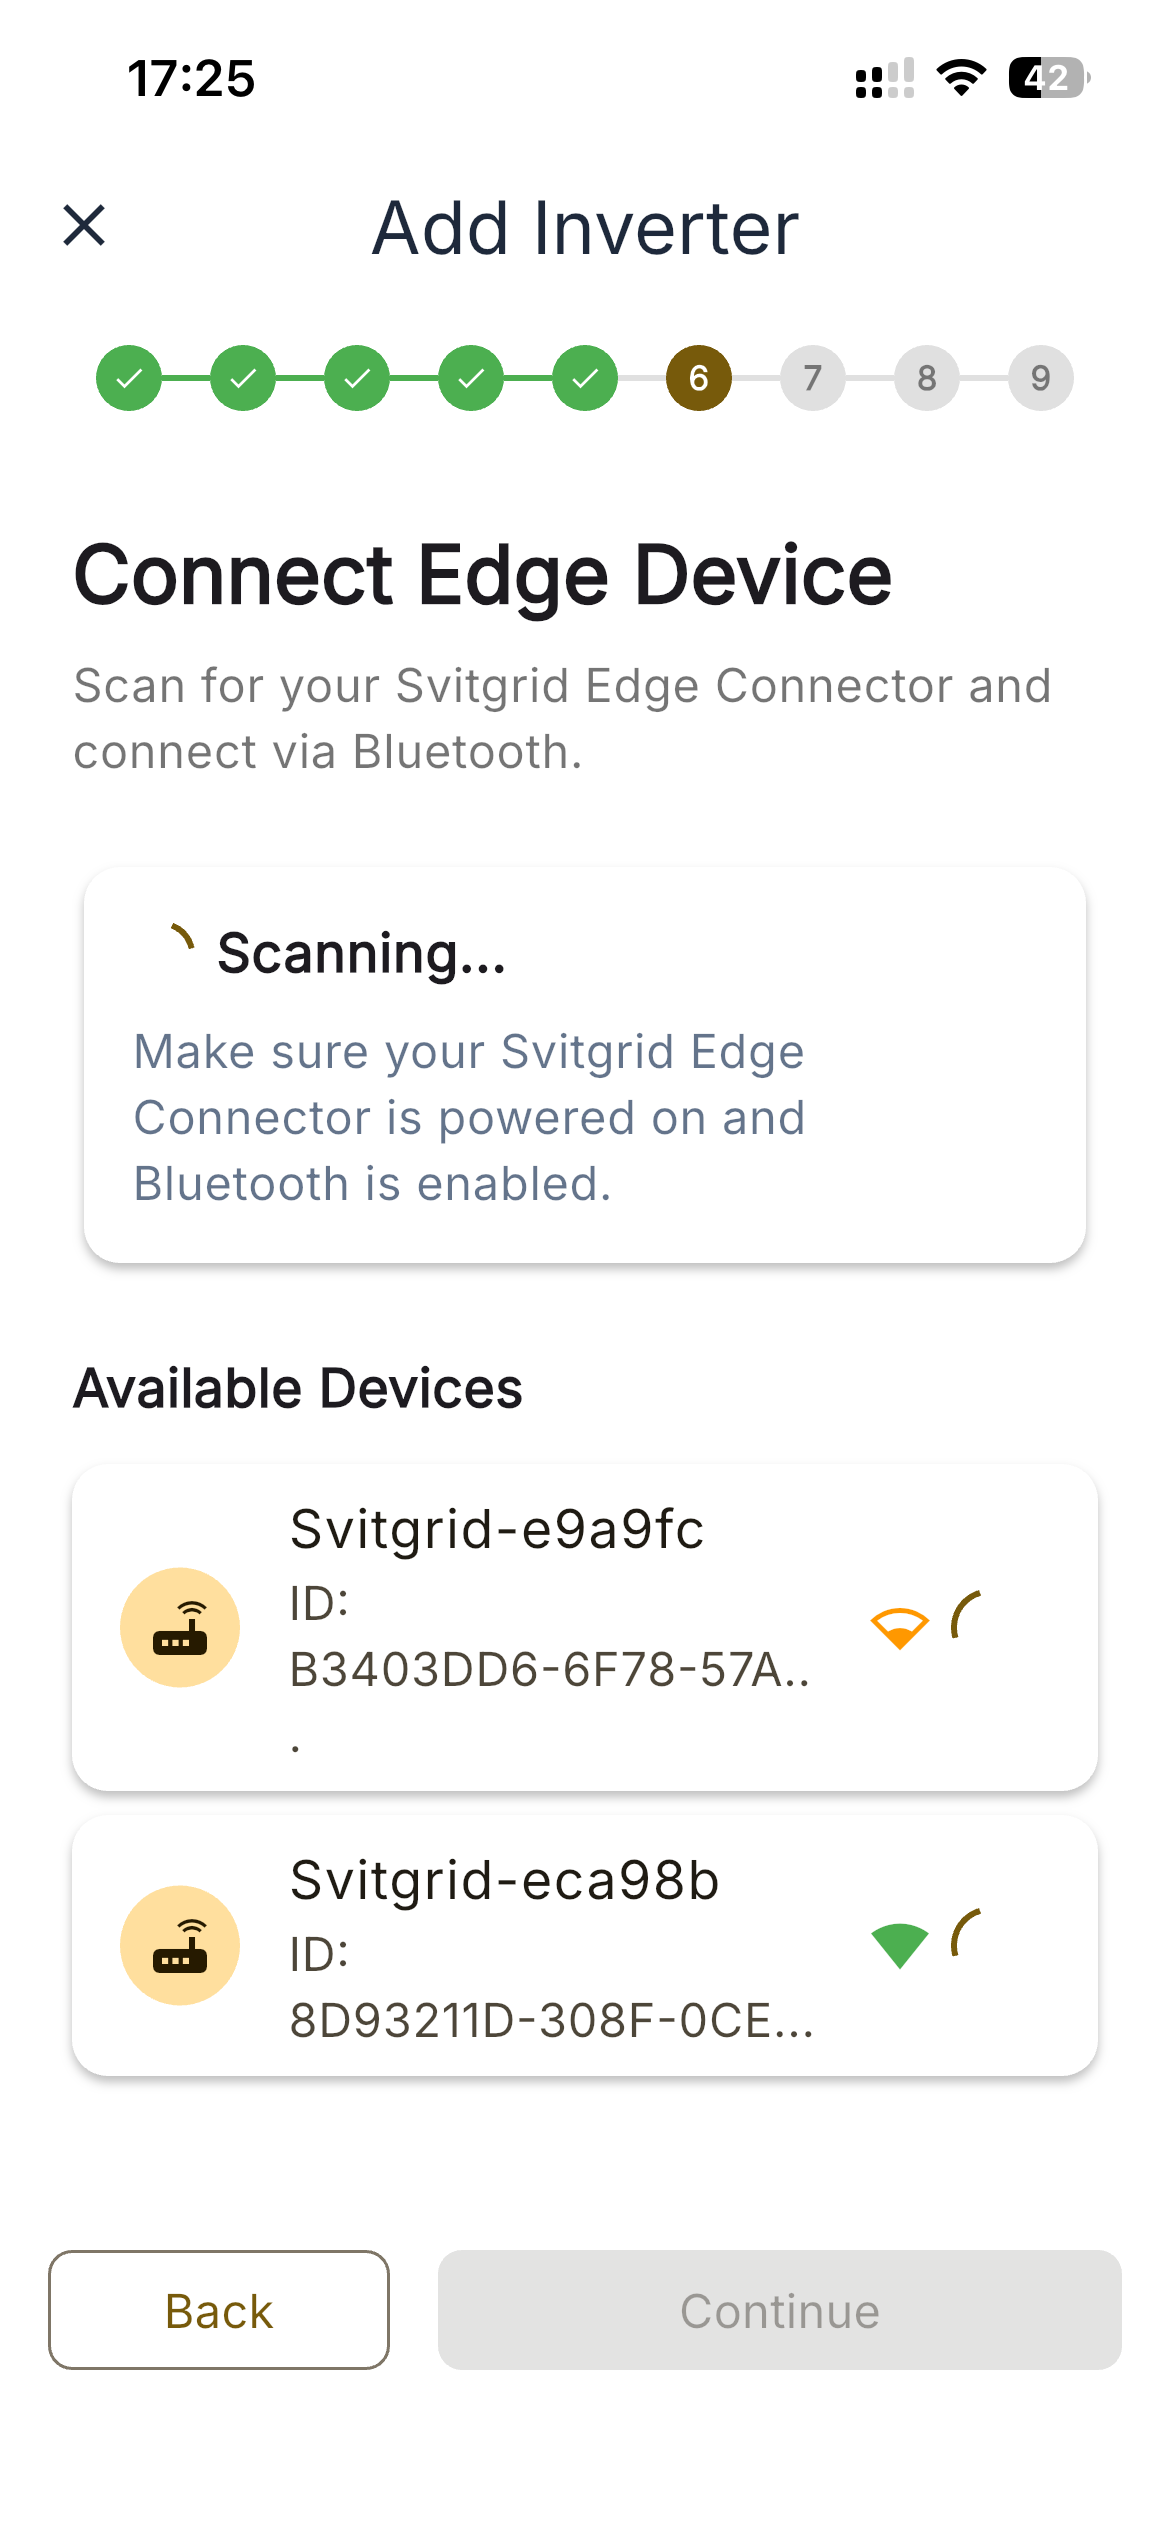
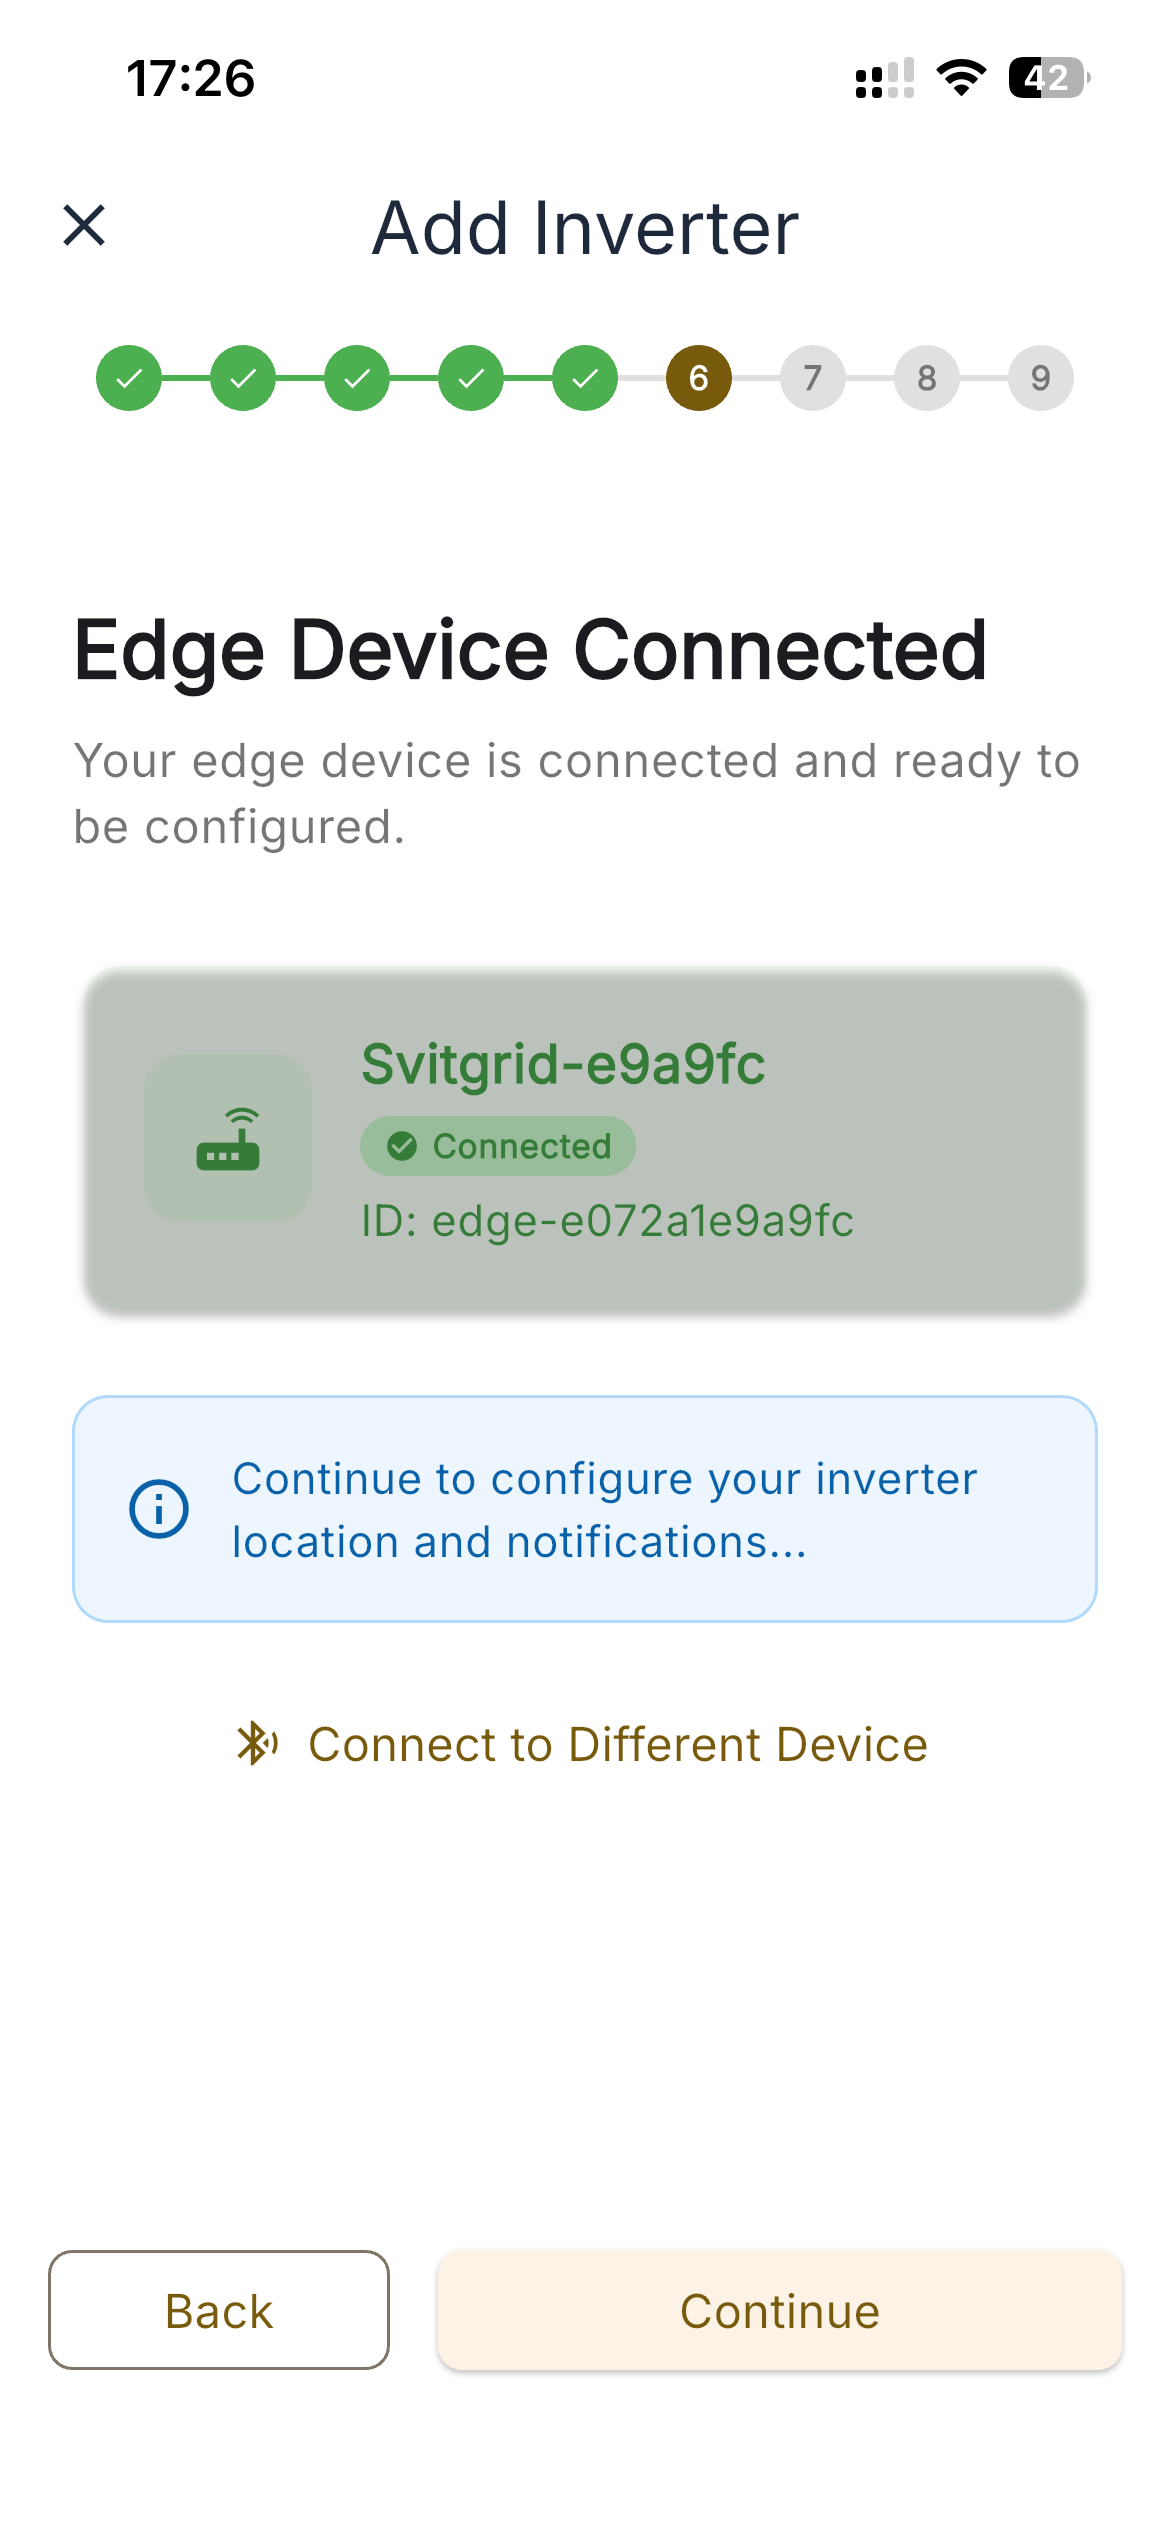
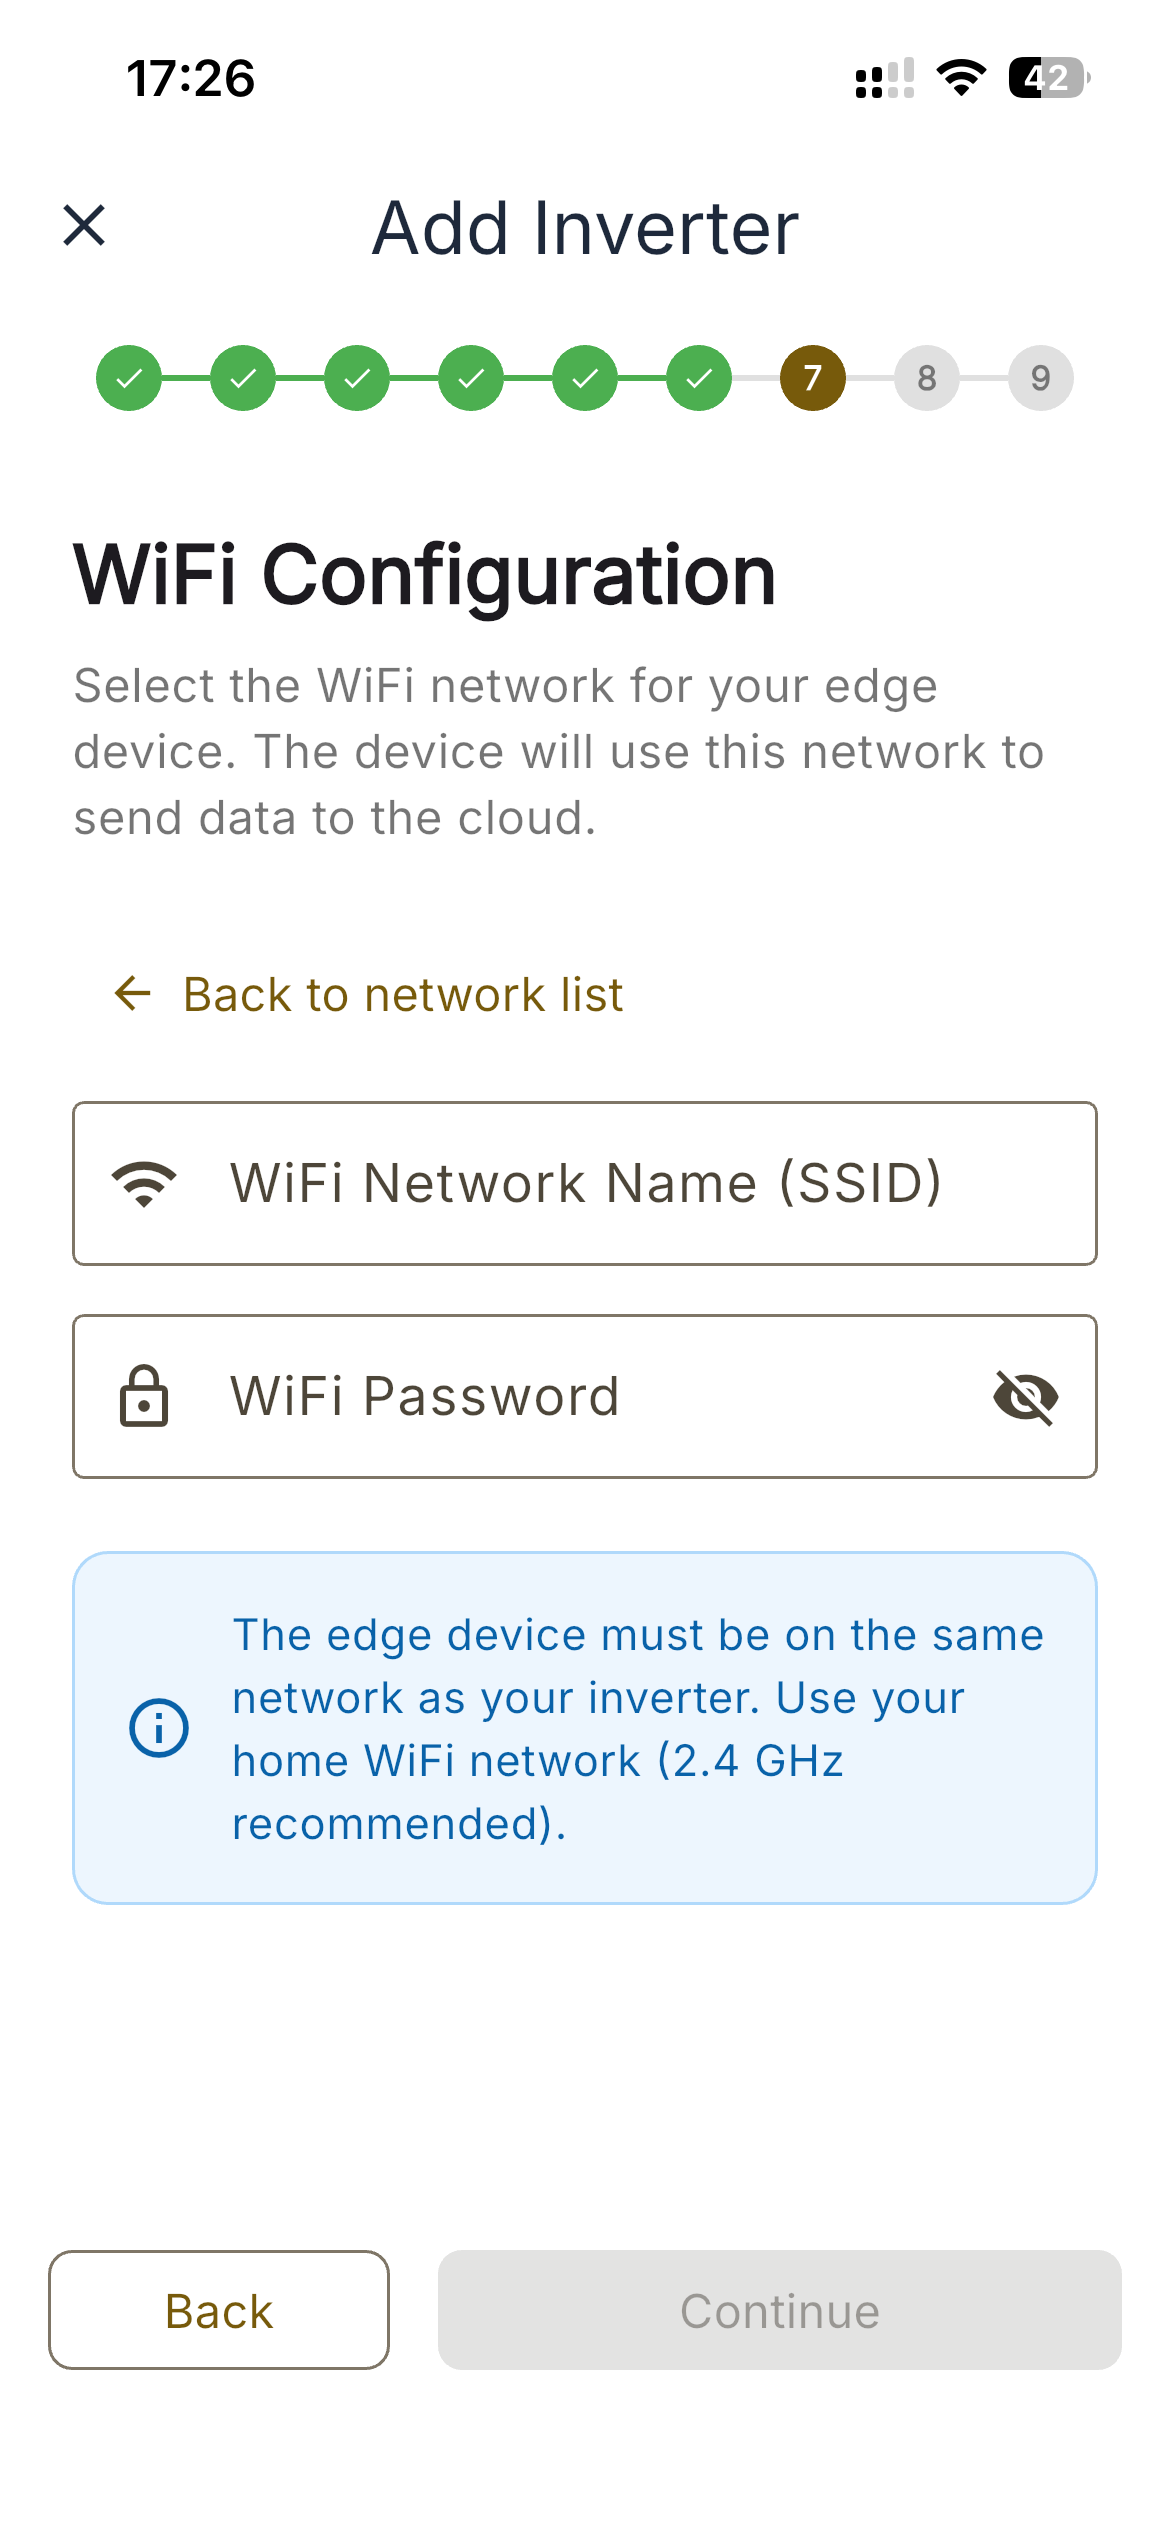
Scan, connect over BLE, send Wi-Fi credentials
Step 7 — Review & Finish
Review your settings and tap Create Inverter. The app validates the configuration, registers the device in the cloud, sends Wi-Fi credentials (Edge mode), and waits for the device to come online.
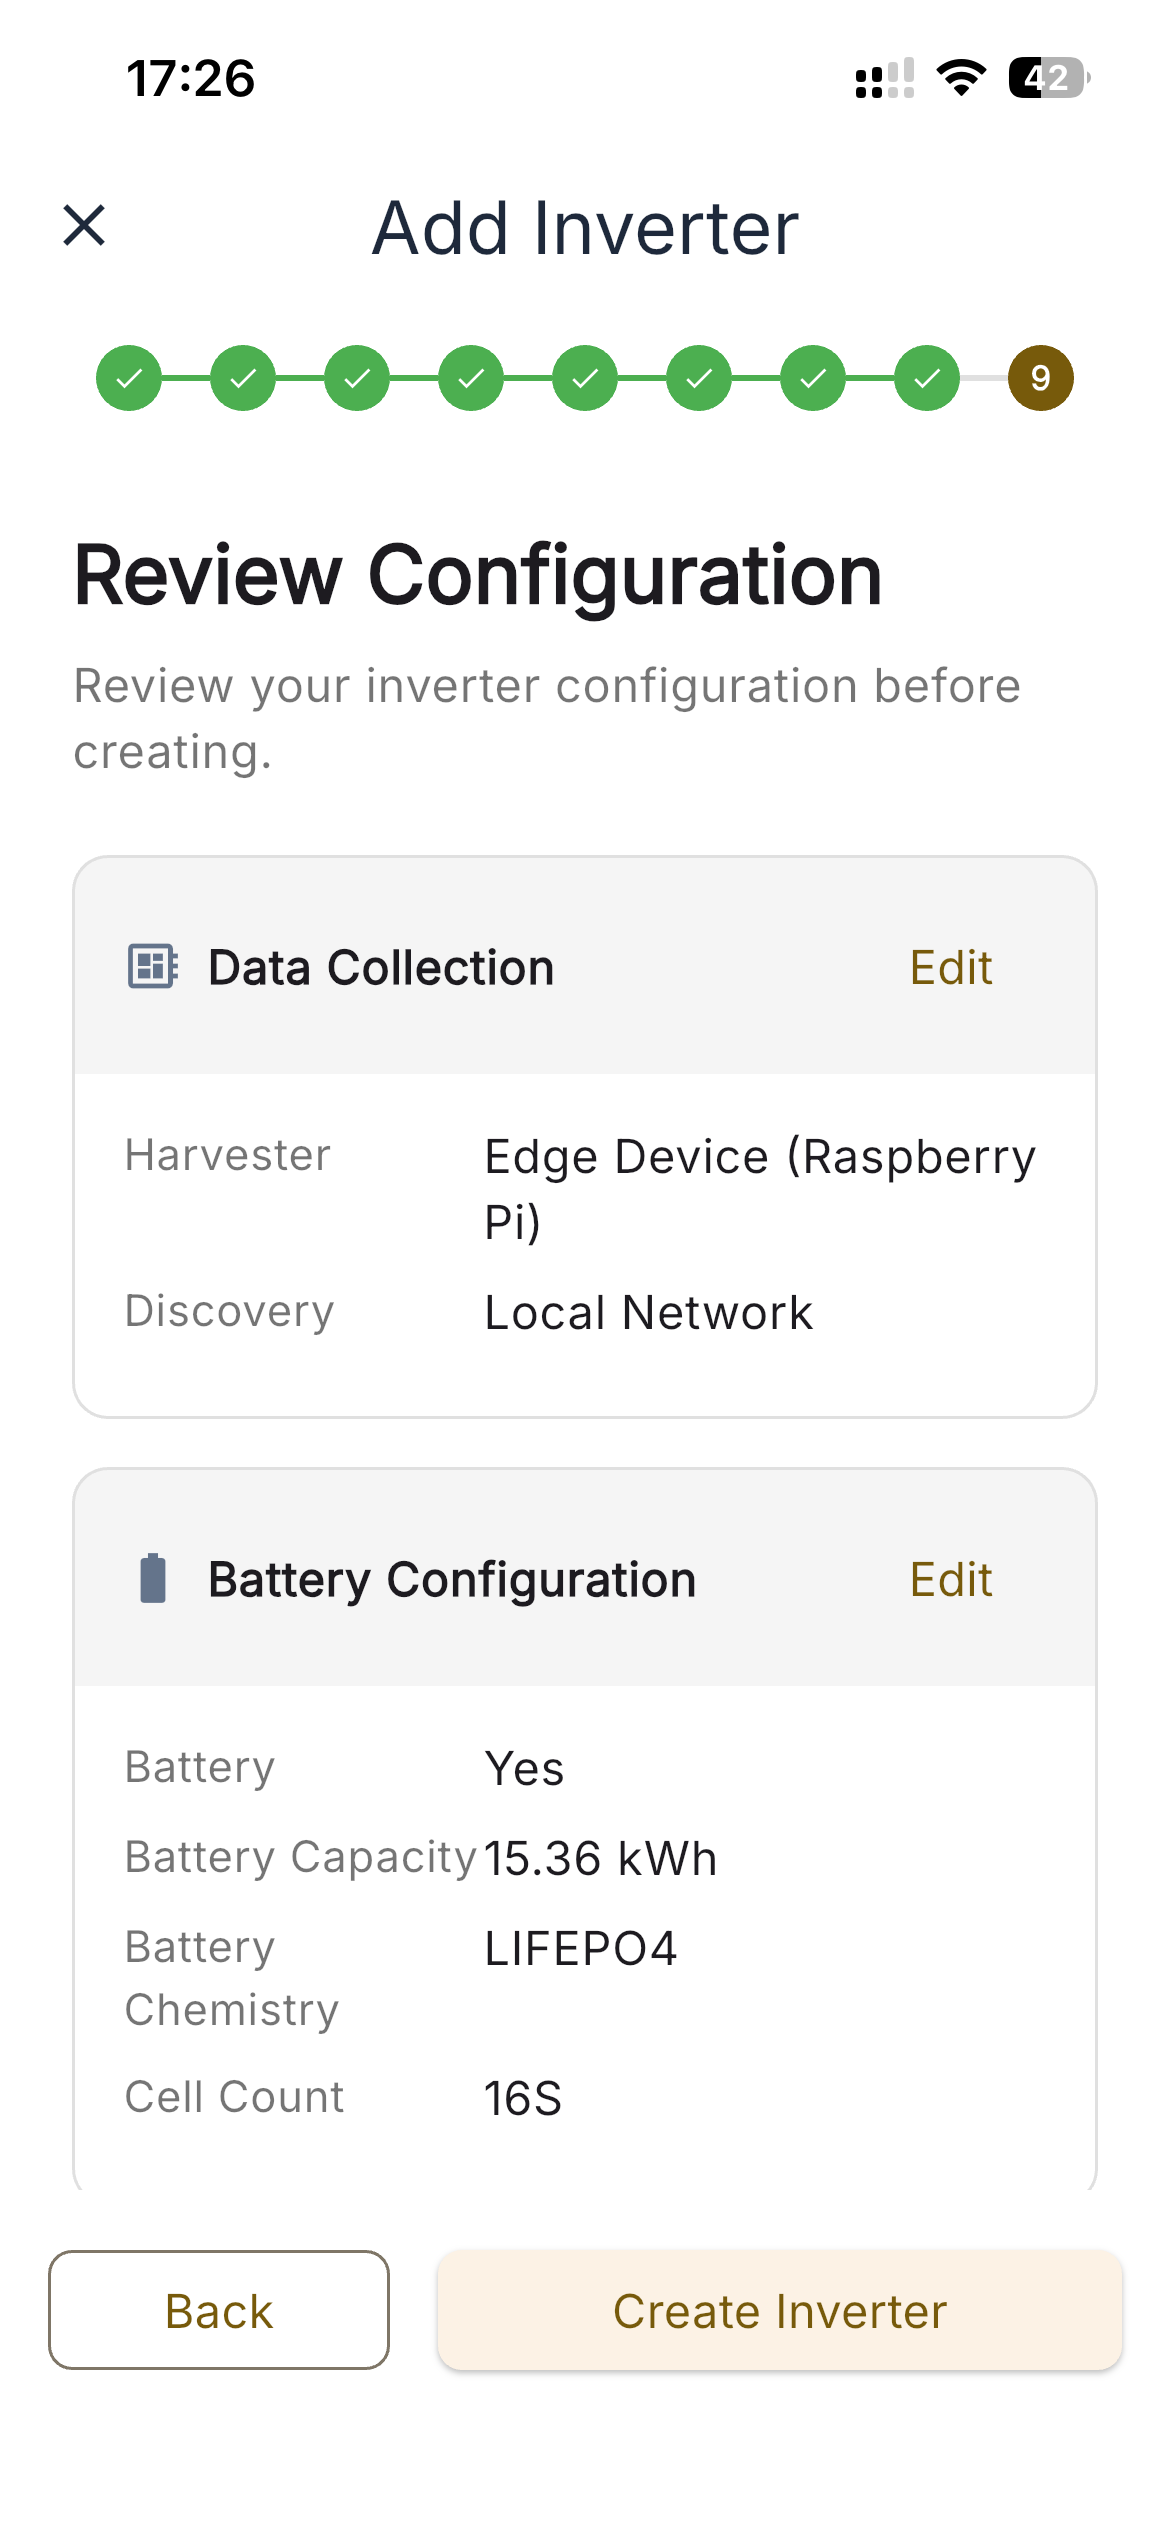


Review, then watch the automated setup process complete
Dashboard (Home)
The first tab of the app — a live, single-screen view of your solar system.
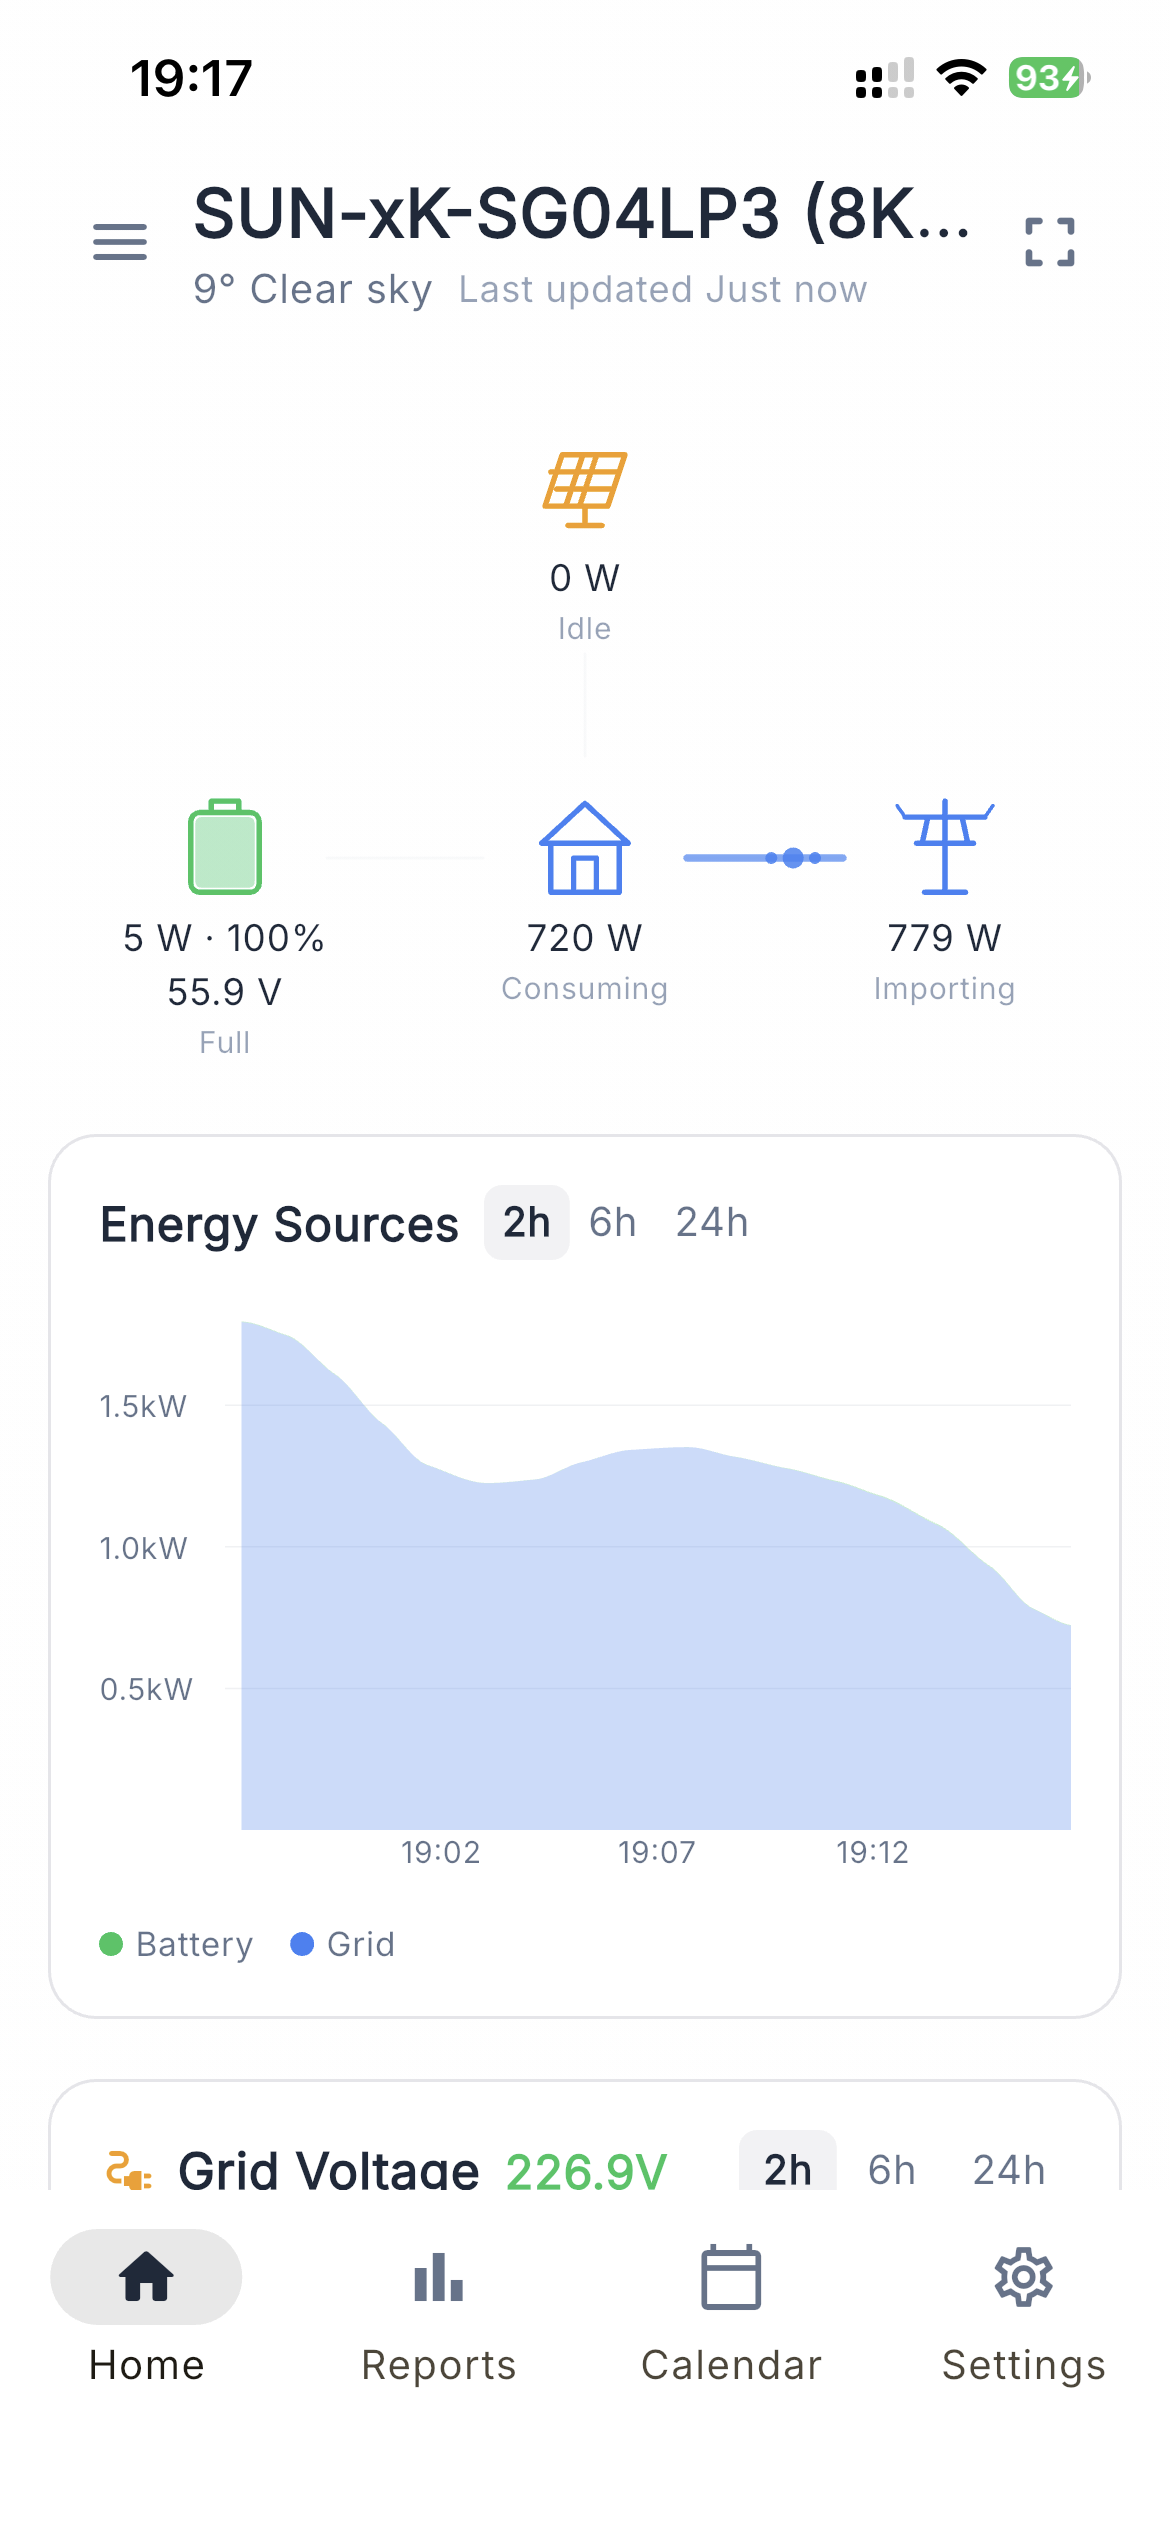
Live energy flow with solar strings, battery, grid, home load, and outage strip
Bottom navigation
Svitgrid has four tabs at the bottom of the screen:
| Tab | What it shows |
|---|---|
| Home | Live dashboard (this screen) |
| Reports | Green-tariff revenue, CO₂ savings, daily/weekly totals — see Reports |
| Calendar | Hour-by-hour day view, planner, and command history — see Calendar & Planner |
| Settings | Household, inverter, edge device, members, your devices, tariff |
Live energy flow
The flow diagram shows where energy is coming from and going to right now. Animated dots flow between five nodes:
- Solar (top) — current PV power, broken down per string (PV1, PV2, …)
- Battery (left) — state of charge, voltage, temperature; arrow direction shows charging or discharging
- Grid (right) — import (in) or export (out)
- Home (bottom) — total household load
- Gen Port (optional) — generator, smart load, or micro-inverter — see Smart Load / Gen Port
Battery card
Tap the battery to see SOC (%), voltage (V), temperature (°C), and instantaneous power (kW). Color reflects SOC range — green ≥80%, yellow 40–79%, orange 20–39%, red <20%.
Outage strip
If your household has an outage region/group configured, a strip below the energy flow shows the next planned blackouts. Tap to open the full schedule.
Solar forecast strip
Below the outage strip, the forecast strip shows expected production for today and tomorrow. Tap to open the forecast detail view.
Auto-refresh
In Edge mode, readings arrive every few seconds and the dashboard updates automatically. In Phone mode, the app polls the inverter every 5–10 seconds while open.
Multiple inverters / households
If you have several inverters under one household, Svitgrid sums them on the dashboard. Use the household switcher at the top to jump between properties.
Energy Charts
Day, month, year, and all-time views — with battery cycles and per-phase voltage.
Below the live energy flow, the dashboard has a tabbed chart area: Day, Month, Year, All-time. Swipe between tabs or tap to switch.
Day view
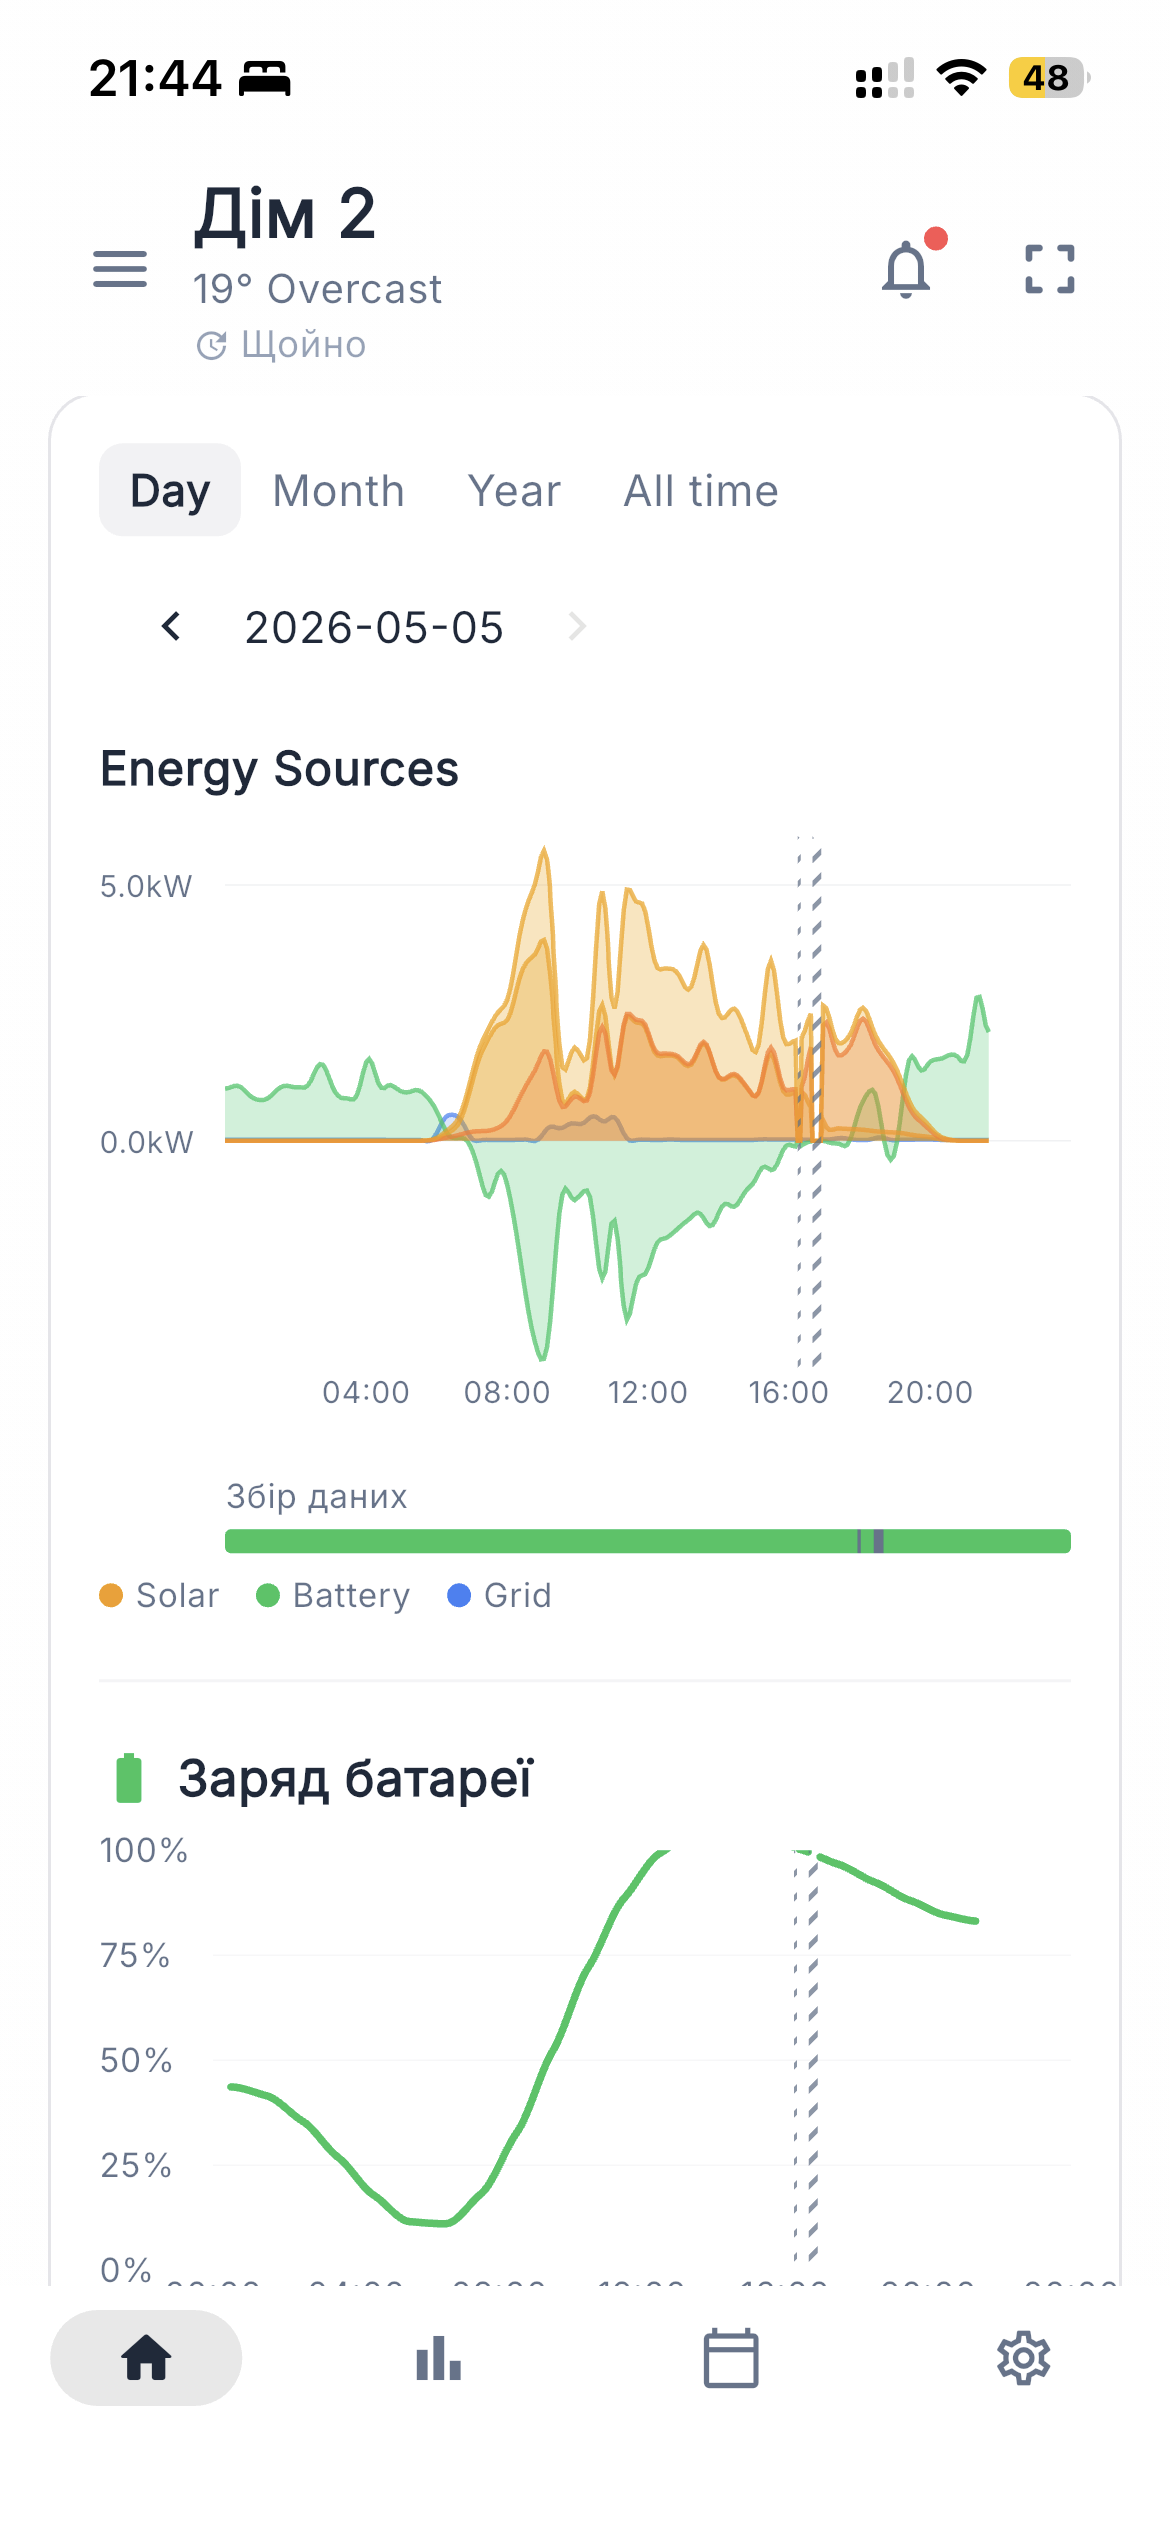
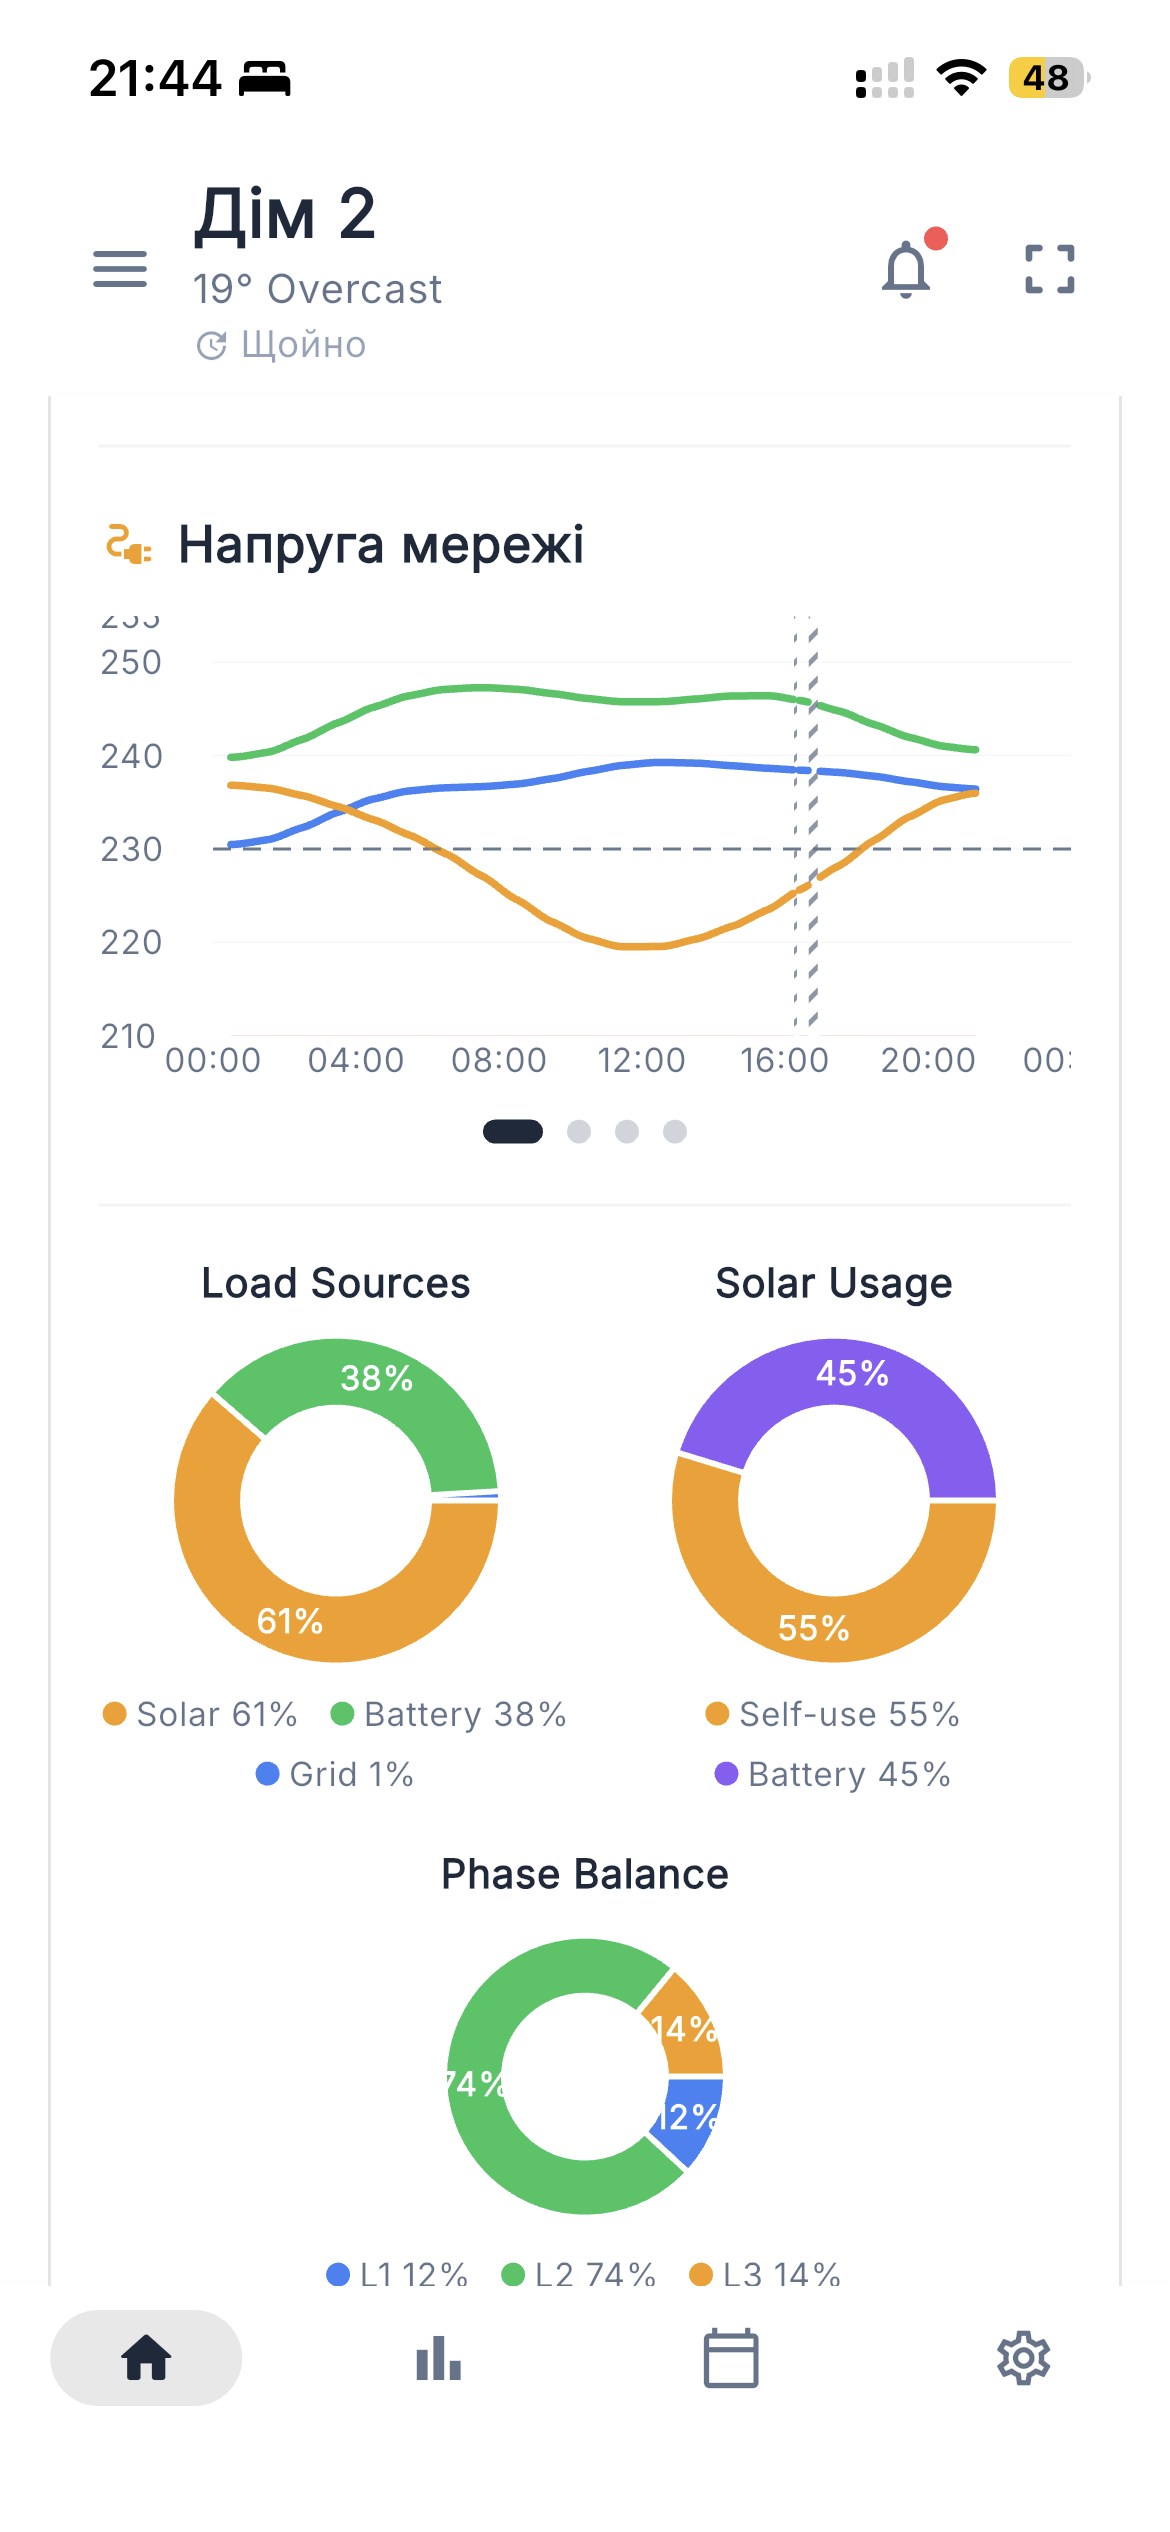
Stacked energy sources with battery SOC overlay (left); voltage chart, source/usage donuts, phase balance (right)
The day view shows a stream graph from 00:00 to now with energy sources stacked: solar (yellow), battery (green), grid import (blue). The battery state-of-charge overlay (line) shows charge/discharge timing.
Below the stream graph:
- Voltage chart — grid voltage per phase over the day. Spikes can indicate grid instability.
- Load Sources donut — how today's consumption was covered (solar / battery / grid).
- Solar Usage donut — where today's solar went (home / battery / export).
- Phase Balance — relative load on L1 / L2 / L3 (3-phase systems only).
Month view
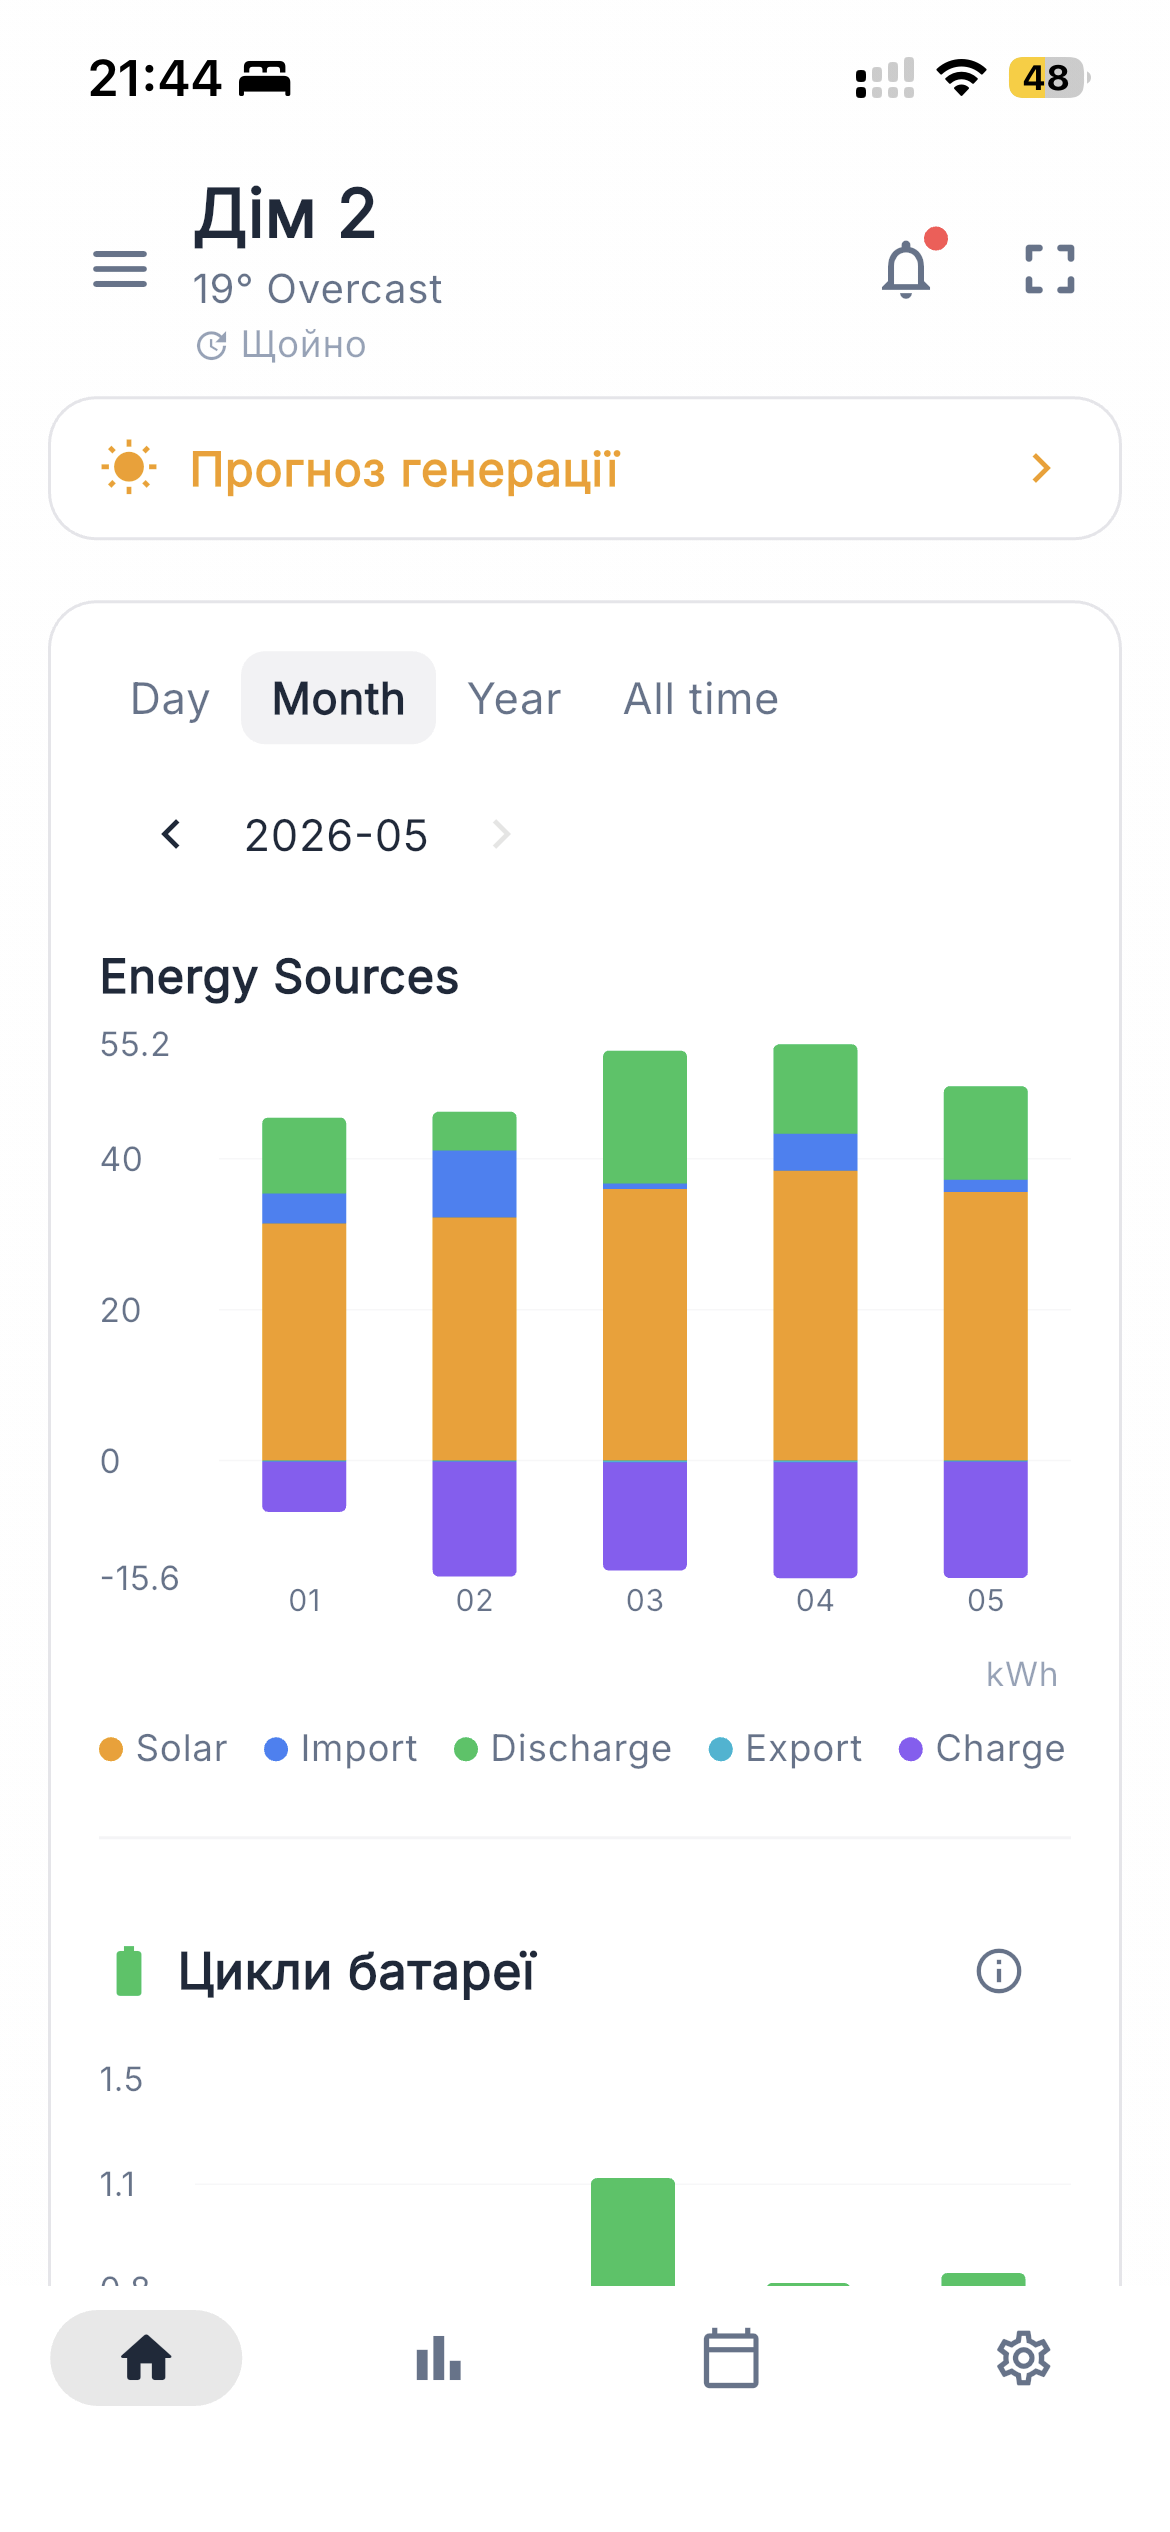
Daily bars for the current month with battery cycle overlay
Each bar represents one day of the current month, broken down into solar / battery / grid. The battery cycle line shows how many full charge cycles your battery did per day — useful for tracking long-term battery health.
Year view
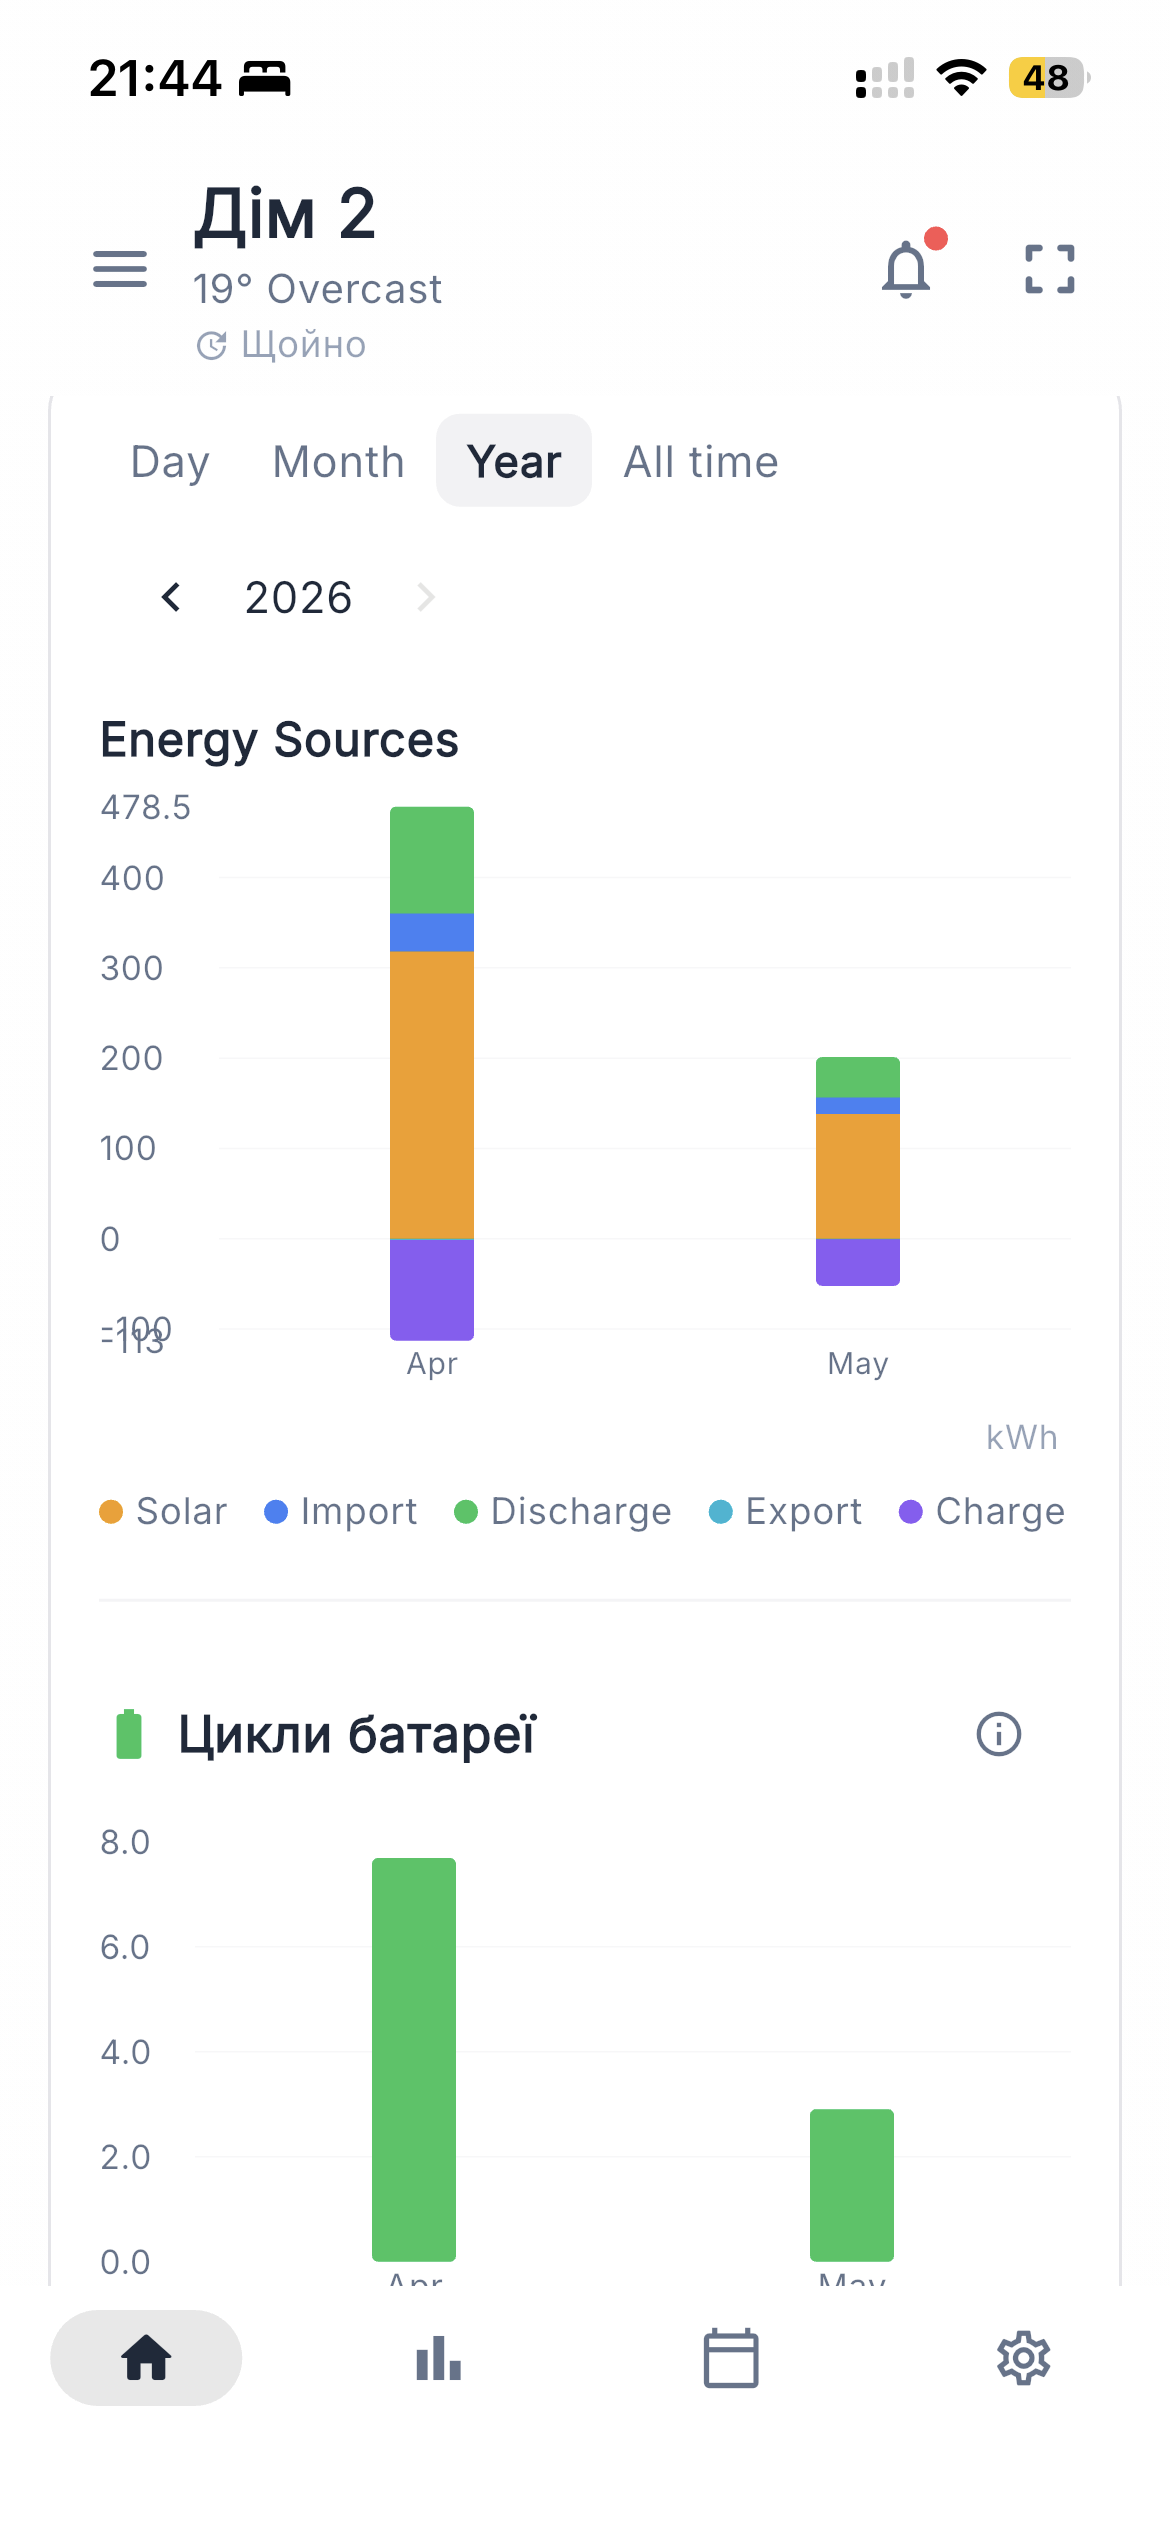
Monthly totals for the current year
Twelve bars, one per month, with the same source breakdown. Easy to see seasonal patterns at a glance.
All-time view
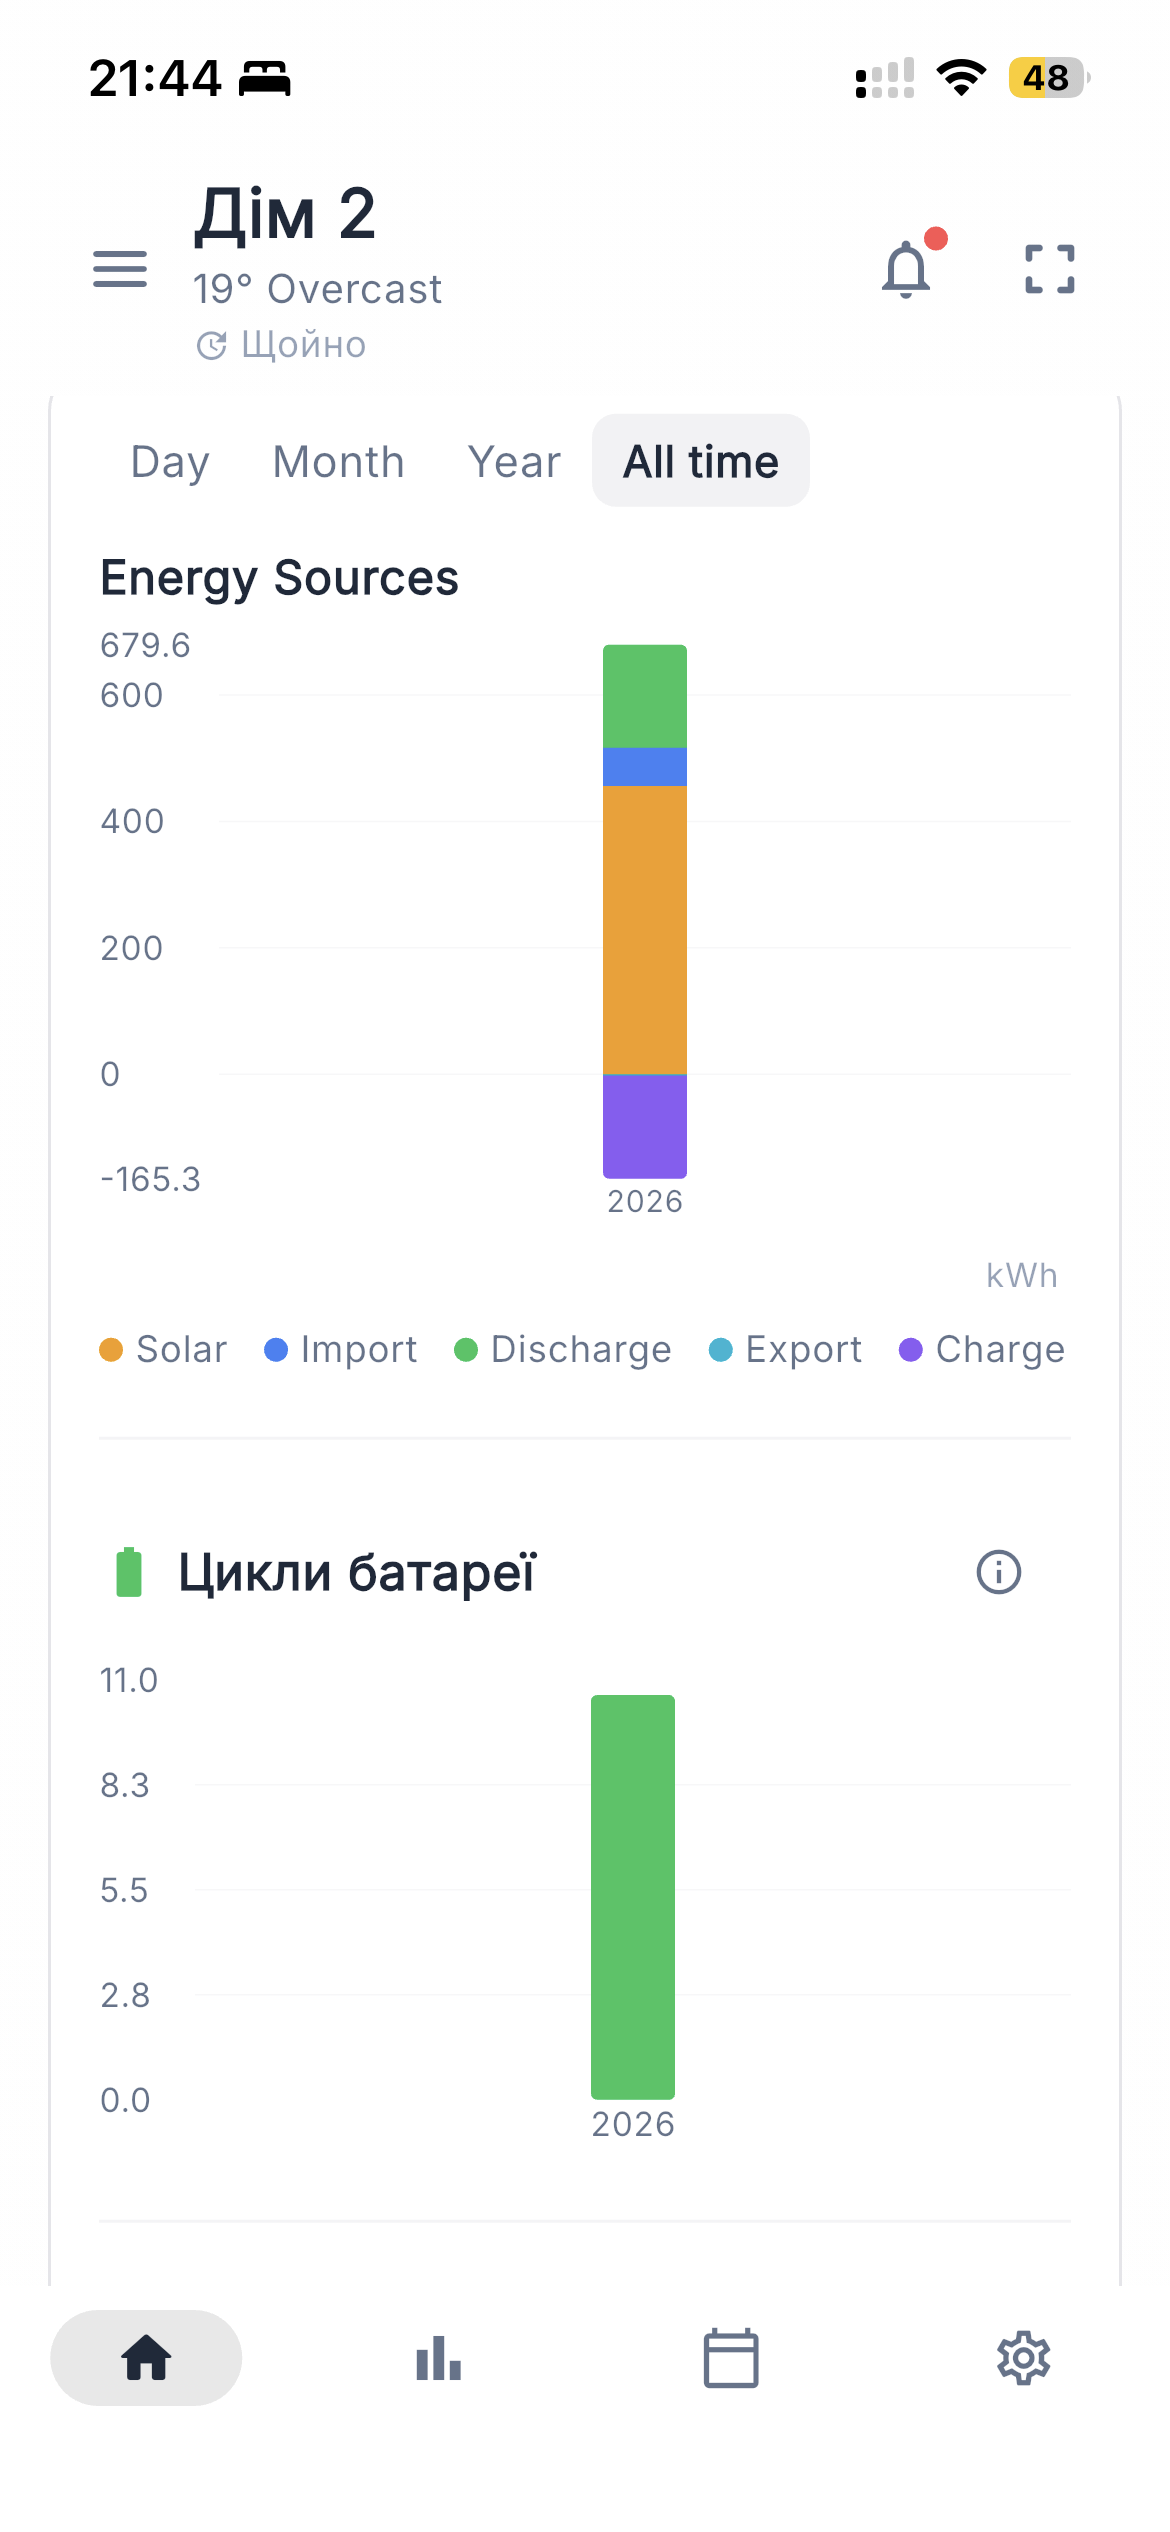
Lifetime totals since the inverter was added
One big aggregate showing how many kWh your system has produced since you started monitoring it.
Battery cycles & voltage detail
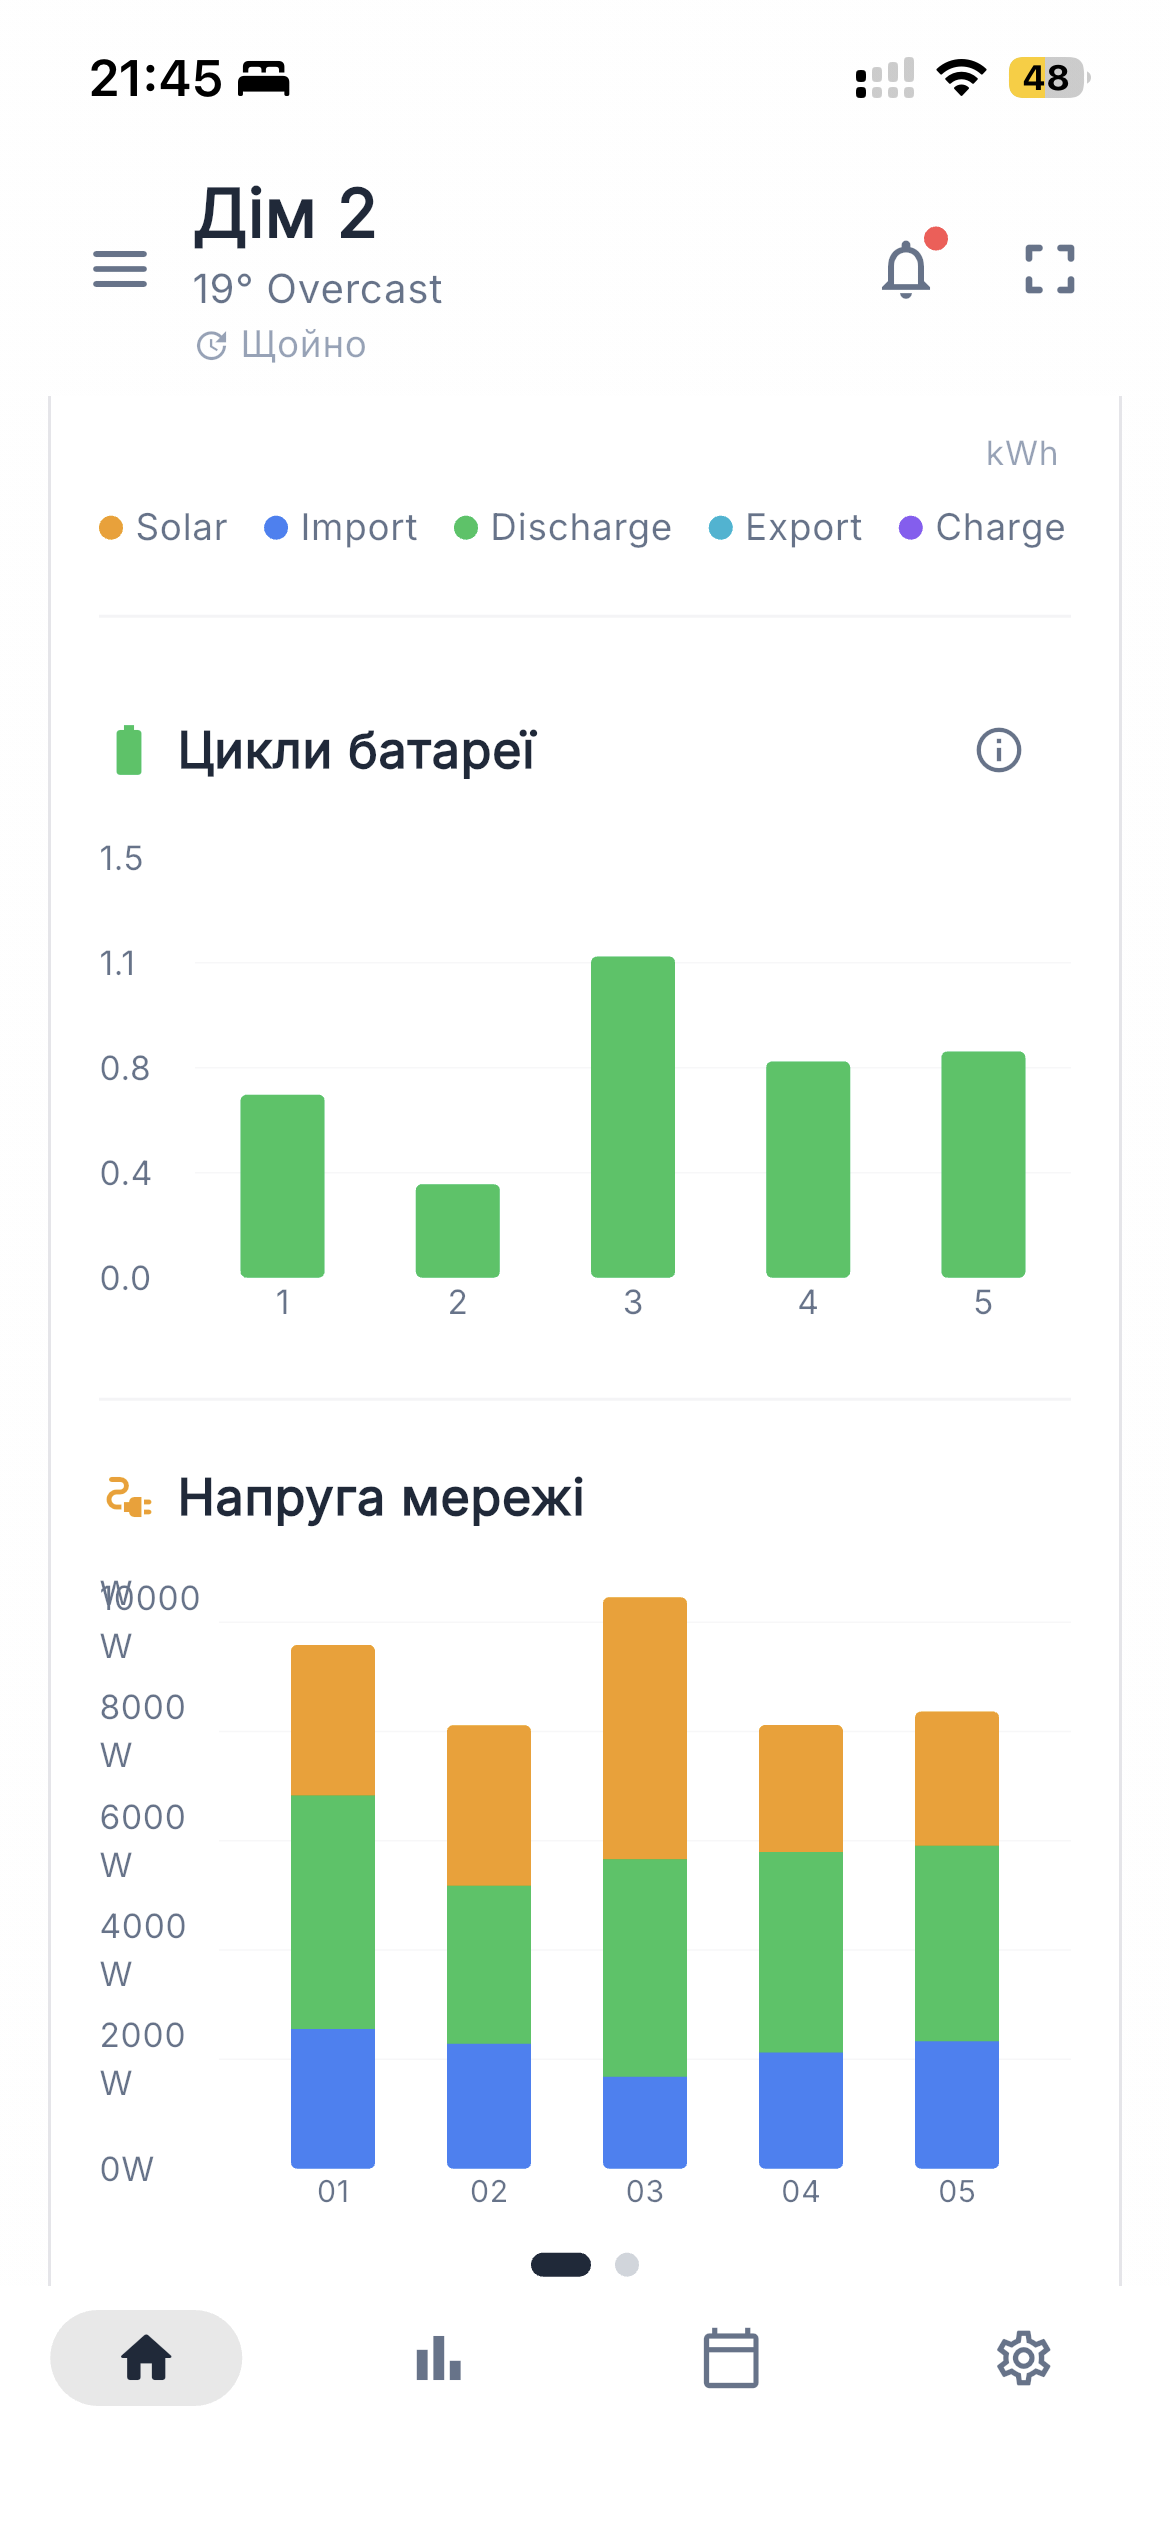
Battery cycles per day and average grid voltage per phase
Reports
The Reports tab — green-tariff revenue, CO₂ savings, daily history, and weekly totals.
Open the Reports tab (second from the left in the bottom nav) to see a longer-horizon summary of your system. The view has four cards stacked vertically.
Green Tariff revenue
Revenue from grid export at the green tariff rate
If your country has a feed-in tariff (in Ukraine, the "зелений тариф"), the revenue card multiplies your daily grid export by the configured per-kWh rate. Set your tariff in Settings → Electricity Tariff.
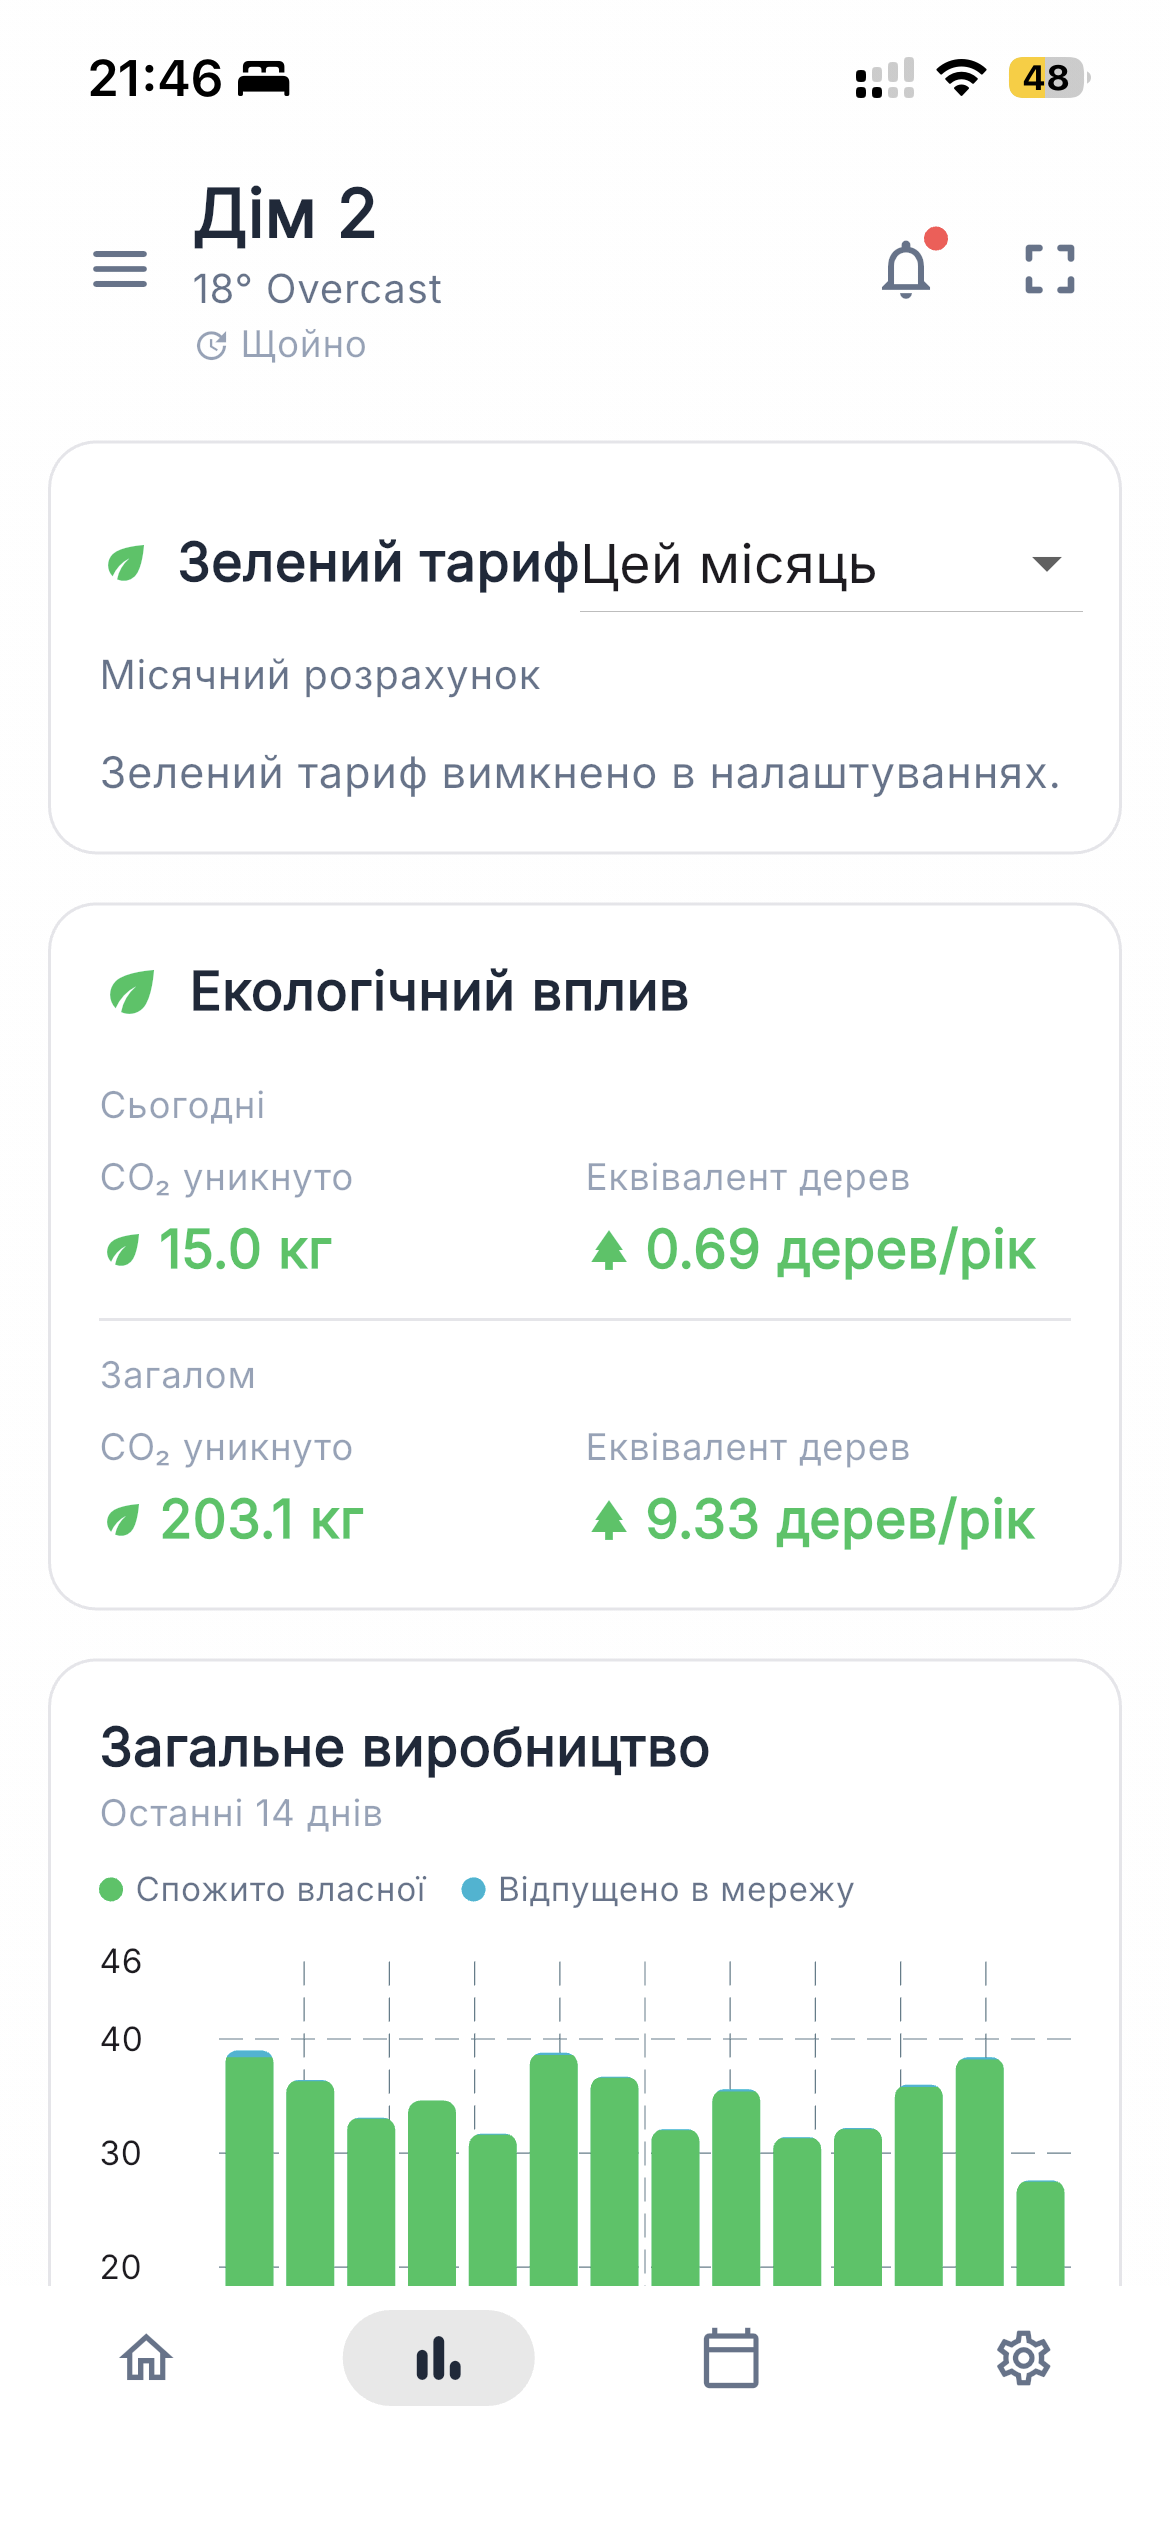
Eco impact
Below the revenue card, the eco card shows estimated CO₂ savings (kilograms) and the equivalent number of trees, based on your total solar production.
Production history (last 14 days)
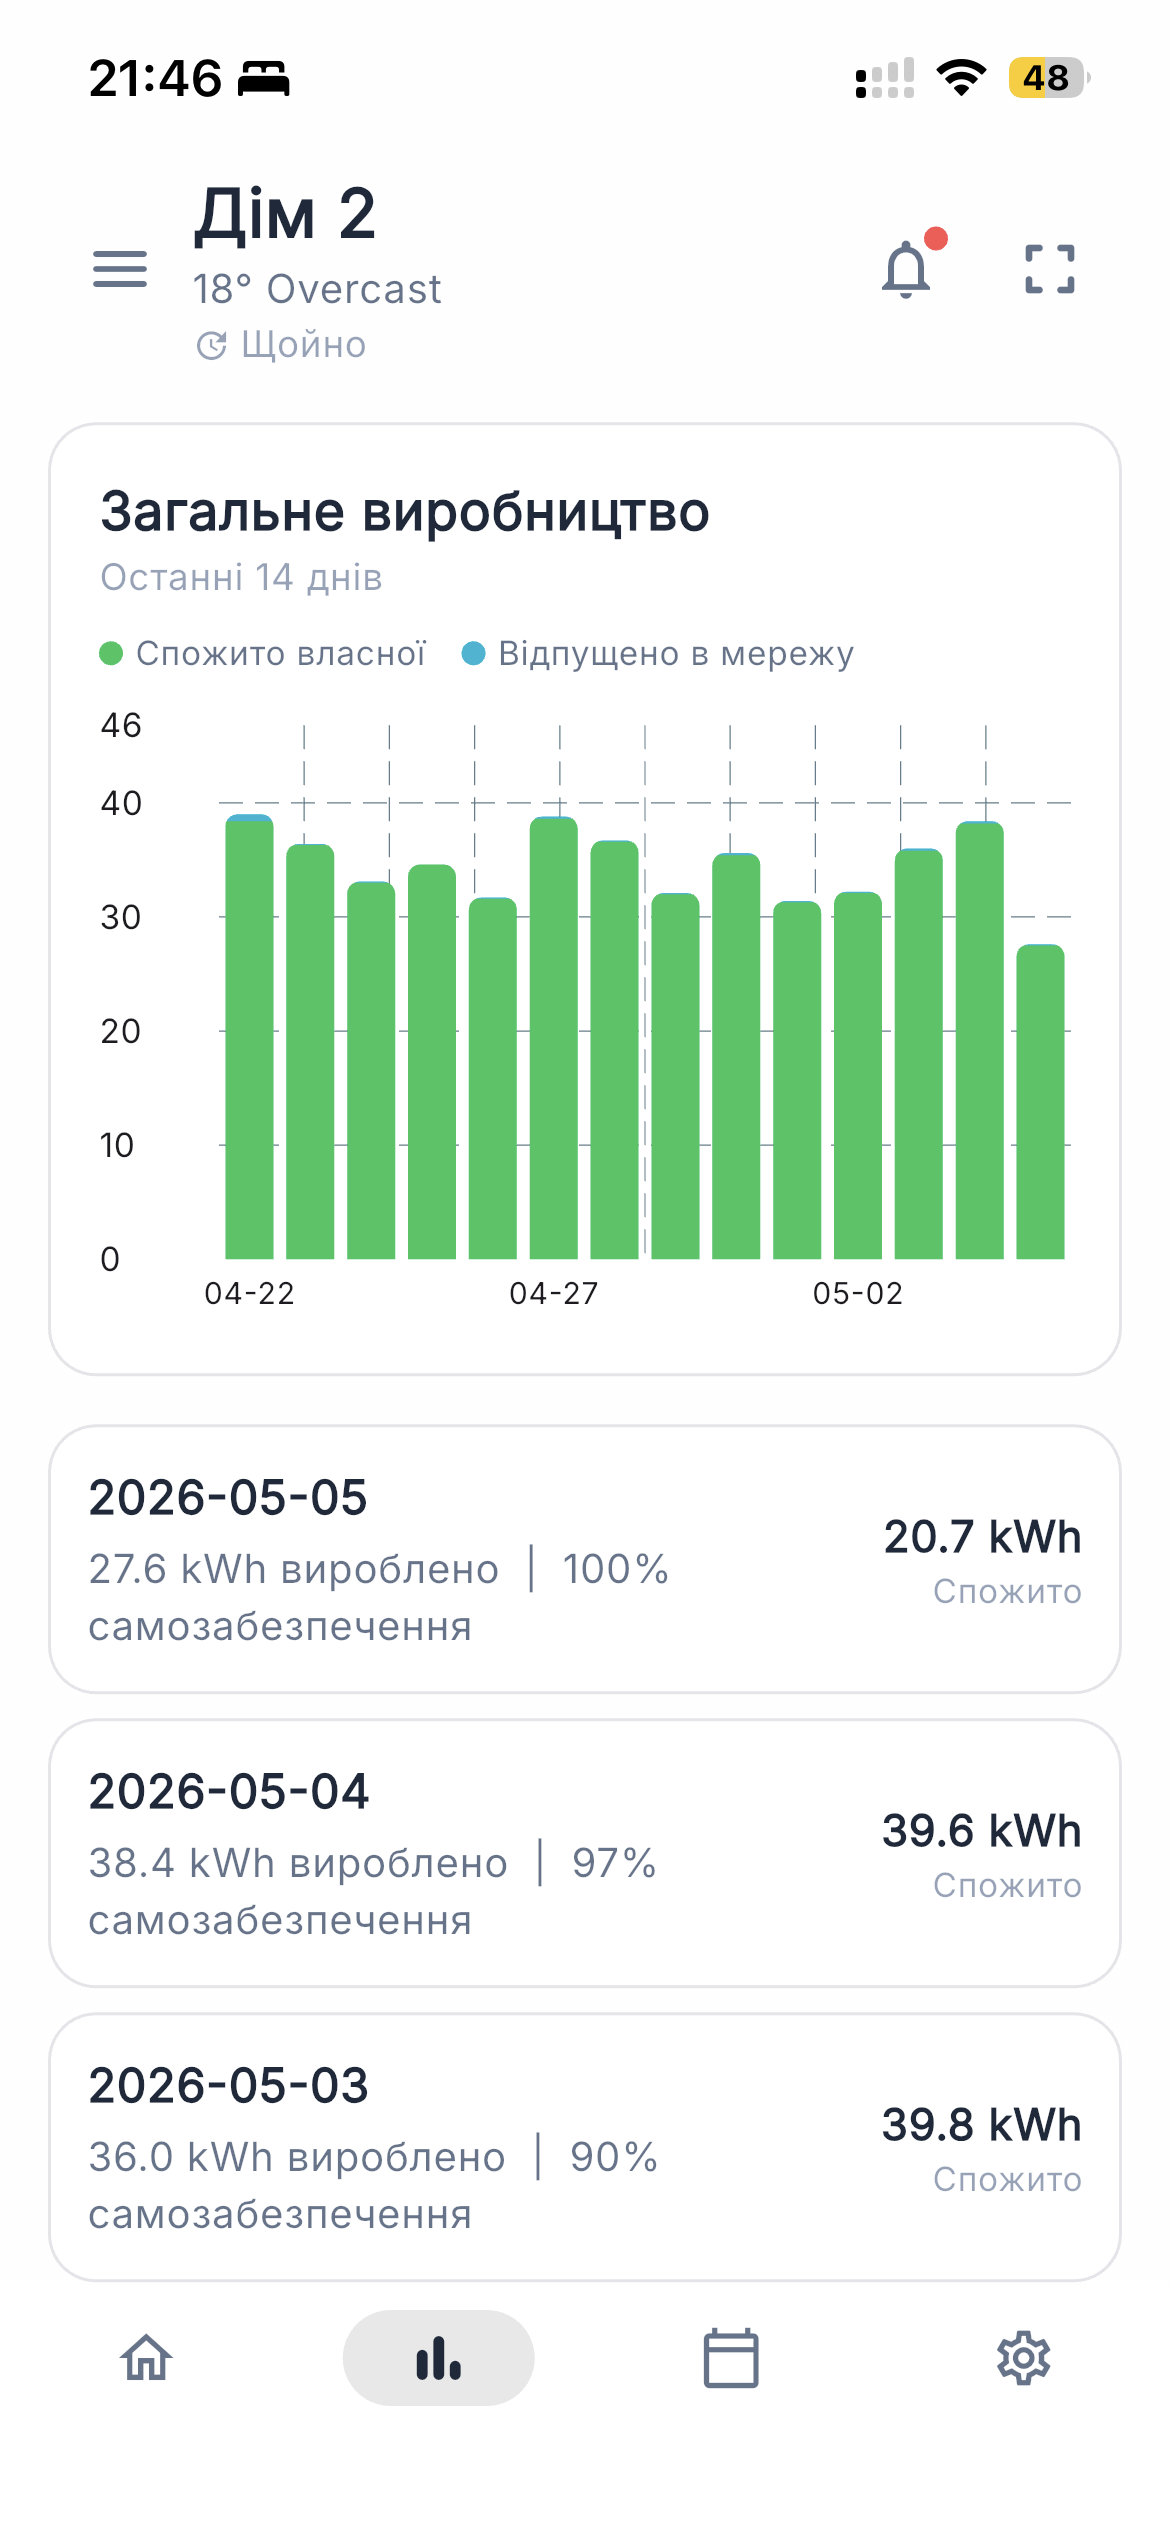
Daily list with self-sufficiency percentage
A scrollable list of the last two weeks. Each row shows the date, total kWh produced that day, and your self-sufficiency % — how much of your home's load came from your own panels and battery.
Weekly energy totals
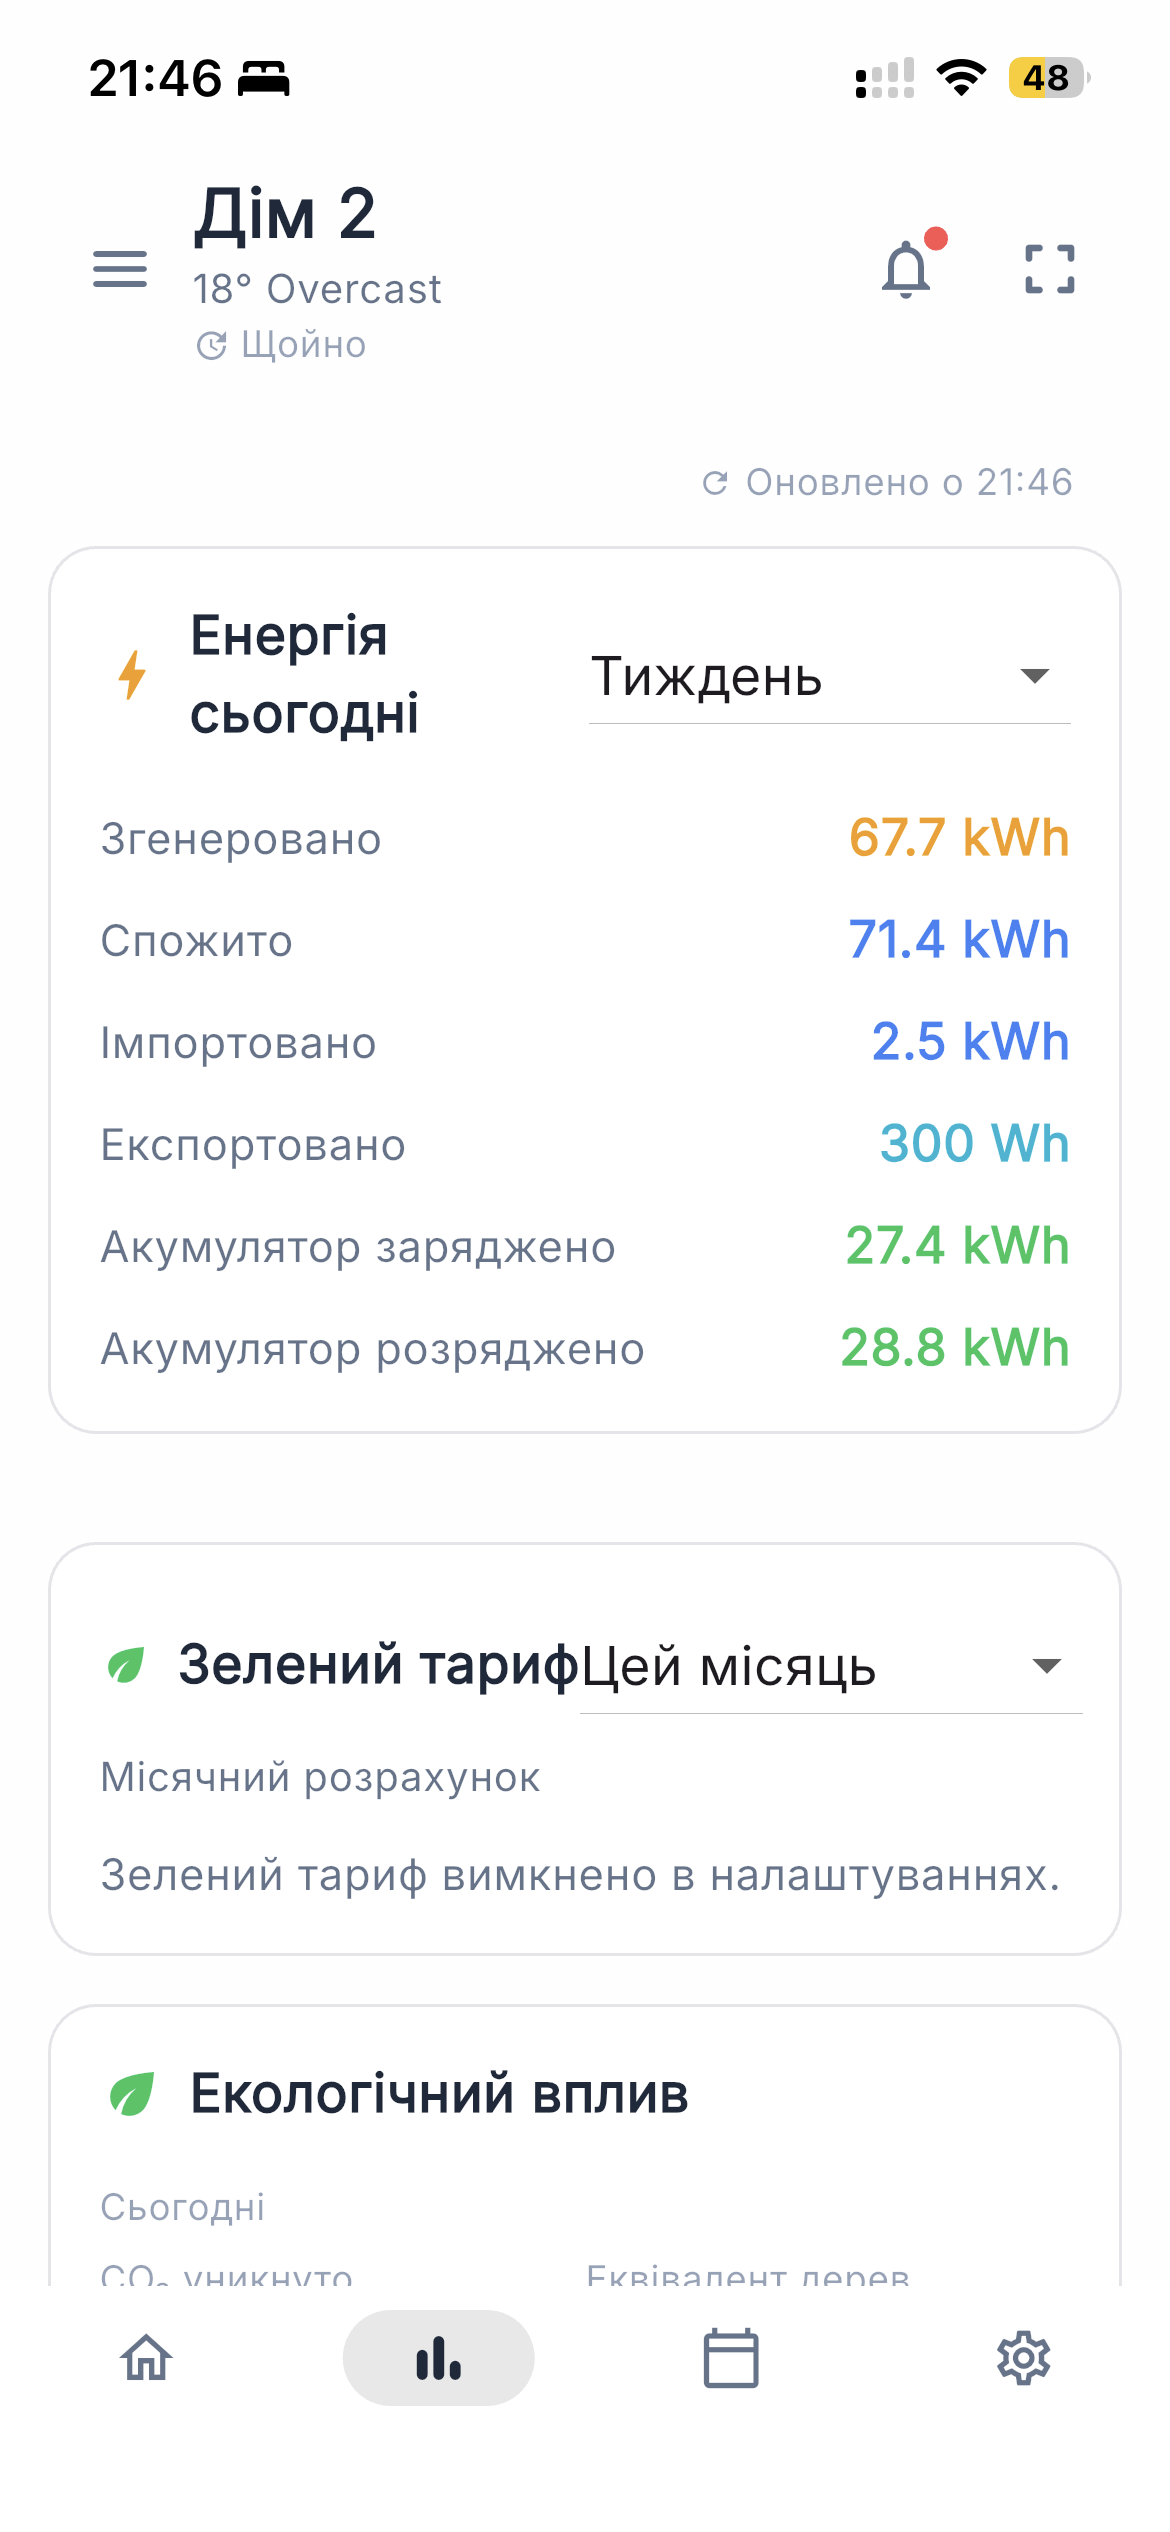
Generation, consumption, import, export, charge, and discharge for the week
The bottom card aggregates the last seven days into six totals: generation, consumption, grid import, grid export, battery charge, and battery discharge.
Exporting data
Tap the share / export icon at the top right of the Reports screen to export the displayed range as CSV. The CSV includes timestamp, PV power, battery SOC, battery power, grid power, load power, and the daily kWh accumulators.
Calendar & Planner
Hour-by-hour day view of forecast vs. actual — and a planner that runs schedules on your inverter automatically.
The Calendar tab (third in the bottom nav) is two things in one: a high-resolution view of any day's energy flow, and a planner that lets Svitgrid run schedules on your inverter on your behalf.
Day view
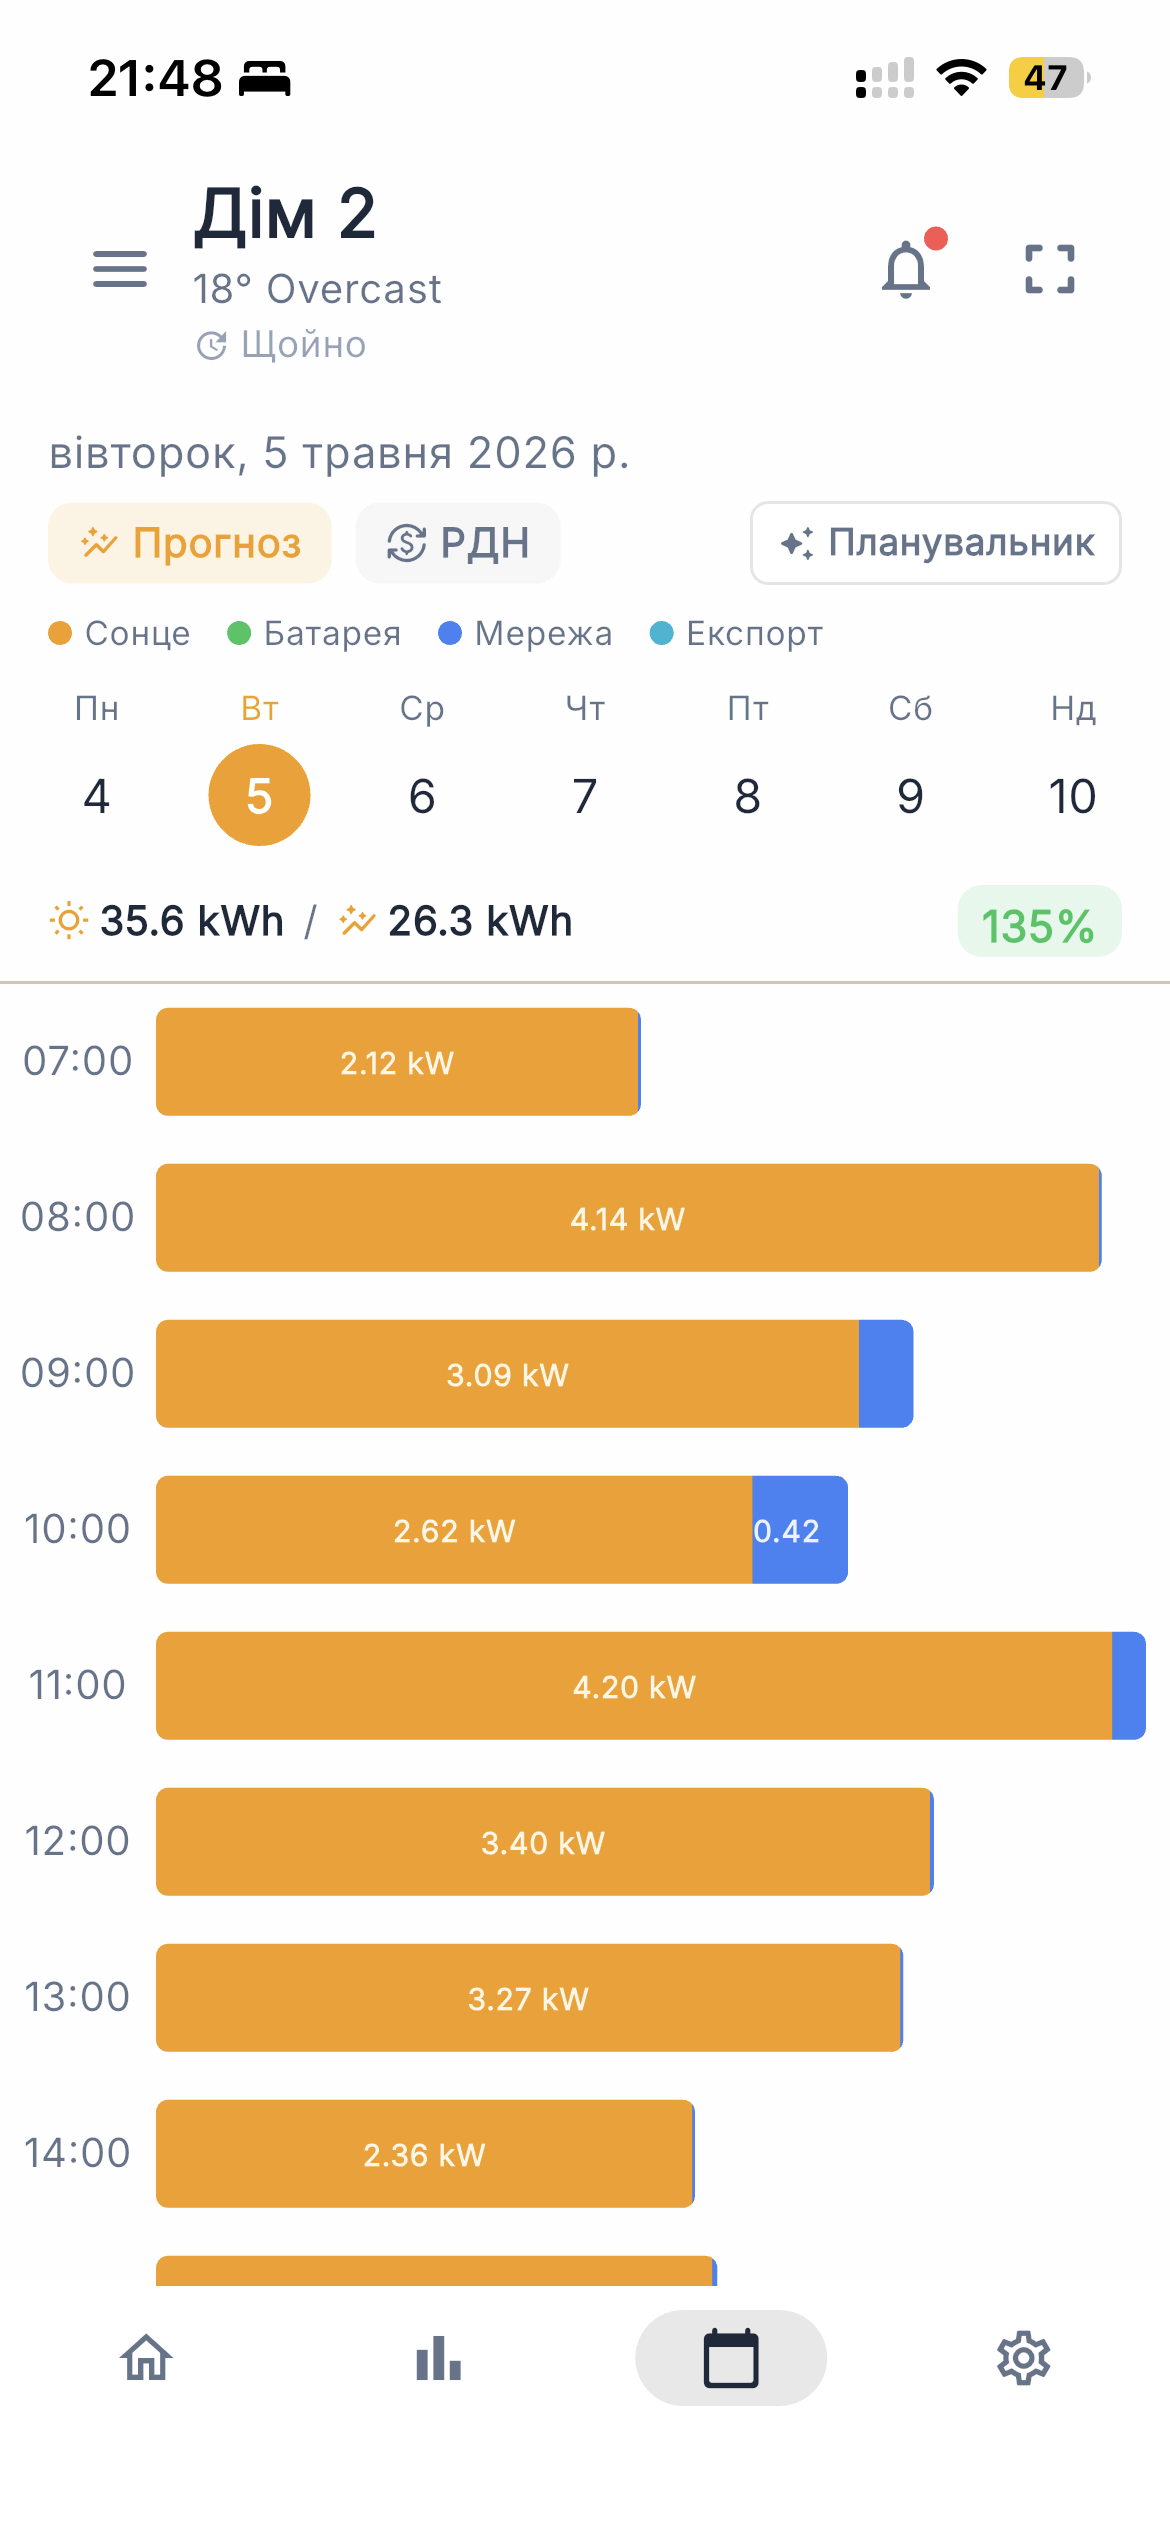
Hourly cards from 00:00 onwards, with a Forecast / Day-ahead toggle and a + Planner button
Each row in the day view is one hour. The card shows:
- Hour label (e.g., 11:00) and the day-ahead market price (in regions where it's published)
- A miniature stacked bar of the hour's energy mix (solar / battery / grid)
- Forecast solar production for the hour
The toolbar at the top has:
- Forecast / Day-Ahead toggle — switch the price-strip data source
- + Planner button — opens the planner setup for the selected day
- Day stats — produced kWh / consumed kWh / accuracy % at the bottom
Hour detail
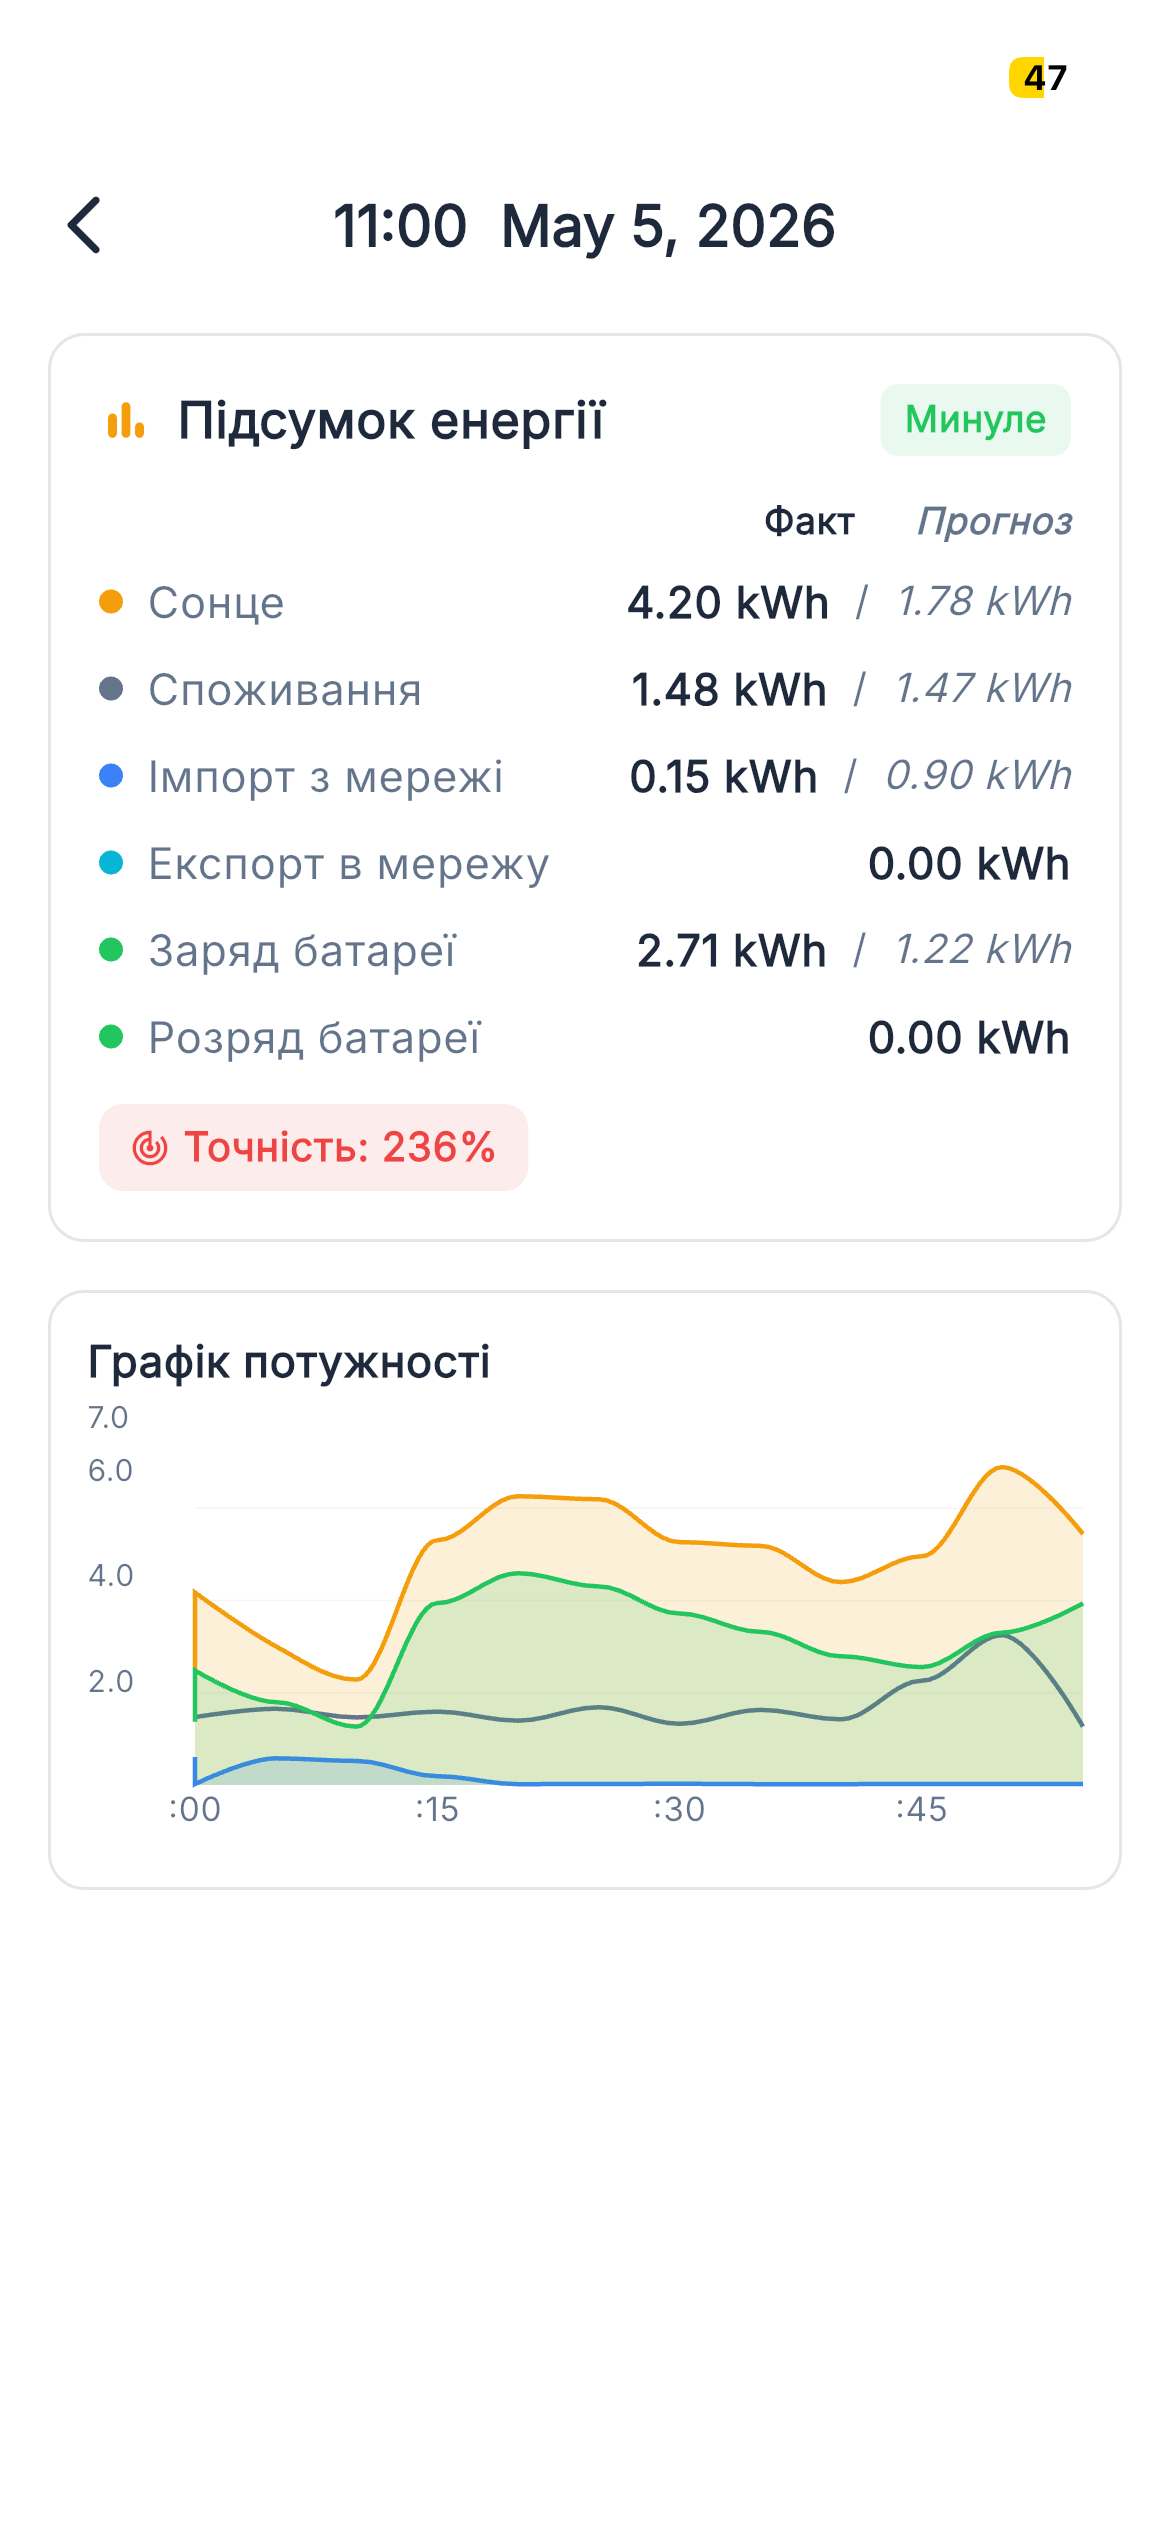
Side-by-side actual vs. forecast for one hour
Tap any hour card to see the full energy summary for that hour: actual generation, actual consumption, grid import / export, battery charge / discharge — alongside the forecast value, with an accuracy percentage.
How scheduling works (TOU)
Anything Svitgrid runs on your inverter — single calendar events, the planner's daily schedule, the grid-charge windows in Inverter Settings — works through the inverter's Time-of-Use (TOU) schedule. TOU is a small set of registers on the inverter that say "in this time window, behave like this". Most Deye, Sunsynk, and Sol-Ark inverters expose six TOU slots; Victron uses an equivalent ESS schedule.
Svitgrid uses TOU in two different ways depending on the source:
| Source | What writes to TOU | Auto-restored? |
|---|---|---|
| Calendar event | Svitgrid snapshots the current TOU before the event starts, applies the event's settings during the window, then restores the snapshot at the end | Yes — automatic |
| Planner (daily) | The planner recomputes a fresh TOU each day and writes it at the recompute time. The next day's recompute overwrites it | Replaced daily, not restored |
| Grid-charge windows (Inverter Settings) | Direct, permanent write to the inverter's TOU slots | No — stays until you change it |
Each command Svitgrid sends to the inverter is logged in the per-day command history (see Event details & command history below) — both the set_* command at the start of a window and the matching restore_* command at the end. If a restore fails, you'll see it there.
Planner
The planner lets Svitgrid run inverter schedules for you. You pick a planning style and a daily window; Svitgrid figures out the schedule each day based on the day's forecast and outage schedule, then sends the commands.
Configuring the planner
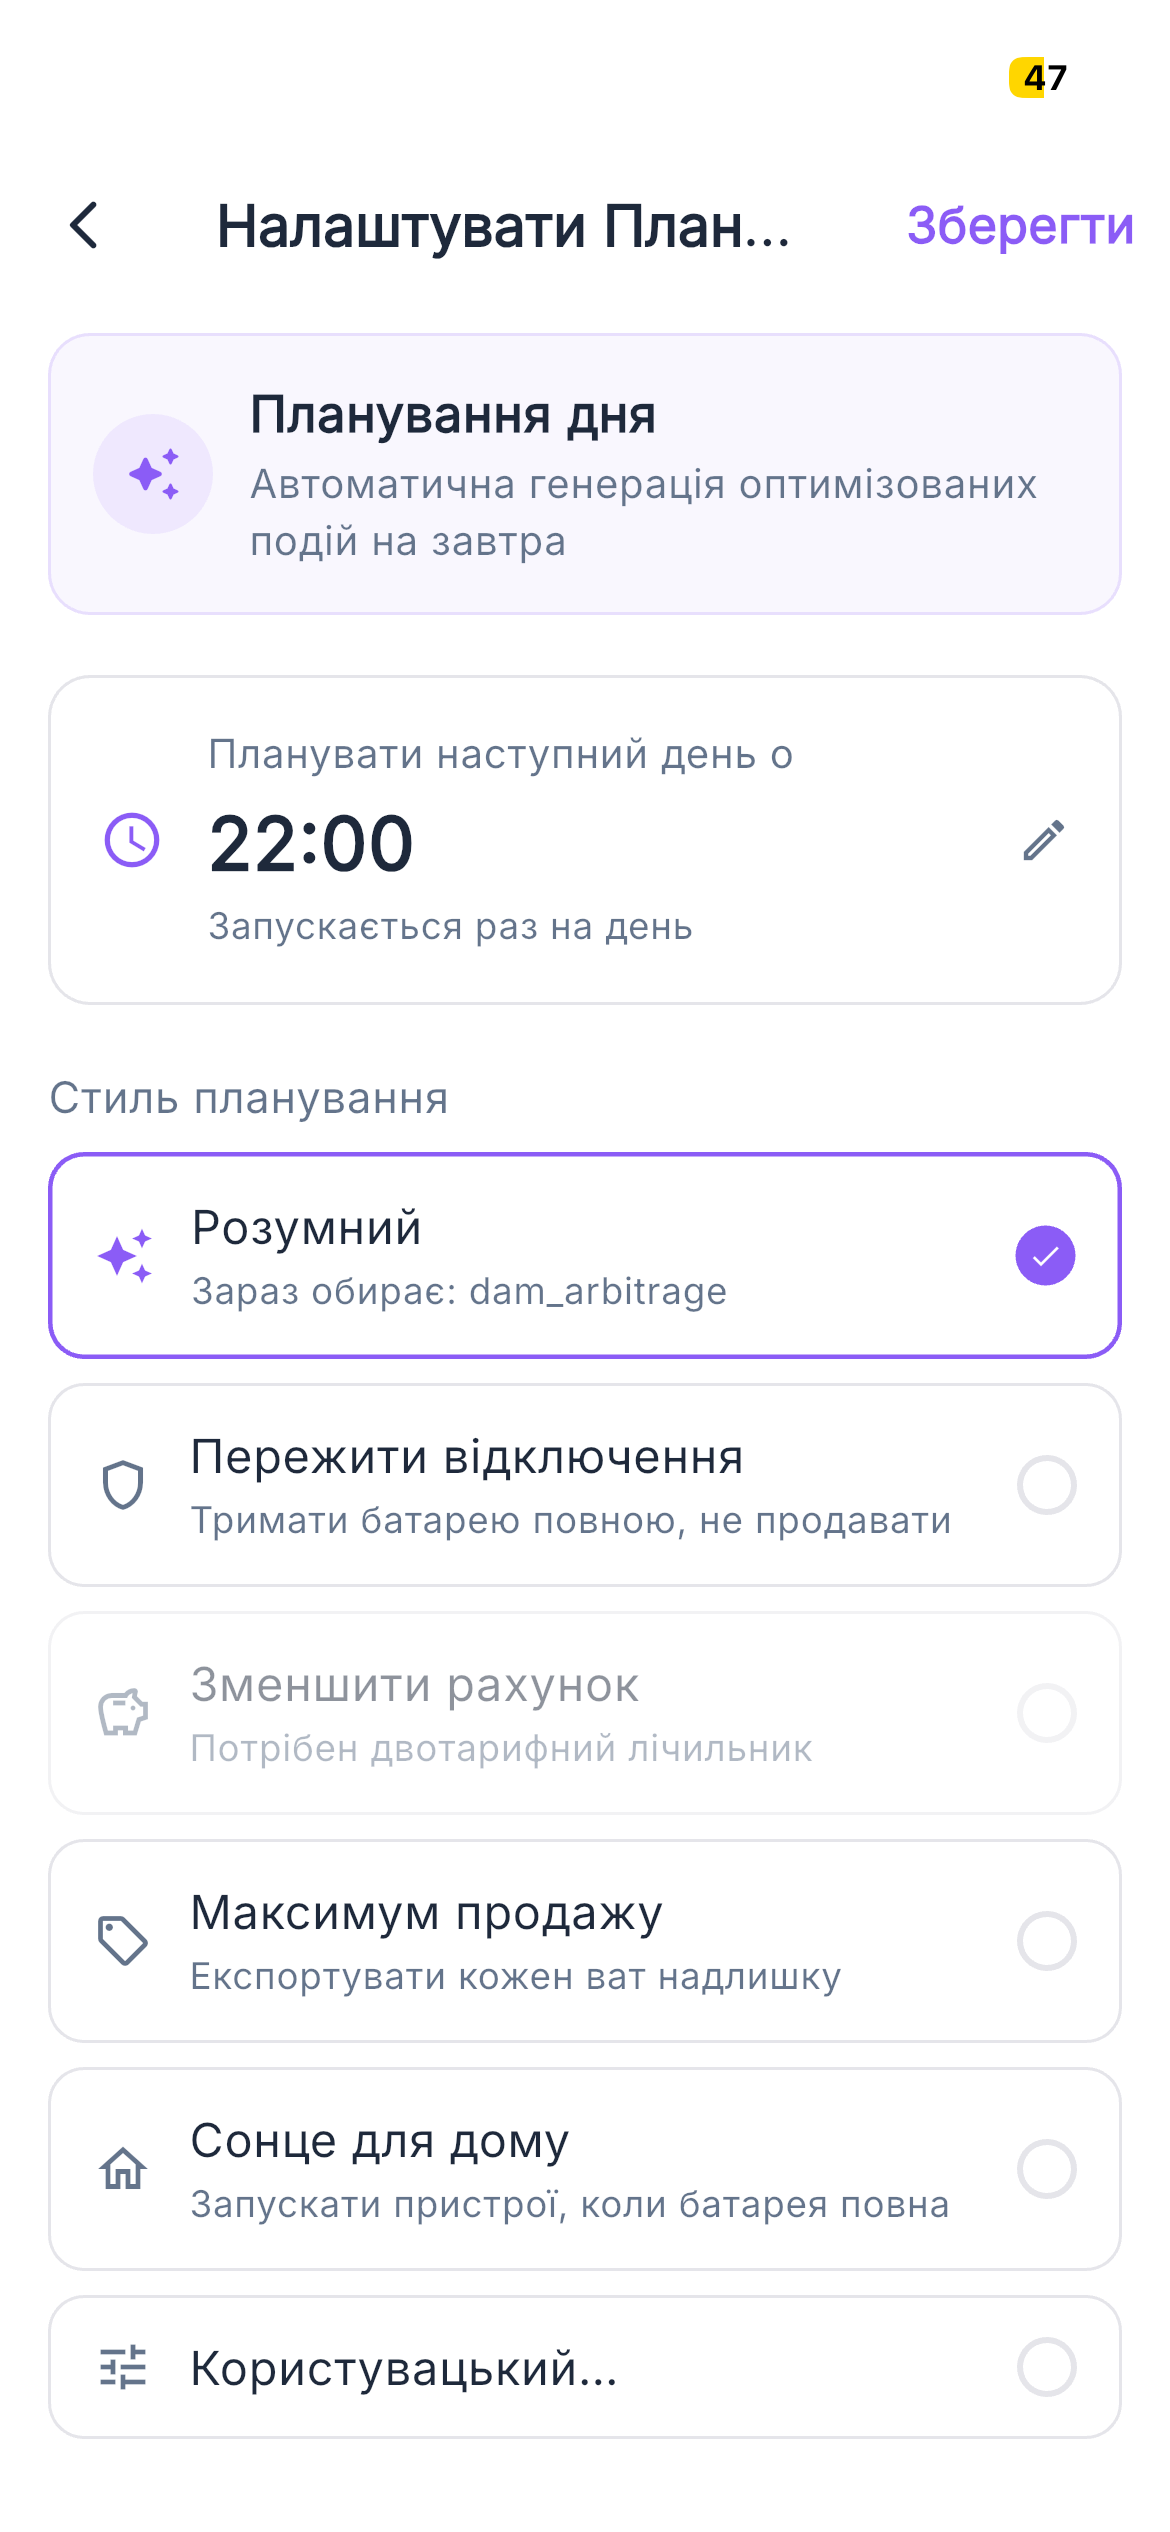
Pick a daily window and a planning style
Open the planner with + Planner on the day view. Steps:
- Toggle Day Planning on.
- Pick a recompute time (e.g., 22:00) — Svitgrid recalculates the next day's plan at this time, after the day-ahead prices and weather are public.
- Pick a planning style (see below).
- (Optional) Adjust style-specific parameters — battery floor, target SOC, daily kWh limits.
- Save.
Planning styles
| Style | What it does |
|---|---|
| Smart | Lets Svitgrid pick the best mix of charge / sell / consume based on forecast, prices, and outages |
| Survive outages | Pre-charges the battery before scheduled blackouts so the home stays powered through them |
| Lower bill | Imports cheap, exports expensive — based on day-ahead prices |
| Maximize sell | Pushes as much solar as possible to the grid during the most-profitable hours |
| Sun for home | Prioritizes self-consumption — solar covers the home first, then charges the battery, only then exports |
| Custom | Build the schedule yourself by hand — pick the mode and window for each block |
Authorize Svitgrid to run schedules
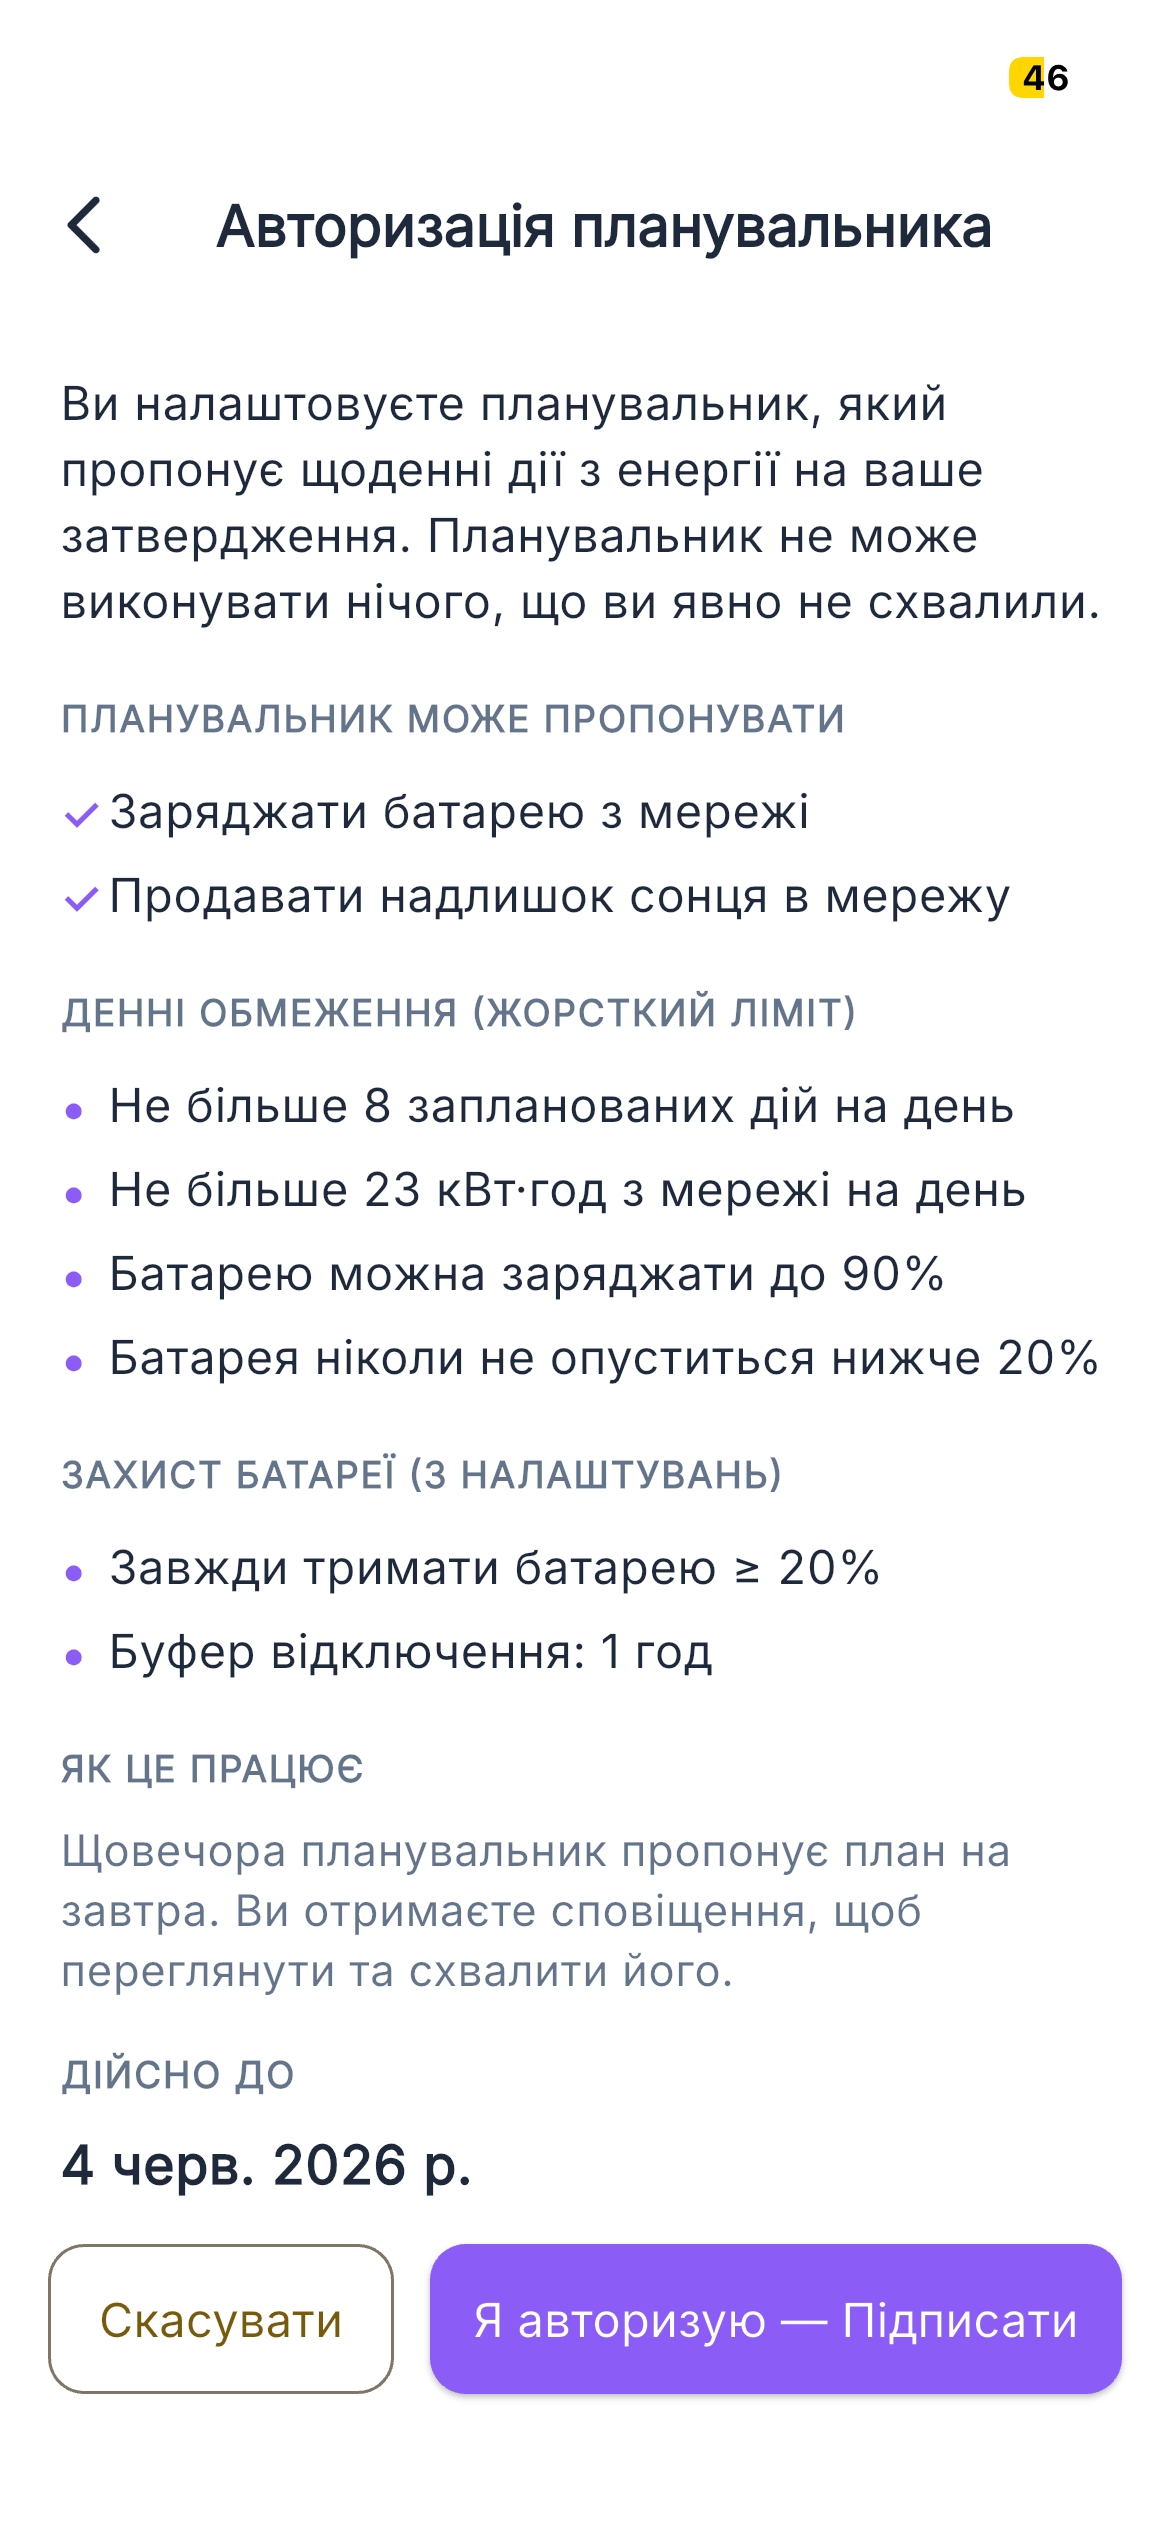
Daily limits and battery protections before delegation goes live
The first time you turn on the planner, Svitgrid asks for explicit authorization. The consent screen lets you set:
- Battery floor — never discharge below this SOC (e.g., 20%)
- Reserve time — keep at least N hours of backup at all times (e.g., 1 hour)
- Daily kWh limits — caps on grid import, grid export, and battery throughput per day
- Authorization expiry — the consent has a 30-day duration; you'll be asked to renew it before it lapses
You can revoke the authorization at any time from the planner screen.
Event details & command history
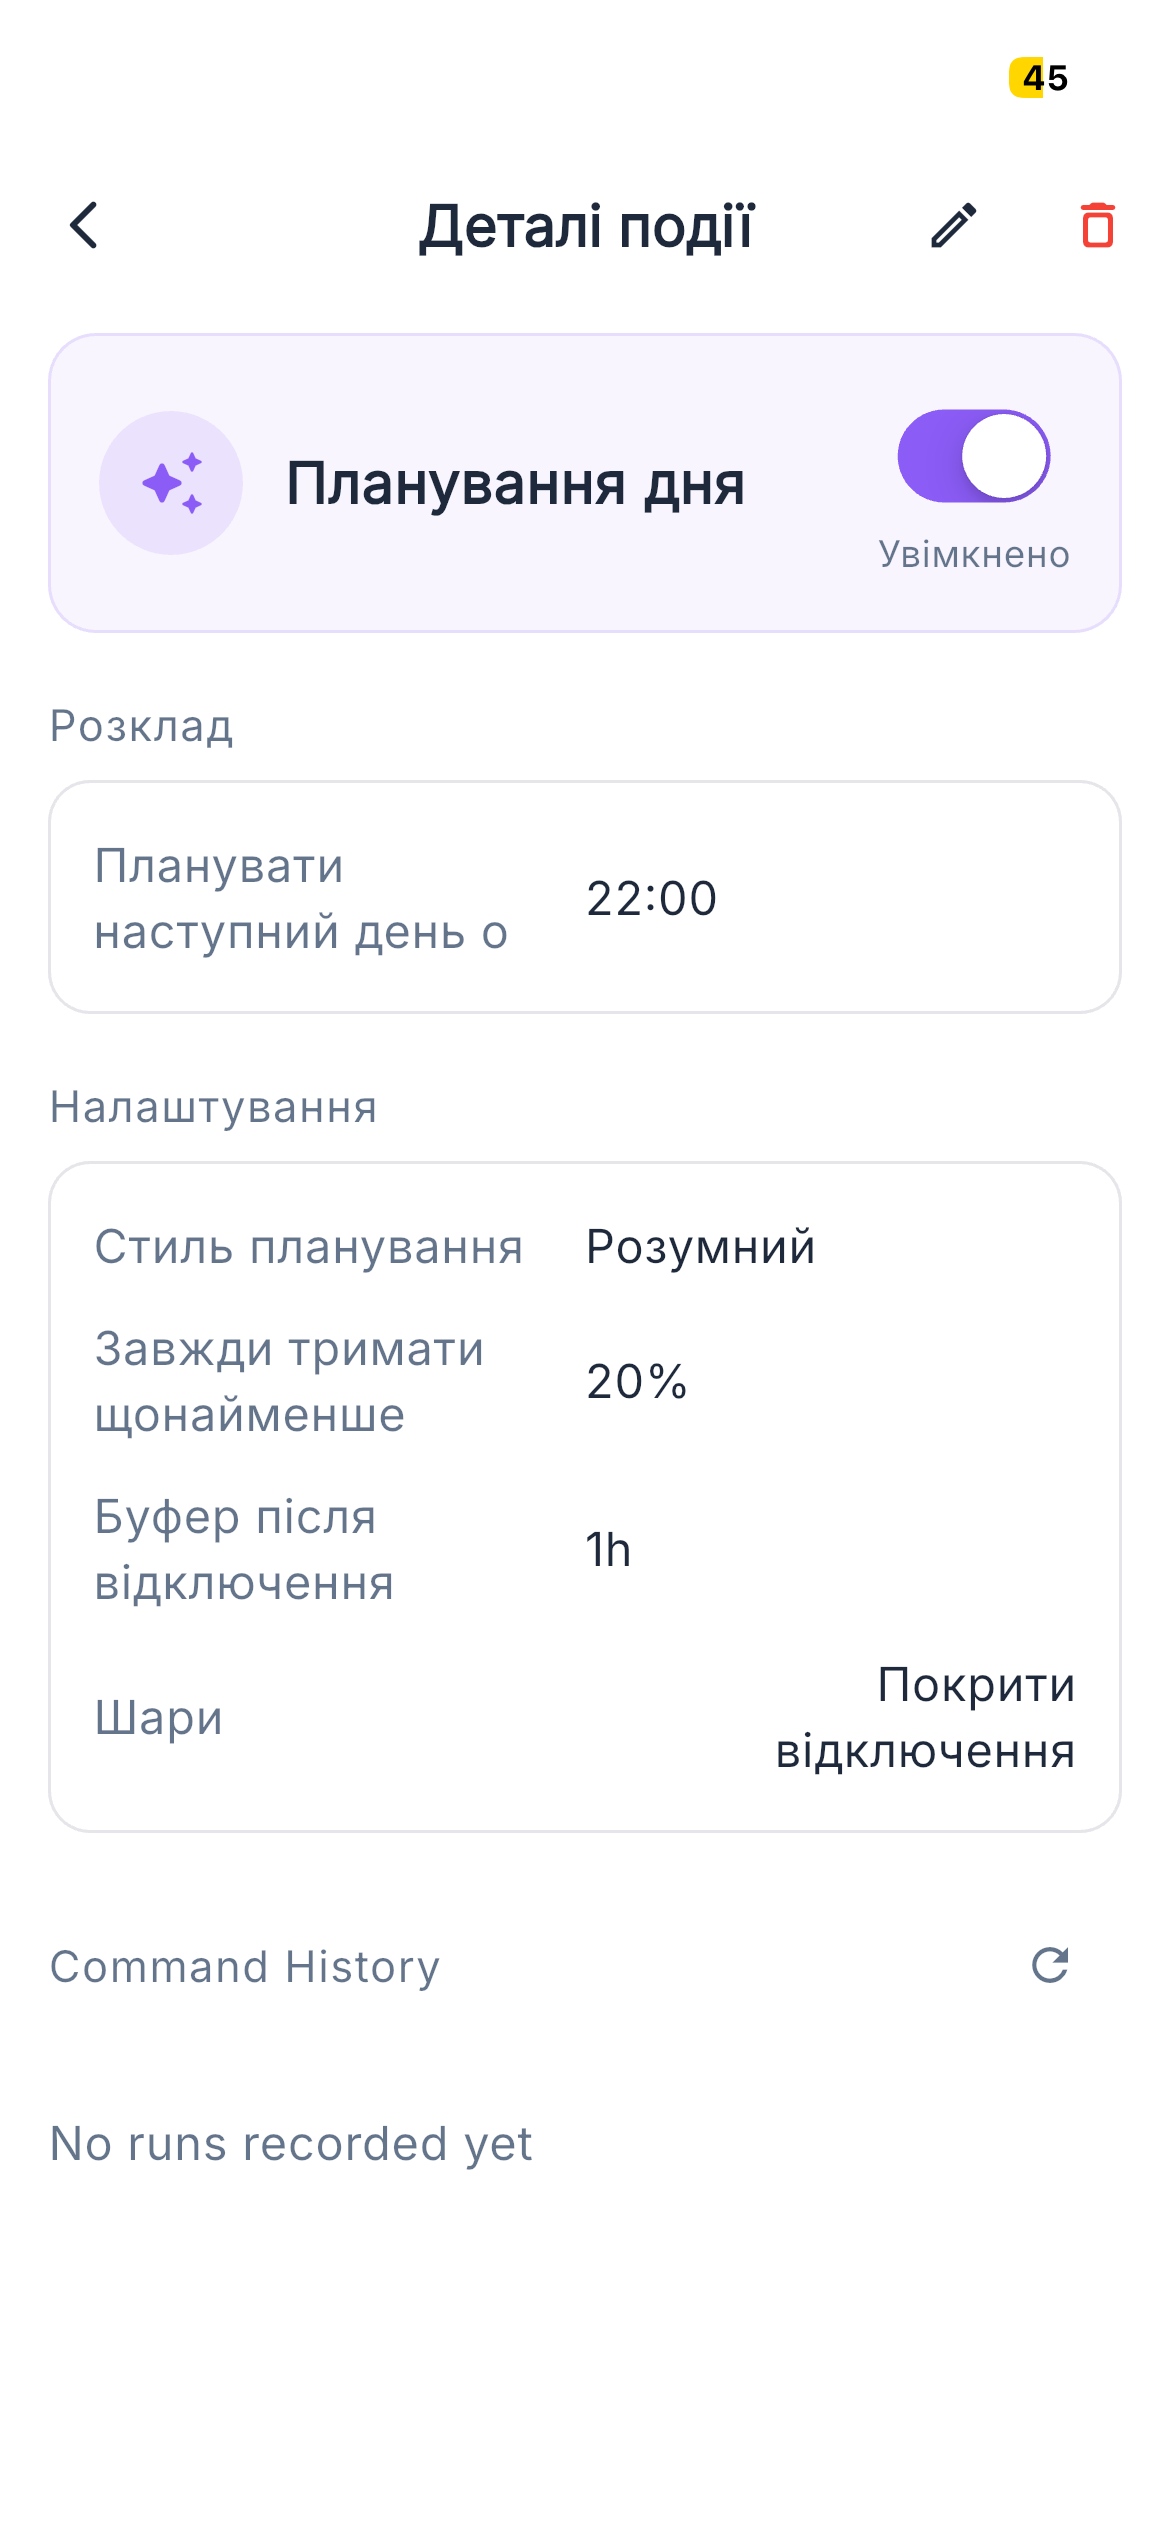
Per-day event view with the recompute schedule and command history
Tap a planned day in the calendar to see:
- The schedule that will run that day (or did run)
- Daily limits in effect
- Command history — every command sent to the inverter, with timestamp and result (success / failed / pending)
Creating a Calendar Event
Schedule a one-off or recurring override on your inverter — charge the battery before a cheap-rate window, push extra solar to the grid, lower consumption when smart plugs are available.
Calendar events let you tell Svitgrid "during this time window, do this" without committing to a full planner style. Events temporarily change the inverter's TOU settings during the window and restore them at the end — see How scheduling works (TOU).
Starting an event
- Open the Calendar tab (third in the bottom nav).
- Tap the hour where you want the event to start.
- Tap + Add event on the hour-detail screen.
- Pick a mode (see Override modes below).
- Adjust the time window and (optionally) recurrence.
- Tap Save.
Override modes
The mode picker shows only the modes available for your inverter / household configuration. Some are gated:
| Mode | What it does | Available when |
|---|---|---|
| Battery Charge | Forces the inverter to charge the battery from the grid during the window (typically to bank cheap-rate or off-peak electricity). | Household has a battery. |
| Sell to Grid | Pushes solar production to the grid during the window, prioritizing revenue over self-consumption. | Non-Victron inverter, Ukrainian household, pricing model set to Green tariff or DAM (see Household Settings). |
| Lower Consumption | Turns off non-essential loads via paired Zigbee smart plugs during the window. | Edge device present + household has a battery. |
| Consume from Sun | Routes excess solar to loads (via smart plugs) instead of exporting — useful when you have free-running loads like water heaters. | Edge device present. |
Time window
Pick a start hour and end hour for the override. The hour picker snaps to whole hours; for finer granularity, edit the event after creation. The window can span midnight — Svitgrid splits the commands at 00:00 automatically.
Recurrence
By default the event runs once. Tap the recurrence chip to repeat it:
| Option | Behaviour |
|---|---|
| None | Single run on the selected day. Default. |
| Daily | Runs every day at the same time, until you delete the event. |
| Weekly | Runs every week on the selected weekday. |
| Custom | Pick specific weekdays (e.g., Mon/Wed/Fri). |
What happens at run time
At the start of the window, Svitgrid sends a set_* command to the inverter (e.g., set_battery_charge). At the end, it sends a matching restore_* command that puts the inverter back into the pre-event state. Both commands are visible in the per-day command history — see Event details & command history.
Notifications
Push alerts about outages, battery state, calendar events, and system health.
Open Settings → Notifications. The screen has a master toggle at the top, eight per-category toggles, and a global quiet-hours window.
Master toggle
The top switch enables push notifications for the household. Turning it off silences every category — quicker than disabling each one individually. It also pauses the quiet-hours logic since there's nothing to silence.
Alert categories
Each category can be turned on or off independently. The eight categories are:
| Category | Fires when |
|---|---|
| Offline | The Edge device or phone harvester stops reporting data for longer than the offline threshold. |
| Low battery | Battery SOC falls below the configured low-battery threshold. |
| Battery full | Battery reaches its full-charge SOC (usually ~95–100%). |
| Error | The inverter reports a fault or error code. |
| Outage | Grid power drops (detected via the inverter's contactor / relay state, not voltage). |
| Grid restored | Grid power returns after an outage. |
| Calendar event started | A planned calendar event begins — Svitgrid has sent the set_* command. |
| Calendar event ended | A calendar event finishes — Svitgrid has sent the restore_* command. |
Quiet hours
Quiet hours are global — one Start / End window applies to every category. Anything that fires inside the window is suppressed (not queued and delivered later — actually silenced). Turn quiet hours on, then pick a start and end time. Setting both times to the same value disables the window; the screen warns you about that.
Solar Forecast
Day-ahead production prediction.
How it works
Svitgrid calculates expected solar production based on:
- Panel location (latitude, longitude, altitude)
- Per-string capacity (kWp)
- Per-string tilt and azimuth
- Weather forecast (cloud cover, temperature)
- Sun position (sunrise, solar noon, sunset)
Configuring solar strings
For accurate forecasts, configure each string in Settings → Inverter Settings. For each string:
- Capacity (kWp) — total rated power of panels on this string
- Tilt — angle from horizontal (0 = flat, 90 = vertical wall mount)
- Azimuth — compass direction (180 = due south in the northern hemisphere)
Forecast vs. actual
The forecast view overlays predicted production (shaded area) with the actual production line. Persistent under-performance suggests shading, dirt, or a hardware issue.
Calibration
Svitgrid quietly learns from your inverter — after about a week of data, the forecast is recalibrated against your actual production. You don't need to do anything; it just gets more accurate over time.
Outage Schedule
View planned power outages (Ukraine).
Overview
In Ukraine, planned outages follow a rotating schedule by region (oblast) and group. Svitgrid scrapes regional distribution-company schedules and shows the upcoming blocks for your area on the dashboard and on every planner day.
Setup
- Open Settings → Household Settings
- Pick your region (oblast)
- Pick your group number (printed on your electricity bill or shown on your local distribution company's website)
Reading the schedule
- Green — power expected to be on
- Red — planned outage
- Yellow — possible outage (utility may cut power if needed)
Inverter Connection
Connect Svitgrid to your solar inverter.
What you need
- A supported inverter (see Supported Inverters)
- The inverter's data logger (Wi-Fi stick) connected to your home Wi-Fi
- A phone or Edge device on the same Wi-Fi as the data logger
Finding the inverter's IP address
- Open your router admin page (often at 192.168.1.1 or 192.168.0.1)
- Look at the connected-devices list for the data-logger model name
- Note the IP (e.g., 192.168.1.100)
Finding the logger serial number
The serial is printed on the data-logger stick. You can also find it in:
- SolarmanSmart app (Device Info)
- Manufacturer's app (Sunsynk Connect, Sol-Ark cloud, etc.)
Connection settings by brand
| Setting | Solarman (Deye / Sunsynk / Sol-Ark) | Victron Modbus TCP |
|---|---|---|
| IP Address | Data-logger IP | GX-device IP (Cerbo / Venus) |
| Port | 8899 | 502 |
| Logger Serial | 10-digit number | Not required (enter 0) |
Testing the connection
After entering the details, tap Test Connection. Svitgrid reads a register from the inverter — on success it shows your current PV power. If it fails:
- Confirm the IP is correct and the data logger is online
- Confirm the phone / Edge is on the same Wi-Fi as the data logger
- Confirm the port (8899 for Solarman, 502 for Victron)
- Confirm the logger serial matches the physical sticker
- Check whether your router has AP isolation / client isolation enabled — it blocks device-to-device traffic
Inverter Settings
Tune the inverter behaviour, work modes, and string configuration.
Open Settings → Inverter Settings to see the inverter cluster (master + any slaves), work-mode controls, grid-charging windows, and per-string configuration. Most controls write directly to the inverter; in multi-inverter setups, only the master accepts writes.
Work modes
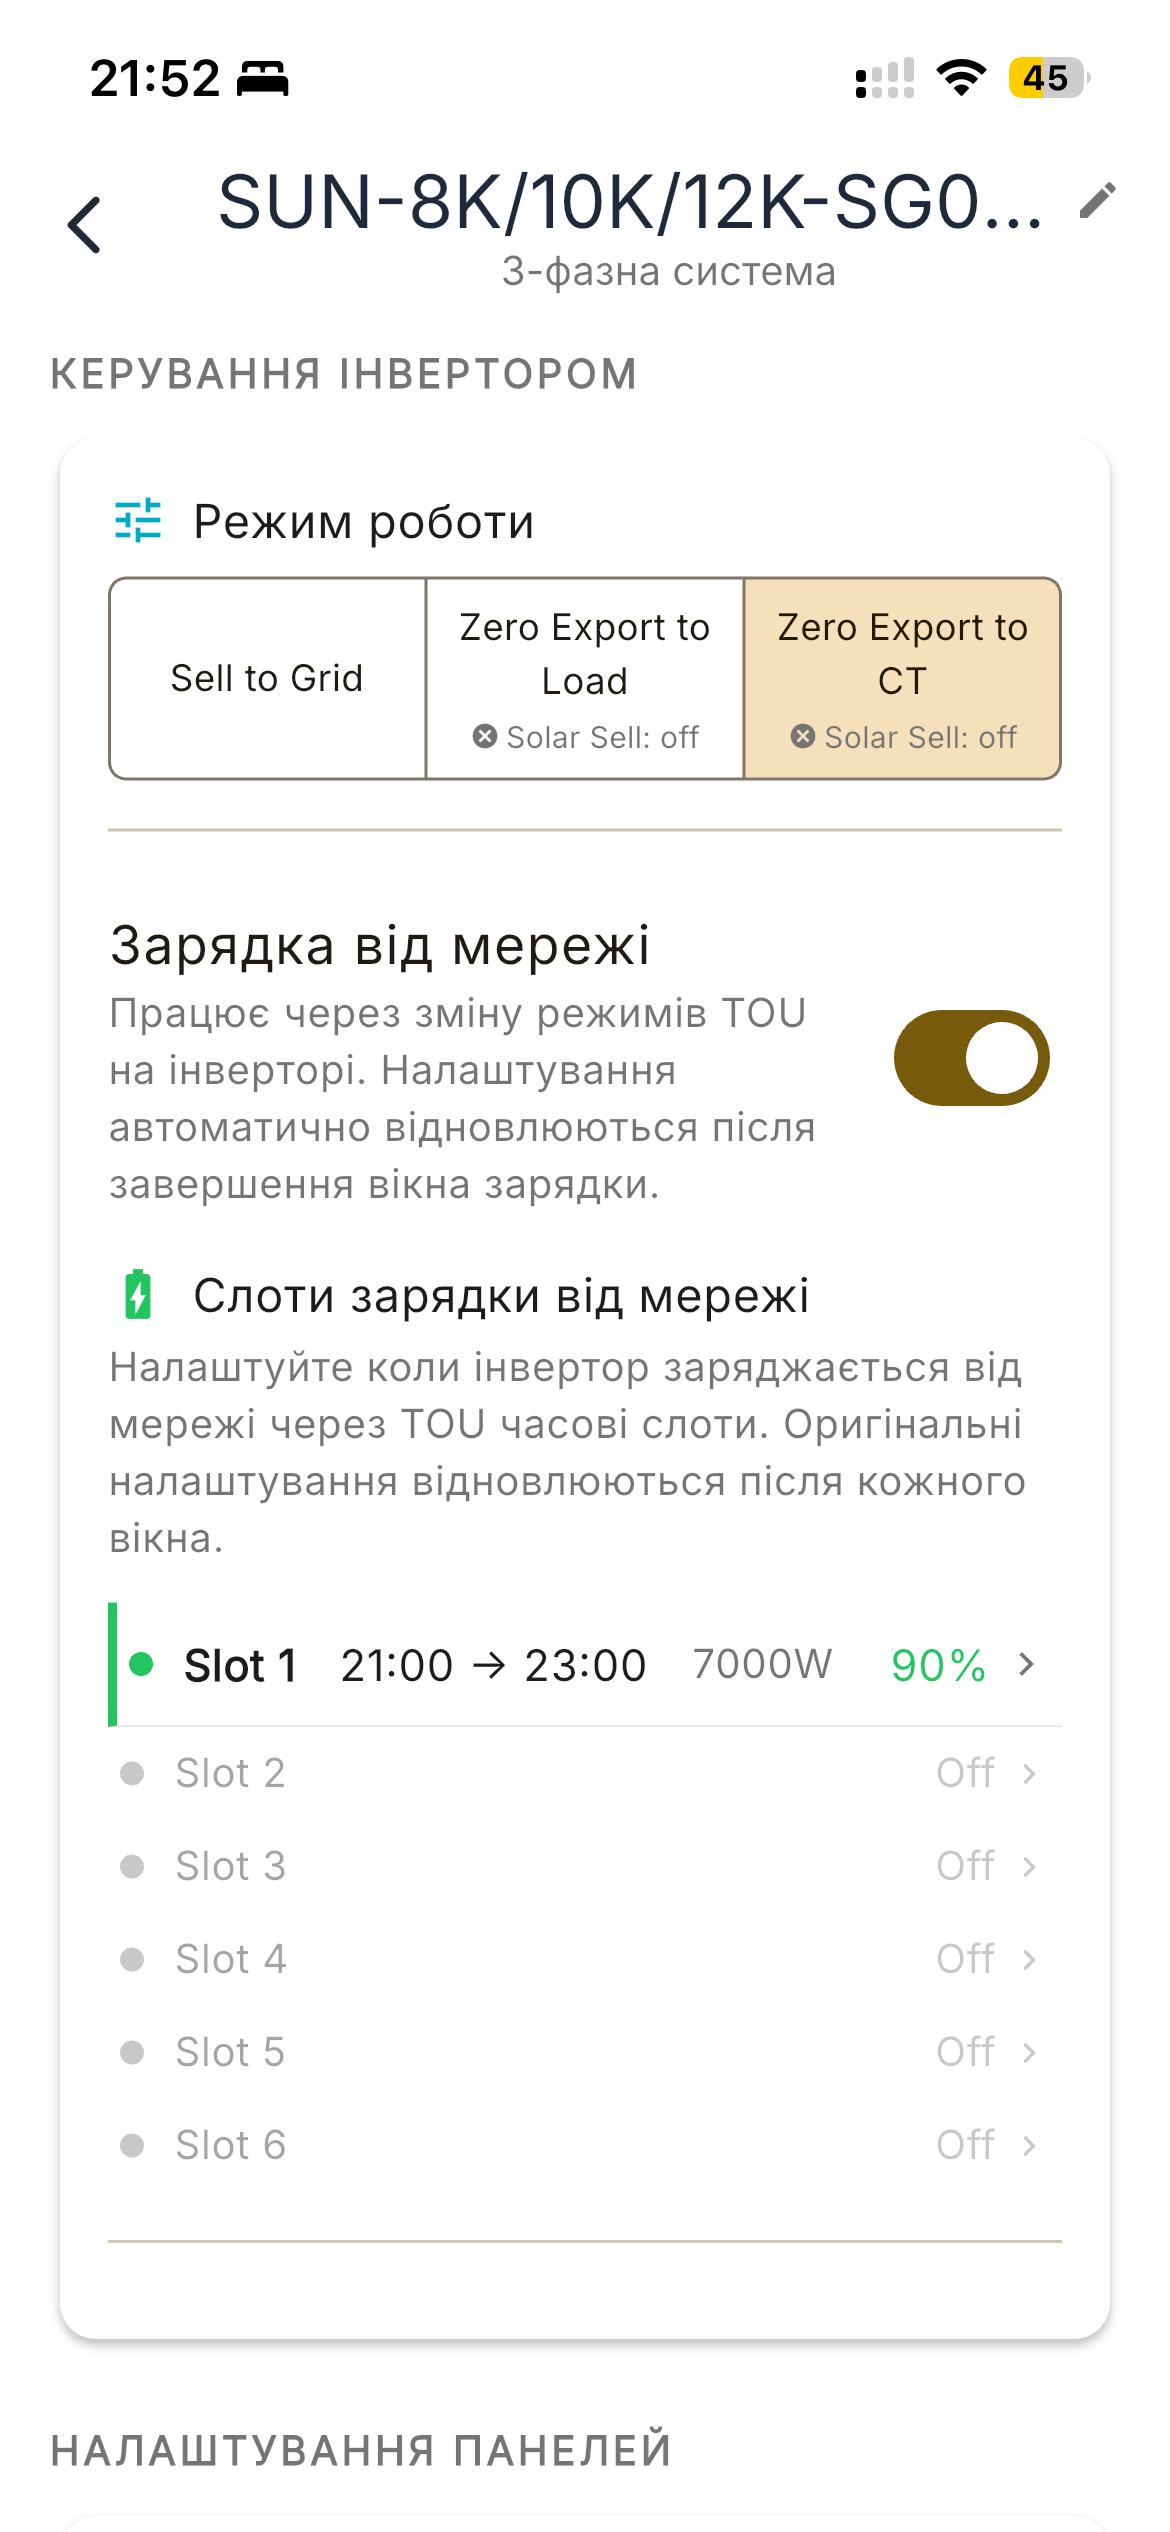
Sell to Grid / Zero Export to Load / Zero Export to CT, plus grid-charging windows
| Mode | What it does |
|---|---|
| Sell to Grid | Excess solar is exported. Required to earn green-tariff revenue. |
| Zero Export to Load | Inverter sizes solar to your home load only — never feeds the grid. |
| Zero Export to CT | Same idea but uses an external CT clamp to measure load — used when the inverter isn't between the meter and the home. |
Grid charging windows
Configure up to six time slots where the inverter is allowed to charge the battery from the grid (typically used to import cheap night-rate electricity). For each slot, set the start time, end time, target SOC, and amperage.
These slots are written directly and permanently to the inverter's TOU registers — they stay until you change them. They are not auto-restored, unlike calendar events. See How scheduling works (TOU) for the distinction.
String configuration
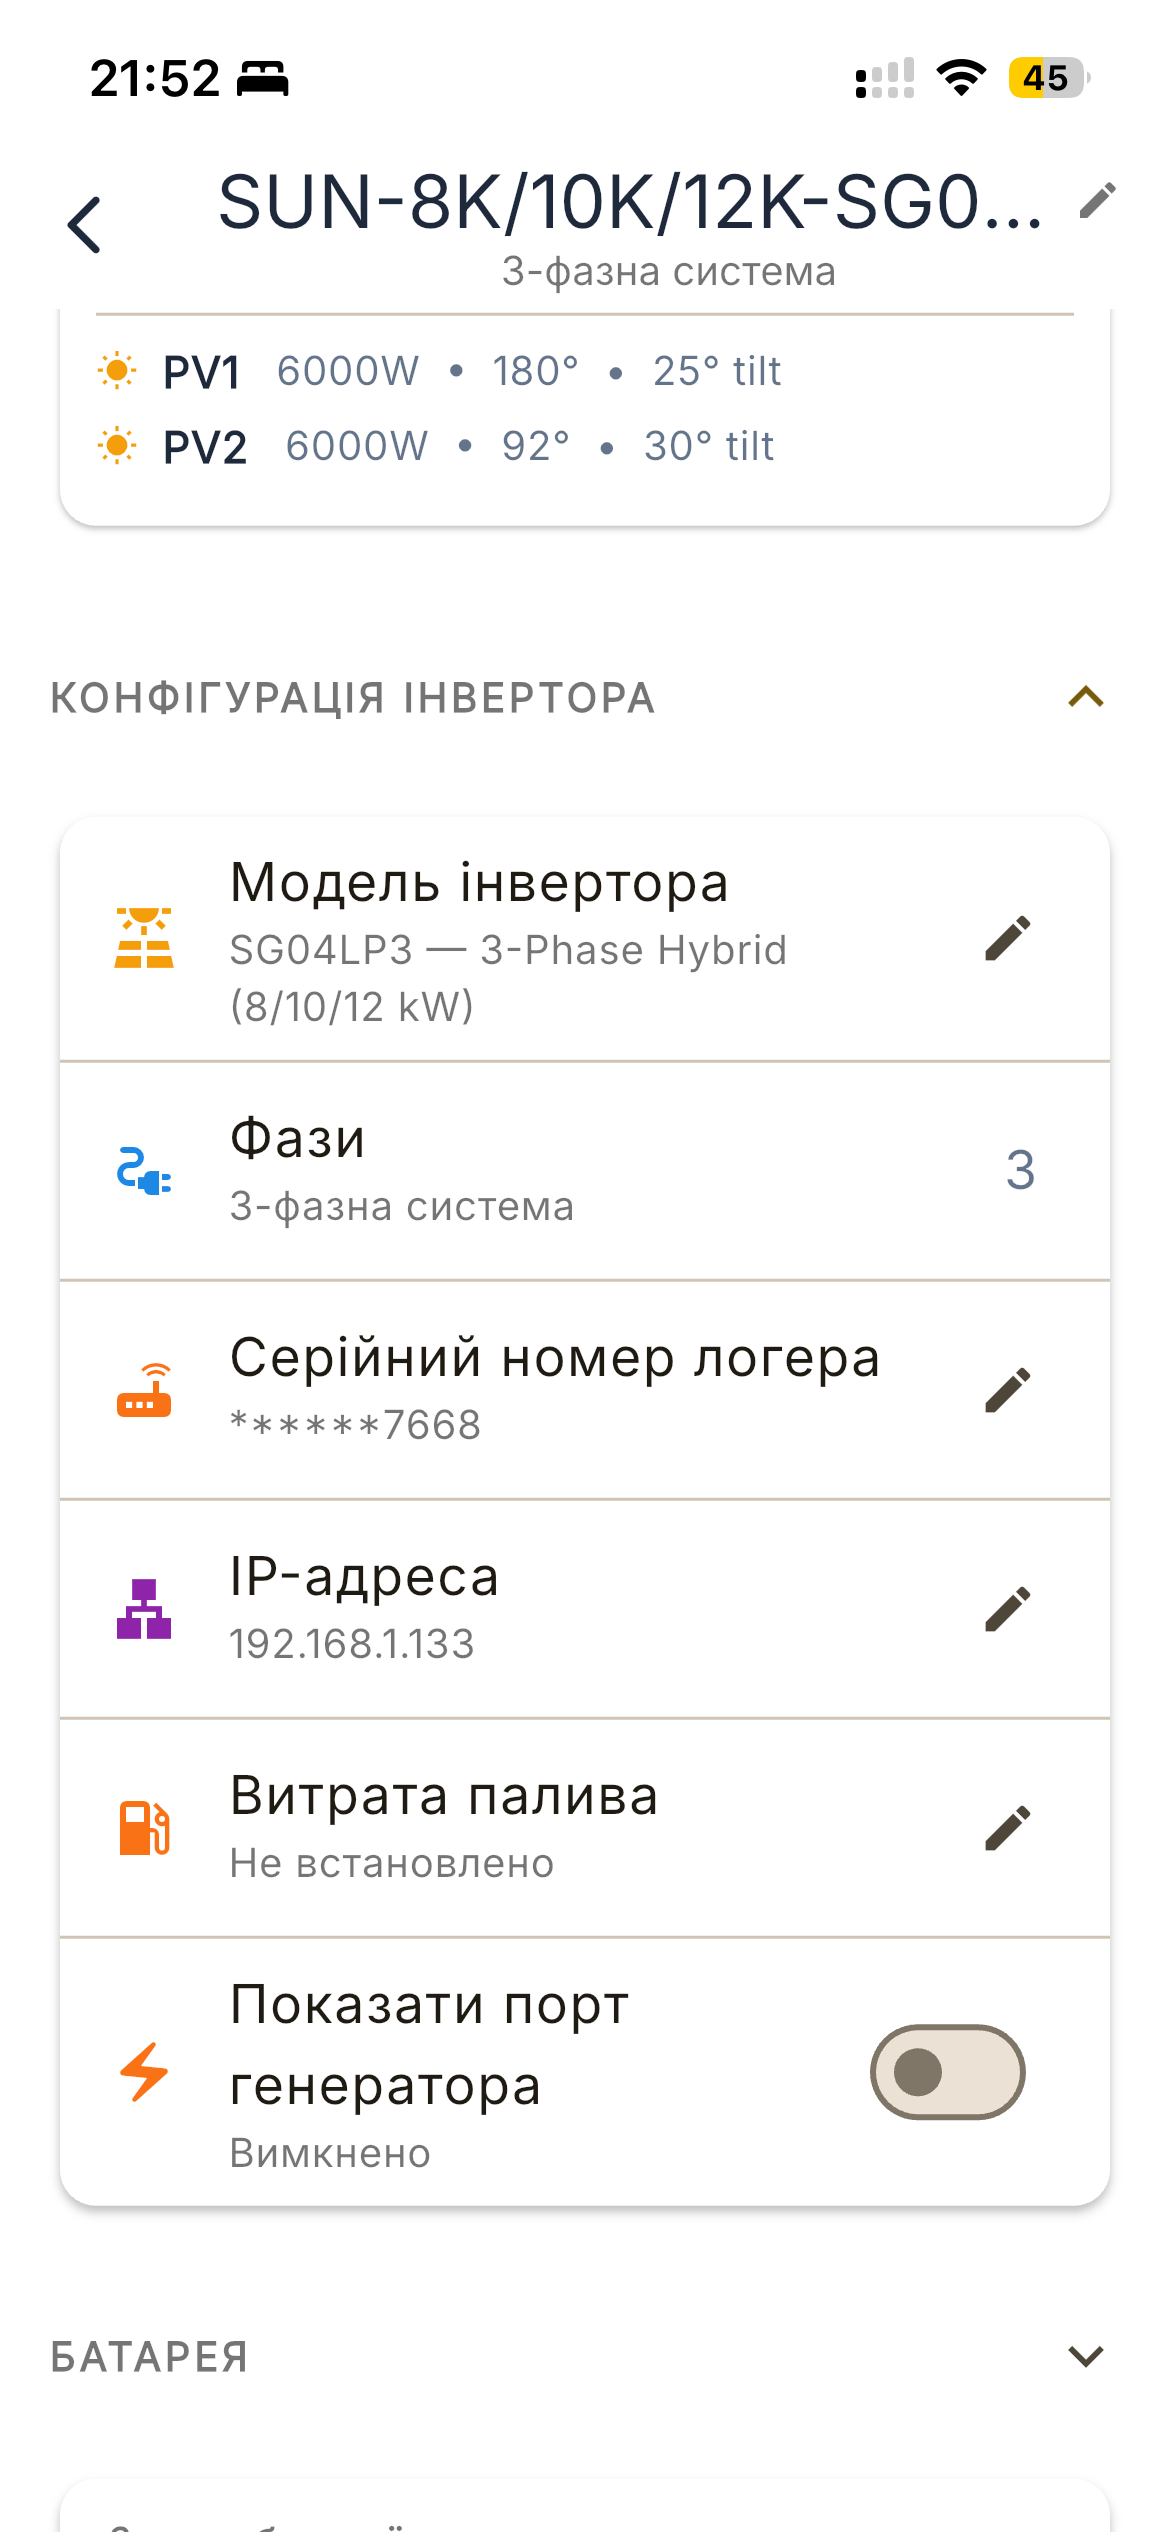
Per-string capacity, tilt, azimuth — plus model, phases, logger, IP, and the Generator-port toggle
Per-string fields:
- Capacity (kWp) — rated DC power on this string
- Azimuth — compass direction (0–360°)
- Tilt — angle from horizontal (0–90°)
Identification fields below the strings:
- Model — Svitgrid uses this to pick the register map
- Phases — 1 or 3
- Logger serial and IP
- Show Generator / Smart-Load Port toggle — see Smart Load / Gen Port
Add Another Inverter (Parallel)
Add a second (or third) inverter to an existing household — typically a master + slave setup wired in parallel.
Use this when you have more than one inverter physically wired together at the same property, sharing a battery and grid feed. Each inverter still has its own data logger (or Modbus connection) and is polled separately, but commands go to the master only — the slaves follow over the inter-inverter link.
Starting the flow
- Open the Dashboard.
- Tap the household tile at the top, then choose Add inverter. (Also reachable from Settings → Inverter Settings when at least one inverter already exists.)
- Pick the topology — Parallel (Master / Slave) is the only option available today. Independent and AC-coupled topologies are on the roadmap.
- The standard onboarding wizard launches in add-to-household mode and walks you through the inverter brand/model and connection details (the same steps as the initial inverter — see Onboarding Wizard).
Parallel configuration step
Partway through the wizard you'll see a Parallel configuration step with three controls:
- Is this inverter part of a parallel setup? — toggle on.
- Master inverter — dropdown listing the existing inverters in this household. Pick the one wired as master.
- Shares battery with master? — toggle on if the new inverter pulls from the same battery bank (typical). Leave off only if it has an independent battery.
After adding
Both inverters show up in Settings → Inverter Settings with a coloured pill on each tile — Master (blue) and Slave (orange). Tap a tile to see that inverter's strings, modes, and IP. The dashboard merges production and consumption across the cluster; per-inverter detail is available from the Energy Charts screen.
- Same brand and protocol on master and slave is strongly recommended — the planner and TOU writes assume the master can speak to the slaves.
- You can add more than one slave; there's no hard cap in the app.
- The first inverter you onboarded is the default master, but you can pick any existing inverter from the dropdown.
Smart Load / Gen Port
Show your inverter's Generator / Smart-Load / Micro-Inverter port on the dashboard.
What is the Gen Port?
Many Deye, Sunsynk, and Sol-Ark inverters have a multi-purpose port labelled Generator. Despite the name, it can operate in three different modes:
| Mode | What it does | Power direction |
|---|---|---|
| Generator | A backup generator feeds the inverter | Into the inverter |
| Smart Load | An extra load output controlled by the inverter (water heater, pool pump) | Out of the inverter |
| Micro Inverter | An additional solar micro-inverter feeds the inverter | Into the inverter |
The mode is configured on the inverter itself (via its LCD or manufacturer app), not in Svitgrid. Svitgrid reads the mode and adjusts the icon and label automatically.
How to enable on the dashboard
By default the gen-port icon is hidden:
- Open Settings → Inverter Settings
- Find Show Generator / Smart-Load Port and turn it on
- Return to the dashboard — the gen-port node now appears in the energy flow
What you'll see
- Smart Load mode — purple icon with current power; dots flow inverter → smart load
- Generator mode — orange icon; dots flow generator → inverter
- Micro Inverter mode — amber solar icon; dots flow into the inverter
Tap the icon to see voltage, frequency, generator status (running / stopped), daily energy, and (generator only) daily runtime hours.
Smart-load accounting
When the gen port is in Smart-Load mode, the inverter's loadPower register includes the smart-load consumption. Svitgrid subtracts the smart-load power from home load to avoid double-counting:
- Home load — your house consumption only
- Smart load — gen-port consumption only
- Total consumption = Home load + Smart load
Edge Device
A small, always-on device that collects data from your inverter and runs planner commands.
What is the Svitgrid Edge?
The Svitgrid Edge is a tiny ESP32-S3 device that sits on your home Wi-Fi, polls your inverter every few seconds, and uploads readings to the cloud. It also receives commands from the cloud (planner runs, battery overrides) and forwards them to the inverter. The device is fanless, draws under 1 W, and runs on USB-C.
- 24/7 data — no gaps, even when nobody's home
- Remote monitoring — view from anywhere
- Runs the planner — sends scheduled commands to your inverter
- Multi-user — every member of the household sees the same data
Edge Devices screen
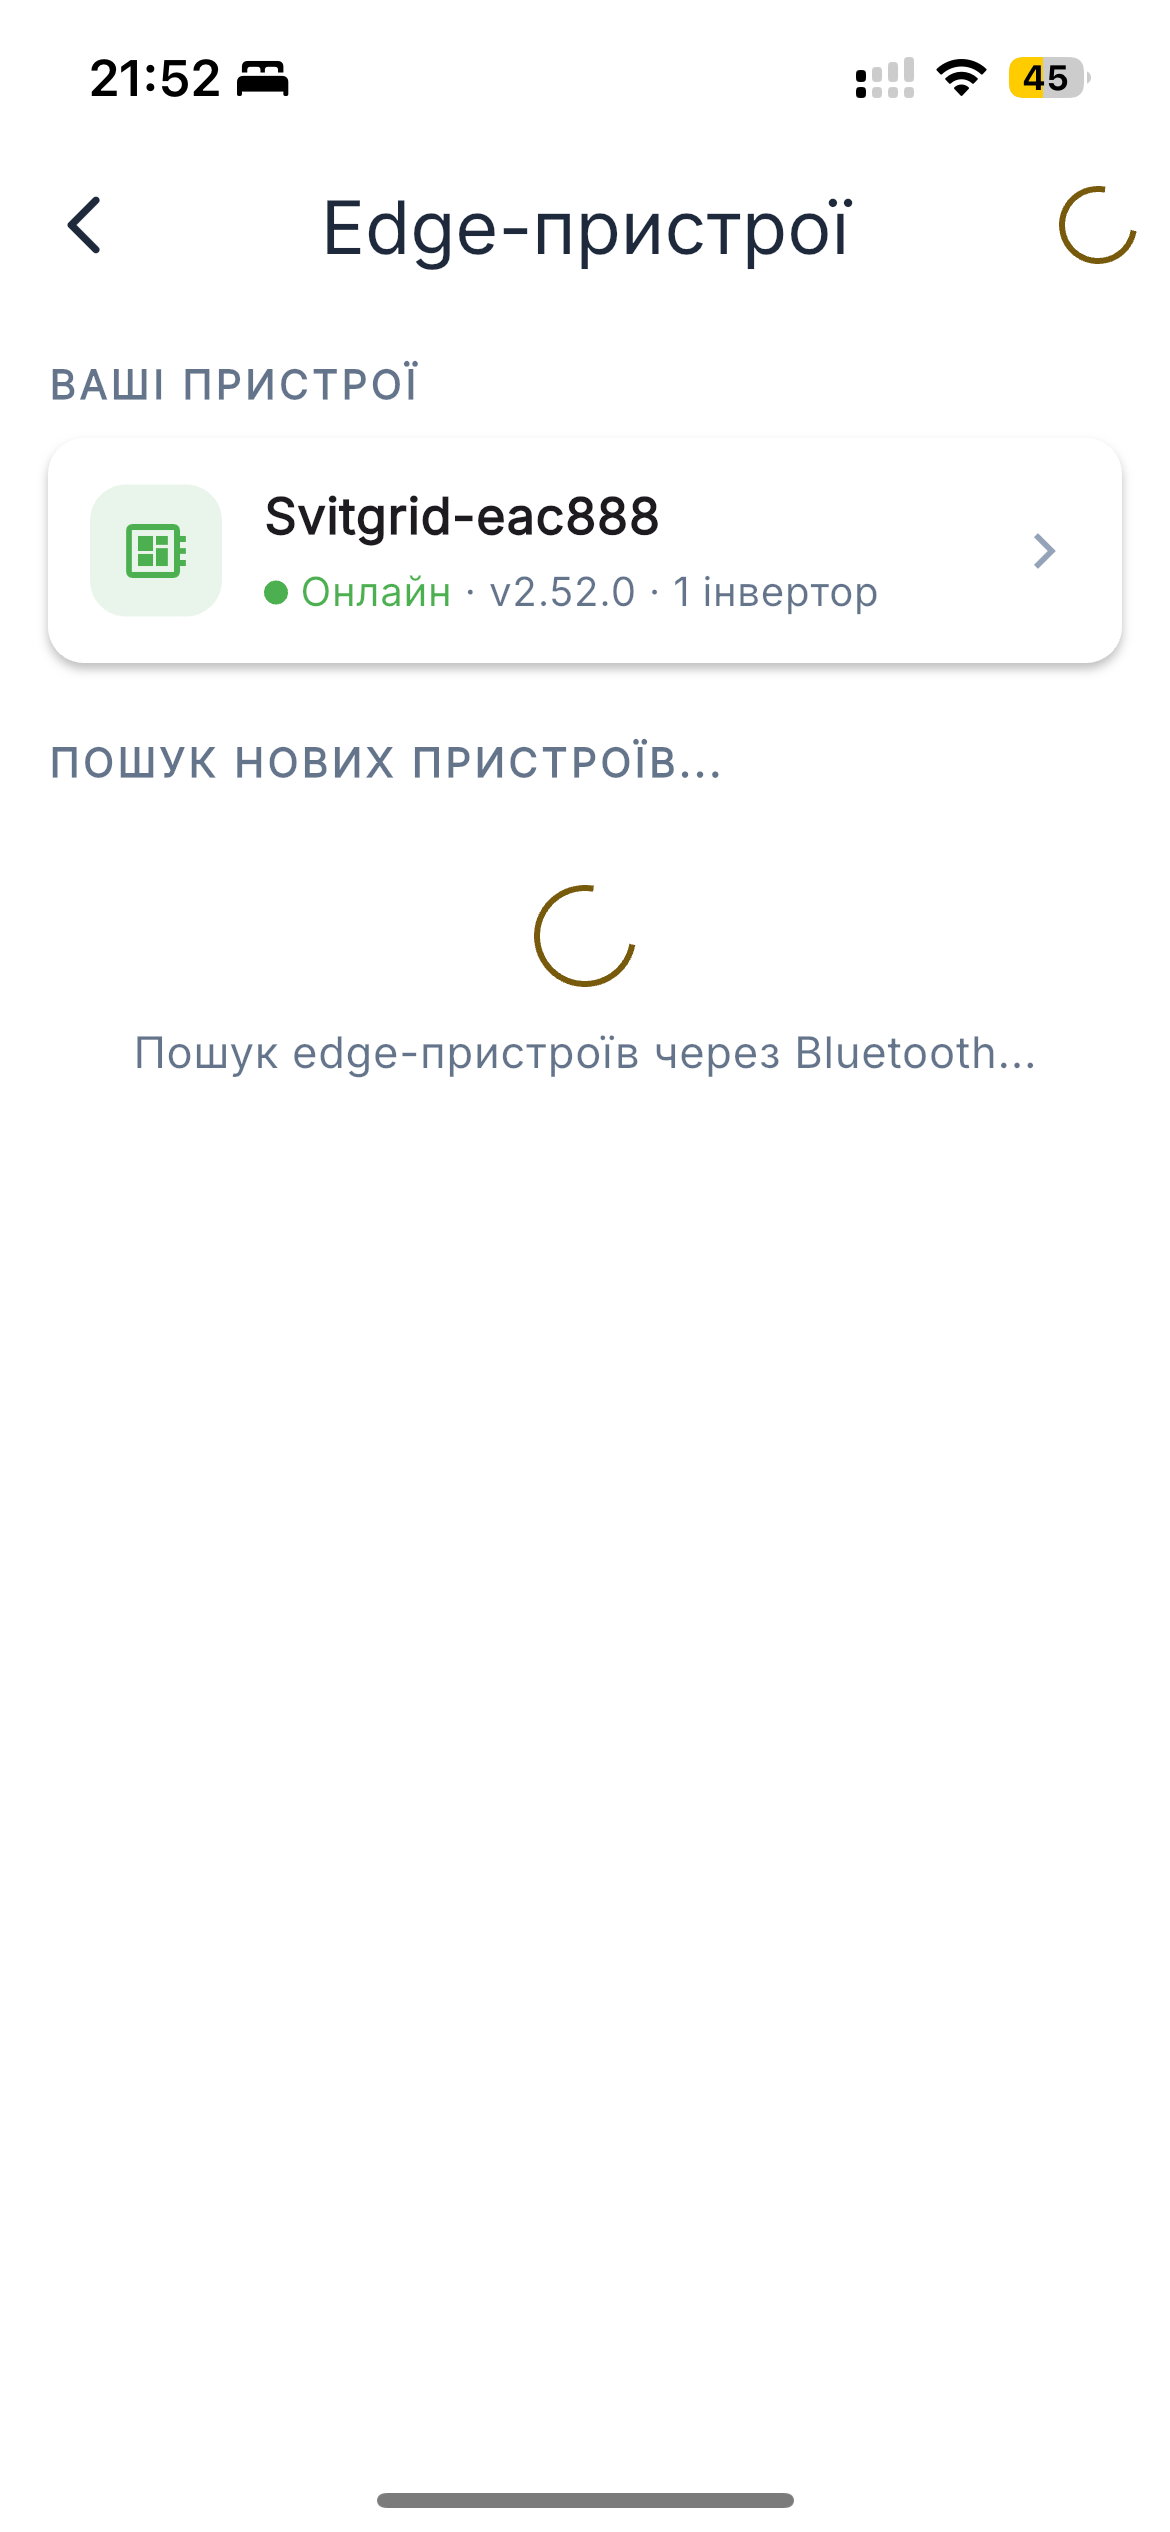
List of paired Edge devices with status and inverter count
Open Settings → Edge Device to see all paired devices. Each card shows the device name (e.g., Svitgrid-eac888), online state, firmware version, and how many inverters are attached.
Below the list, Svitgrid keeps scanning over Bluetooth so a new Edge device appears automatically when powered on within range.
Edge device detail
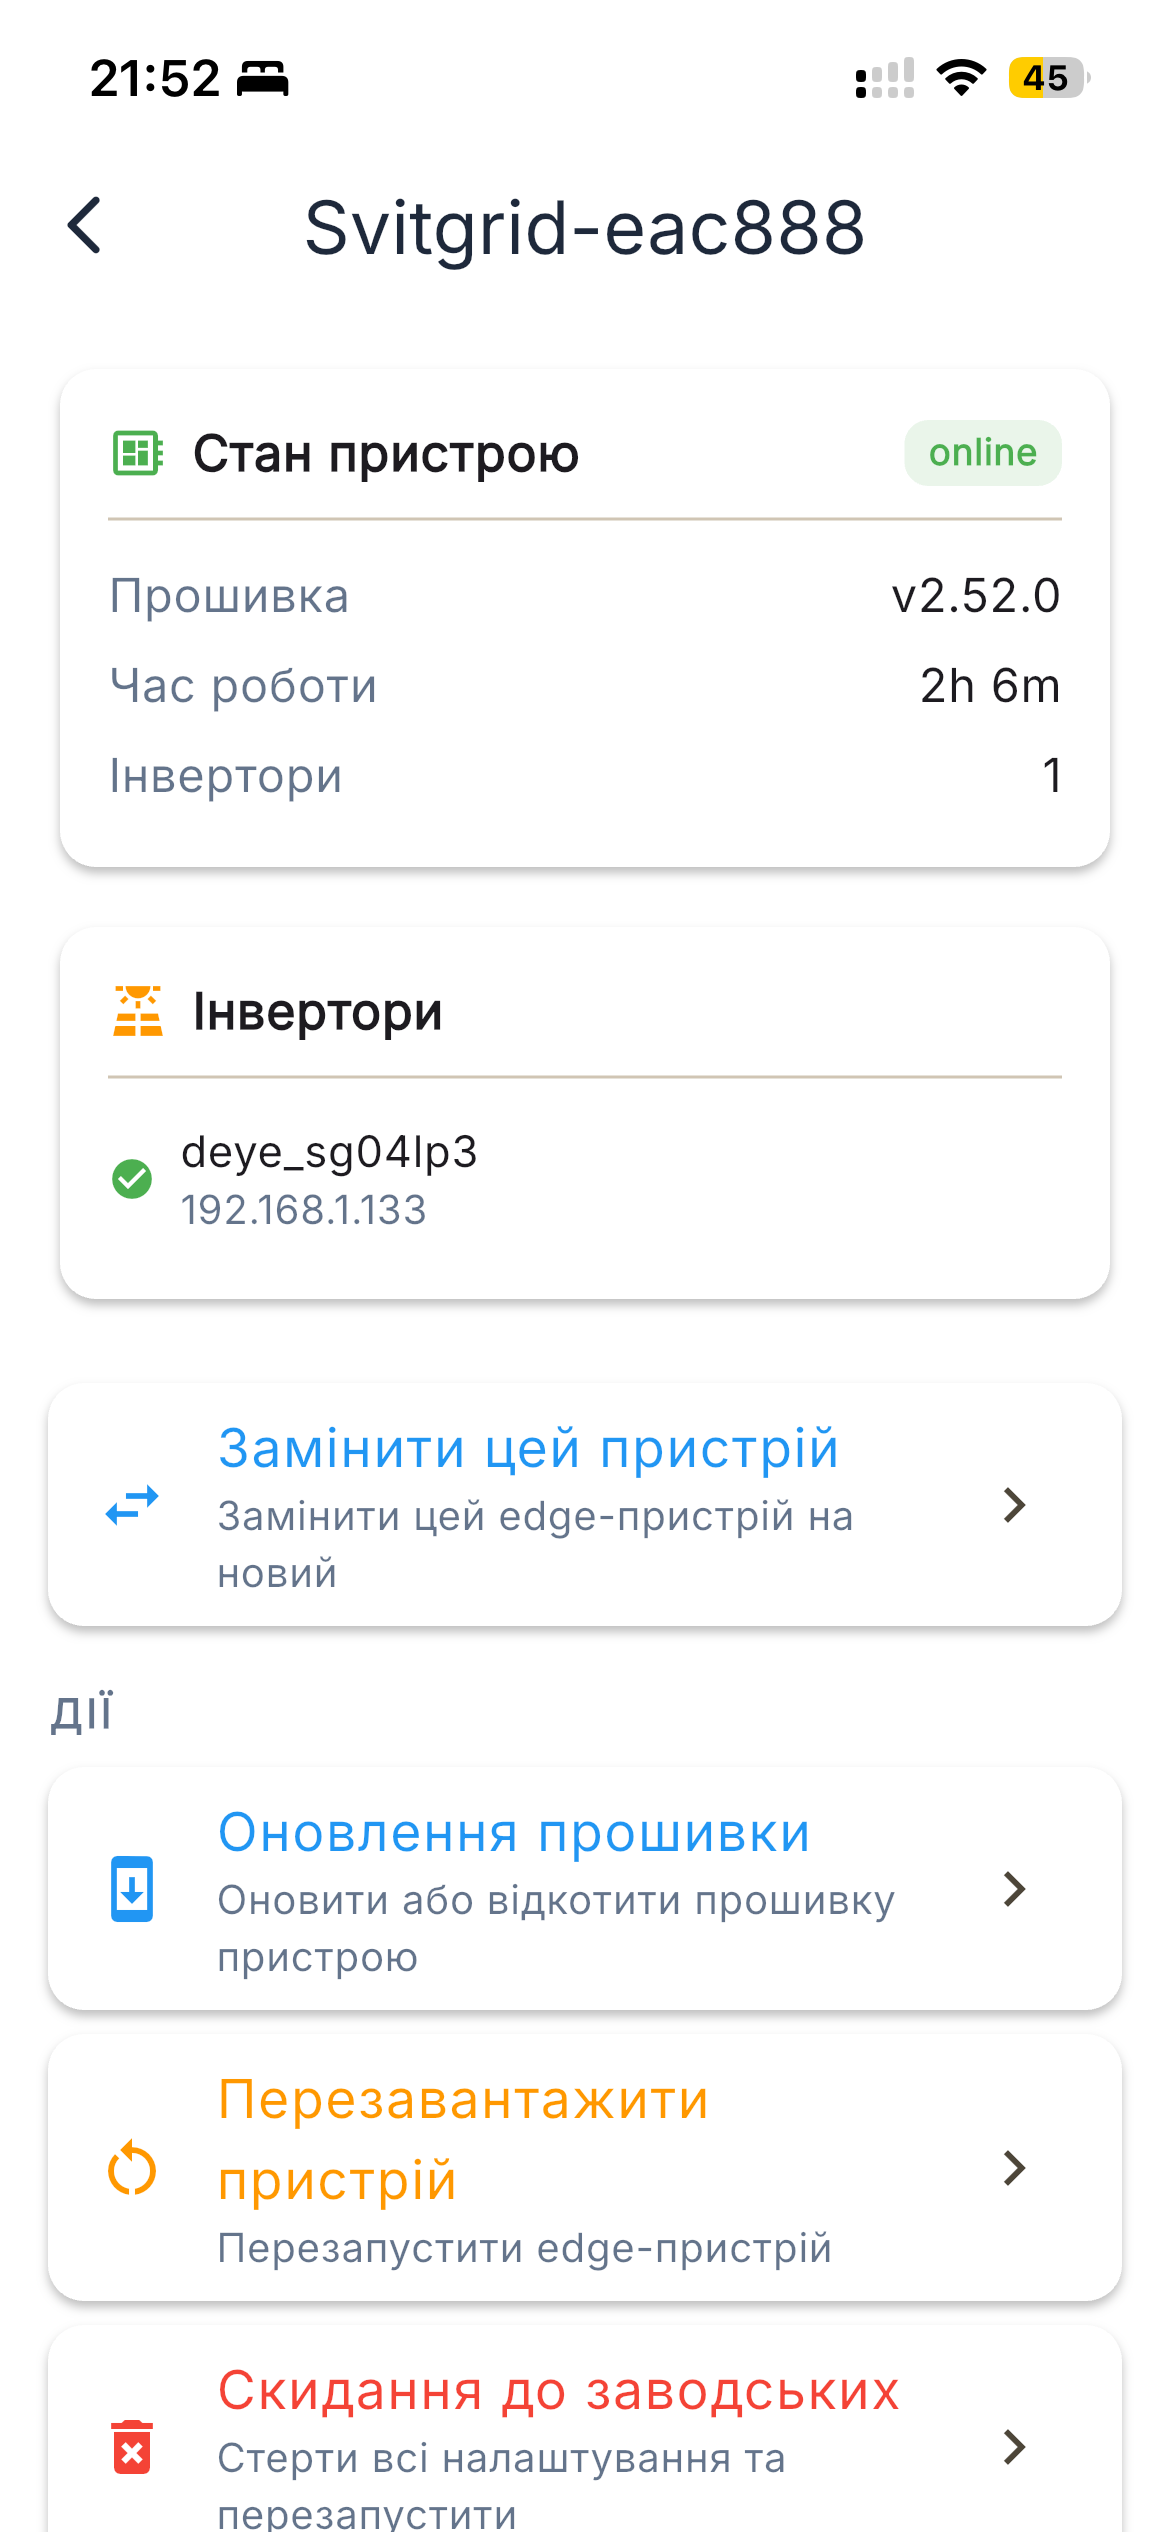
Status card, attached inverters, and actions
Tap a device to open its detail view:
- Status — firmware version, uptime, attached-inverter count
- Inverters — list with their model and IP
- Replace this device — start replacement flow if you bought a new Edge device
- Firmware update — install or roll back firmware
- Reboot — soft restart
- Factory reset — wipe the device's stored Wi-Fi and re-pair from scratch
Firmware updates (OTA)
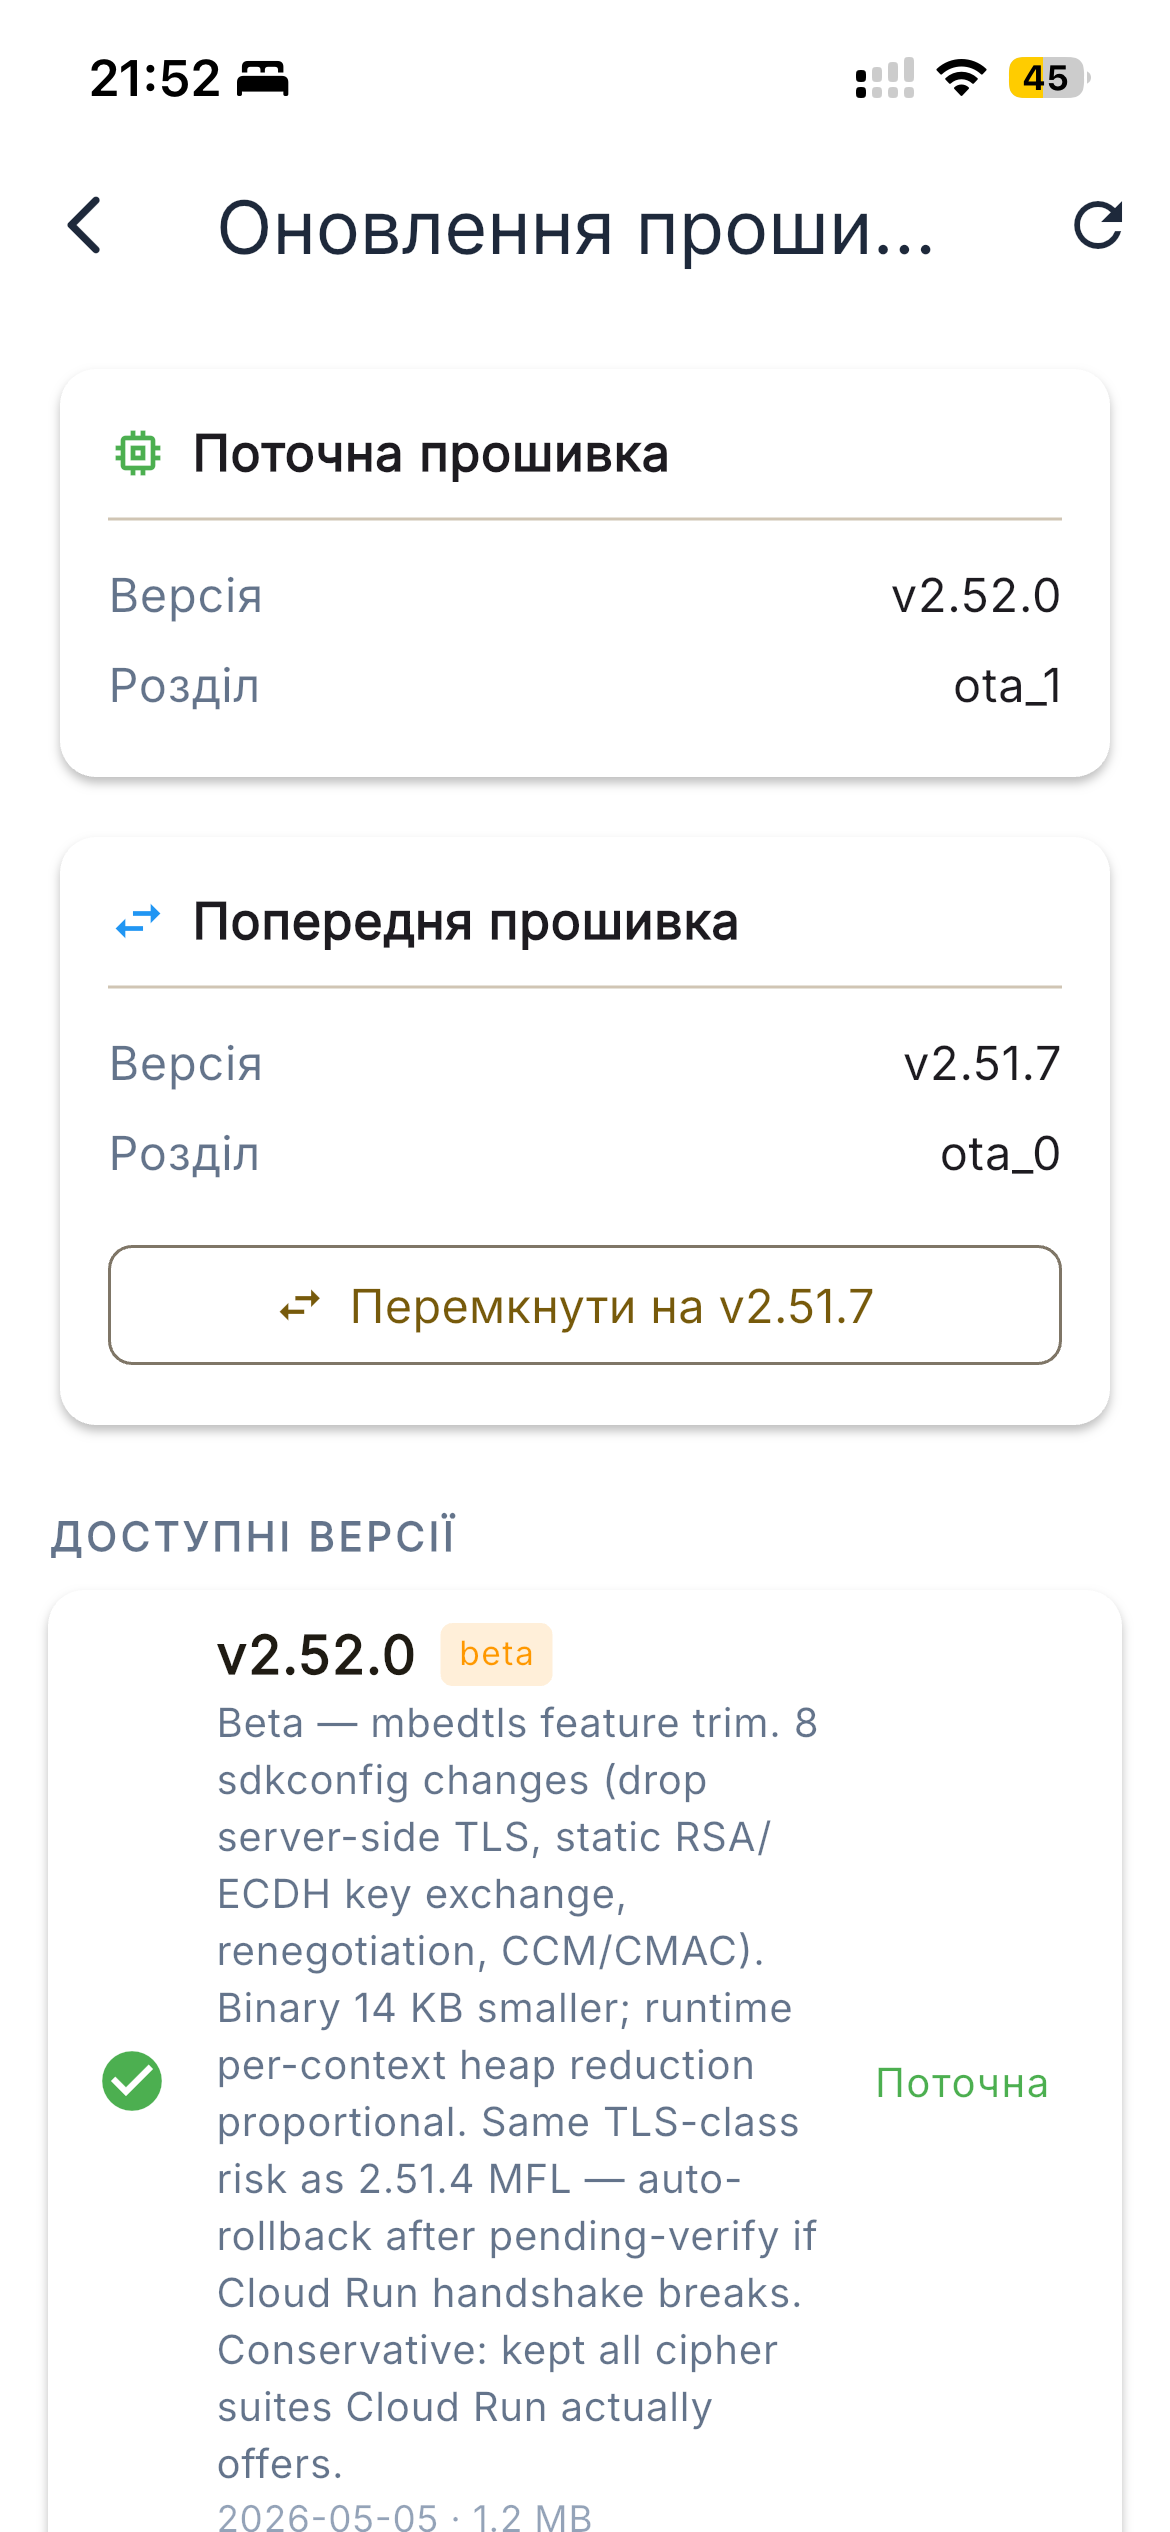
Current and previous firmware partitions, plus available versions
Edge firmware is updated over-the-air. The OTA screen shows:
- Current — version running now and which partition (ota_0 or ota_1)
- Previous — version on the inactive partition; tap to roll back
- Available versions — releases on the stable and beta channels with release notes
Updates use A/B partitions: the new version is written to the inactive partition, then the device boots into it. If the new firmware can't connect, it auto-rolls-back to the previous version.
LED status
| LED pattern | Meaning |
|---|---|
| Slow blink | Waiting for Wi-Fi configuration (BLE pairing mode) |
| Fast blink | Connecting to Wi-Fi |
| Solid on | Online and uploading readings |
| Double blink | Error — open the app for details |
If you build your own ESP32-S3 board or want to flash a new device, see Flash Edge Firmware.
Home Assistant Add-on
Already running Home Assistant? Pair Svitgrid with your existing HA install in under a minute.
If you already have a Home Assistant instance with your inverter set up (via the Solarman, Modbus, or any other integration that exposes battery / PV / grid / load sensors), you don't need a Svitgrid Edge device. Install our HA add-on and pair it with the app — Svitgrid will start receiving readings from the entities Home Assistant already collects.
From "Add Integration" in HA to "Paired" in the mobile app — the full handshake.
Before you start
- Home Assistant 2026.3 or newer (older versions don't support the modern config-flow API)
- An integration in HA that exposes your inverter as sensor entities (Solarman, Deye, Sunsynk, Modbus, MQTT — anything that produces
sensor.inverter_battery-style entities) - Svitgrid mobile app build 144 or newer, signed in
Step 1 — Install the add-on in HA
Copy the custom_components/svitgrid folder from github.com/svitgrid/home-assistant-svitgrid into your HA config/custom_components/ directory, then restart Home Assistant. You can also install it via HACS as a custom repository — same end state.
Step 2 — Start pairing on HA
In Home Assistant: Settings → Devices & Services → Add Integration → Svitgrid → Pair. HA will display a 6-character code and a spinner. Leave that screen open.
Step 3 — Create a household in the mobile app
Tap Add Household. Give it a name (e.g., "Home"), pick a location, and on the connection-mode step tap the new Home Assistant add-on card. You'll land on a screen with a code input + a brand picker.
Step 4 — Pick your inverter brand & type the code
Pick your inverter brand from the dropdown (e.g., Deye SG04LP3) — this tells Svitgrid which HA entities to read for which payload field. Type the 6-character code shown by HA. Tap Pair.
Step 5 — That's it
Within ~30 seconds the dashboard will start showing live data from your inverter via the HA add-on. The add-on publishes one reading every 60 seconds while the app is in active use, and every 5 minutes when idle — matching the cadence of our edge devices and mobile harvester.
What gets created
- An edge device in your household (named e.g. "HA: Deye SG04LP3") — represents the HA install
- An inverter tied to that edge device, with brand/model metadata from the preset you picked
- A trusted signing key the add-on uses to authenticate every reading
Brand presets & entity mapping
The preset you pick during pairing tells the add-on which HA entity to read for each Svitgrid field (PV power, battery SOC, grid power, etc.). The Deye SG04LP3 preset, for example, maps:
batterySoc      → sensor.inverter_battery
batteryPower    → sensor.inverter_battery_power
batteryVoltage  → sensor.inverter_battery_voltage
pv1Power        → sensor.inverter_pv1_power
pv2Power        → sensor.inverter_pv2_power
gridPower       → sensor.inverter_grid_power
loadPower       → sensor.inverter_load_power
The entity names in your HA install must match the preset — these are the defaults the Solarman integration creates for a Deye hybrid inverter. If your entity names differ, edit them in HA before pairing (or wait for the manual-mapping flow in a later release).
Troubleshooting
| Symptom | Cause | Fix |
|---|---|---|
| "Svitgrid" doesn't appear in Add Integration | HA frontend has the integration list cached | Hard-refresh the browser (Cmd+Shift+R / Ctrl+F5) or open HA in a private window |
| Pair screen shows a spinner with no code | Translation files missing from the add-on folder | Make sure custom_components/svitgrid/translations/en.json exists; restart HA |
| Code expired | You waited more than 5 minutes between HA showing the code and tapping Pair in the app | In HA, cancel and start the pairing flow again to get a fresh code |
| Paired but readings stuck at 0 | Your HA inverter entities are unavailable or report 0 (upstream integration broken) | Open HA → Developer Tools → States. Confirm the entity in the preset's entityMap shows real values. If not, fix the upstream integration (e.g., Solarman dongle config) before re-pairing |
| Multiple households see the same inverter | You paired the same HA install to two households | Each HA pairing creates a new edge device; remove the unwanted one from Settings → Devices & Services |
Differences from the Svitgrid Edge device
| HA Add-on | Svitgrid Edge | |
|---|---|---|
| Hardware | Reuses your existing HA host | Dedicated ESP32-S3 board |
| Data source | Reads HA entities you already have | Polls the inverter directly over Solarman V5 / Modbus |
| Inverter control | Read-only in v1 (write commands ship later) | Full control — schedules, force-charge, sell-to-grid, generator port |
| Setup time | ~1 minute (if HA is already running) | ~5 minutes (flash + BLE pairing + Wi-Fi setup) |
| Best for | Existing HA users who just want app dashboards / forecasts / reports | Anyone who wants Svitgrid to actively run their inverter schedules |
Smart Devices (Zigbee)
Pair Zigbee smart sockets to your Svitgrid Edge and control them from the app.
Open Home → Smart Devices. The screen lists every Zigbee device that's been paired to your Edge, with its current on/off state and live power draw (when on).
What you need
- A Svitgrid Edge device with the ESP32-H2 Zigbee coordinator (Gateway 0.1 has this built-in).
- A Zigbee-3.0 socket that can be put into pairing mode (usually a long press of its on/off button).
Pairing a new socket
- Open Smart Devices.
- Tap the + Add Device floating button — a dialog opens with a 120-second countdown.
- Within those 120 seconds, put the socket into pairing mode (usually long-press its button until it flashes).
- The dialog scans every 5 seconds and lists devices it discovers.
- Tap a discovered device to register it with your household. It moves to the main list.
- The dialog auto-closes once every discovered device is registered.
If a device doesn't show up in the dialog, the most common causes are: socket not actually in pairing mode, socket out of range of the Edge, or another network is competing for it (factory-reset the socket and try again).
Per-device actions
| Action | How |
|---|---|
| Toggle on / off | Tap the switch on the device card, or tap the card to open detail. |
| See live power | The card and the detail screen show the current draw in watts (only while the socket is on and reporting). |
| Rename | Open the device → menu → Rename. The new name is shown everywhere (including in calendar events that use the device). |
| Remove | Open the device → menu → Remove. Unpairs the device from the Edge and deletes its history. |
| Activity history | The device-detail screen lists every command_sent / command_executed / state_change / paired event with a timestamp. |
Use with calendar events
Two event types use Smart Devices: Lower Consumption turns sockets off during the window (e.g., before a planned blackout) and Consume from Sun turns them on when there's excess solar (e.g., to run a water heater on free energy). See Creating a Calendar Event.
Flash your Svitgrid Edge
Install fresh firmware on your Svitgrid Edge from your browser — no terminal, no script downloads.
Open svitgrid.app/flash in Chrome, Edge, Opera, Brave, or Arc on a desktop computer.
What you'll need
- A Svitgrid Edge device
- A USB-C cable that carries data (not just power)
- A Chromium-based browser (Safari and Firefox do not support in-browser flashing — see /flash for the warning banner if you opened the page in the wrong browser)
Steps
- Plug the Edge into your computer via USB-C.
- Hold BOOT, tap RESET, release BOOT.
- Open /flash and click Flash now.
- Pick your Edge from the device picker that appears.
- Choose Erase device for a fresh device, or Upgrade to preserve existing Wi-Fi credentials.
- Wait ~30 seconds — your Edge will reboot into the new firmware.
After flashing, the Edge needs Wi-Fi credentials. Pair it through the Svitgrid mobile app — see Onboarding.
Firmware Update (OTA)
Update or roll back the Svitgrid Edge over-the-air from the app — no USB cable, no desktop flasher required.
Once your Edge is online and reporting heartbeats, you can ship a new firmware version to it from inside the app. The device downloads the binary directly from Svitgrid's CDN, verifies the SHA256, writes it to the inactive A/B partition, and reboots. If the new firmware fails to boot or stops heartbeating, the device automatically rolls back to the previous partition.
Opening the firmware screen
- Open Home → tap your edge device tile (under the inverter card).
- On the Edge Device detail screen, tap the Update or Rollback card.
What you see
The screen has up to three blocks:
- Running Firmware — the version currently active (e.g.,
v2.61.0) plus the partition it's running from. A green checkmark marks the same version in the list below. - Previous Firmware (only shown if the other A/B slot is populated) — the version sitting in the inactive partition, with a Switch to v… button to roll back to it.
- Available versions — every published firmware version from
GET /firmware-versions. Each tile shows the version number, a channel badge (beta / stable), release notes, build date, and binary size in MB.
Updating
- Tap a version tile that's not your current one.
- Confirm in the dialog. The app sends
POST /edge-devices/:id/firmware-updatewith that version. - The screen shows a progress bar and stage label that tracks the device's actual state via heartbeats:
- Sending command — the API has queued the OTA command.
- Device preparing — the device picked up the command and is about to start.
- Downloading — live 0–100% from the device.
- Verifying — SHA256 check against the manifest.
- Reconnecting — device rebooted into the new partition; waiting for the first heartbeat to confirm boot.
- Finalizing — boot confirmed, OTA committed. The screen refreshes to show the new running version.
The whole flow typically takes 60–120 seconds on a decent WiFi connection. The home dashboard also shows a Firmware Update banner during the update so you don't have to keep this screen open.
Rolling back
If a new version misbehaves, tap Switch to v… on the Previous Firmware card. The app calls POST /edge-devices/:id/firmware-rollback, which tells the device to boot from the inactive partition. The previous binary is still in flash from the last update — no download is needed, so rollback is quick.
Move Harvester to Another Phone
Transfer the always-on phone harvester from one phone to another — replacing the device that stays at home reading your inverter.
If you use a phone harvester (a phone left at home polling the inverter over local WiFi, instead of an Edge device), you'll eventually want to move that role to a new phone — upgrading hardware, an old phone breaking, switching to a tablet, etc. The harvester transfer flow does this in a single scan, without re-onboarding the inverter.
The flow at a glance
- On the old phone open Settings → Inverter Settings → Transfer Harvester. A QR code dialog appears with a 5-minute countdown.
- On the new phone, sign in to the same Svitgrid account and open the in-app QR scanner (from the same Inverter Settings screen, or via the deep-link in the share sheet).
- Point the new phone at the QR code on the old phone. The transfer happens in a couple of seconds.
- The new phone takes over harvesting. The old phone stops polling automatically.
The transfer code
- The QR encodes a deep-link:
svitgrid://transfer-harvester?inverterId=…&token=… - The token is valid for 5 minutes. The countdown turns orange in the last 60 seconds. After it expires the QR stops working and you'll need to regenerate.
- The token is one-shot — once redeemed, it can't be reused. Cancelling the dialog also invalidates it.
What changes after a successful transfer
- The server sets the inverter's active harvester to the new phone.
- The old phone stops polling on its next heartbeat — no manual step needed.
- The old phone stays signed in to your account. You can keep using it for dashboard / app features; it just won't run the harvester anymore.
- All historical readings stay on the inverter — they're tied to the inverter, not to the harvesting device.
Your Devices
Approve which phones can sign commands for your household.
The planner and any manual control (battery override, gen-port toggle) requires a signed command. Each phone you sign in to Svitgrid registers a per-device key; the household owner approves which phones are allowed to sign.
Approving a new phone

A new sign-in shows up as a pending request — Approve or Reject
When you sign in on a new phone, the device shows up under Settings → Your Devices with status "Access requested". The owner taps:
- Approve — the phone can now sign commands
- Reject — the phone is blocked
Device detail
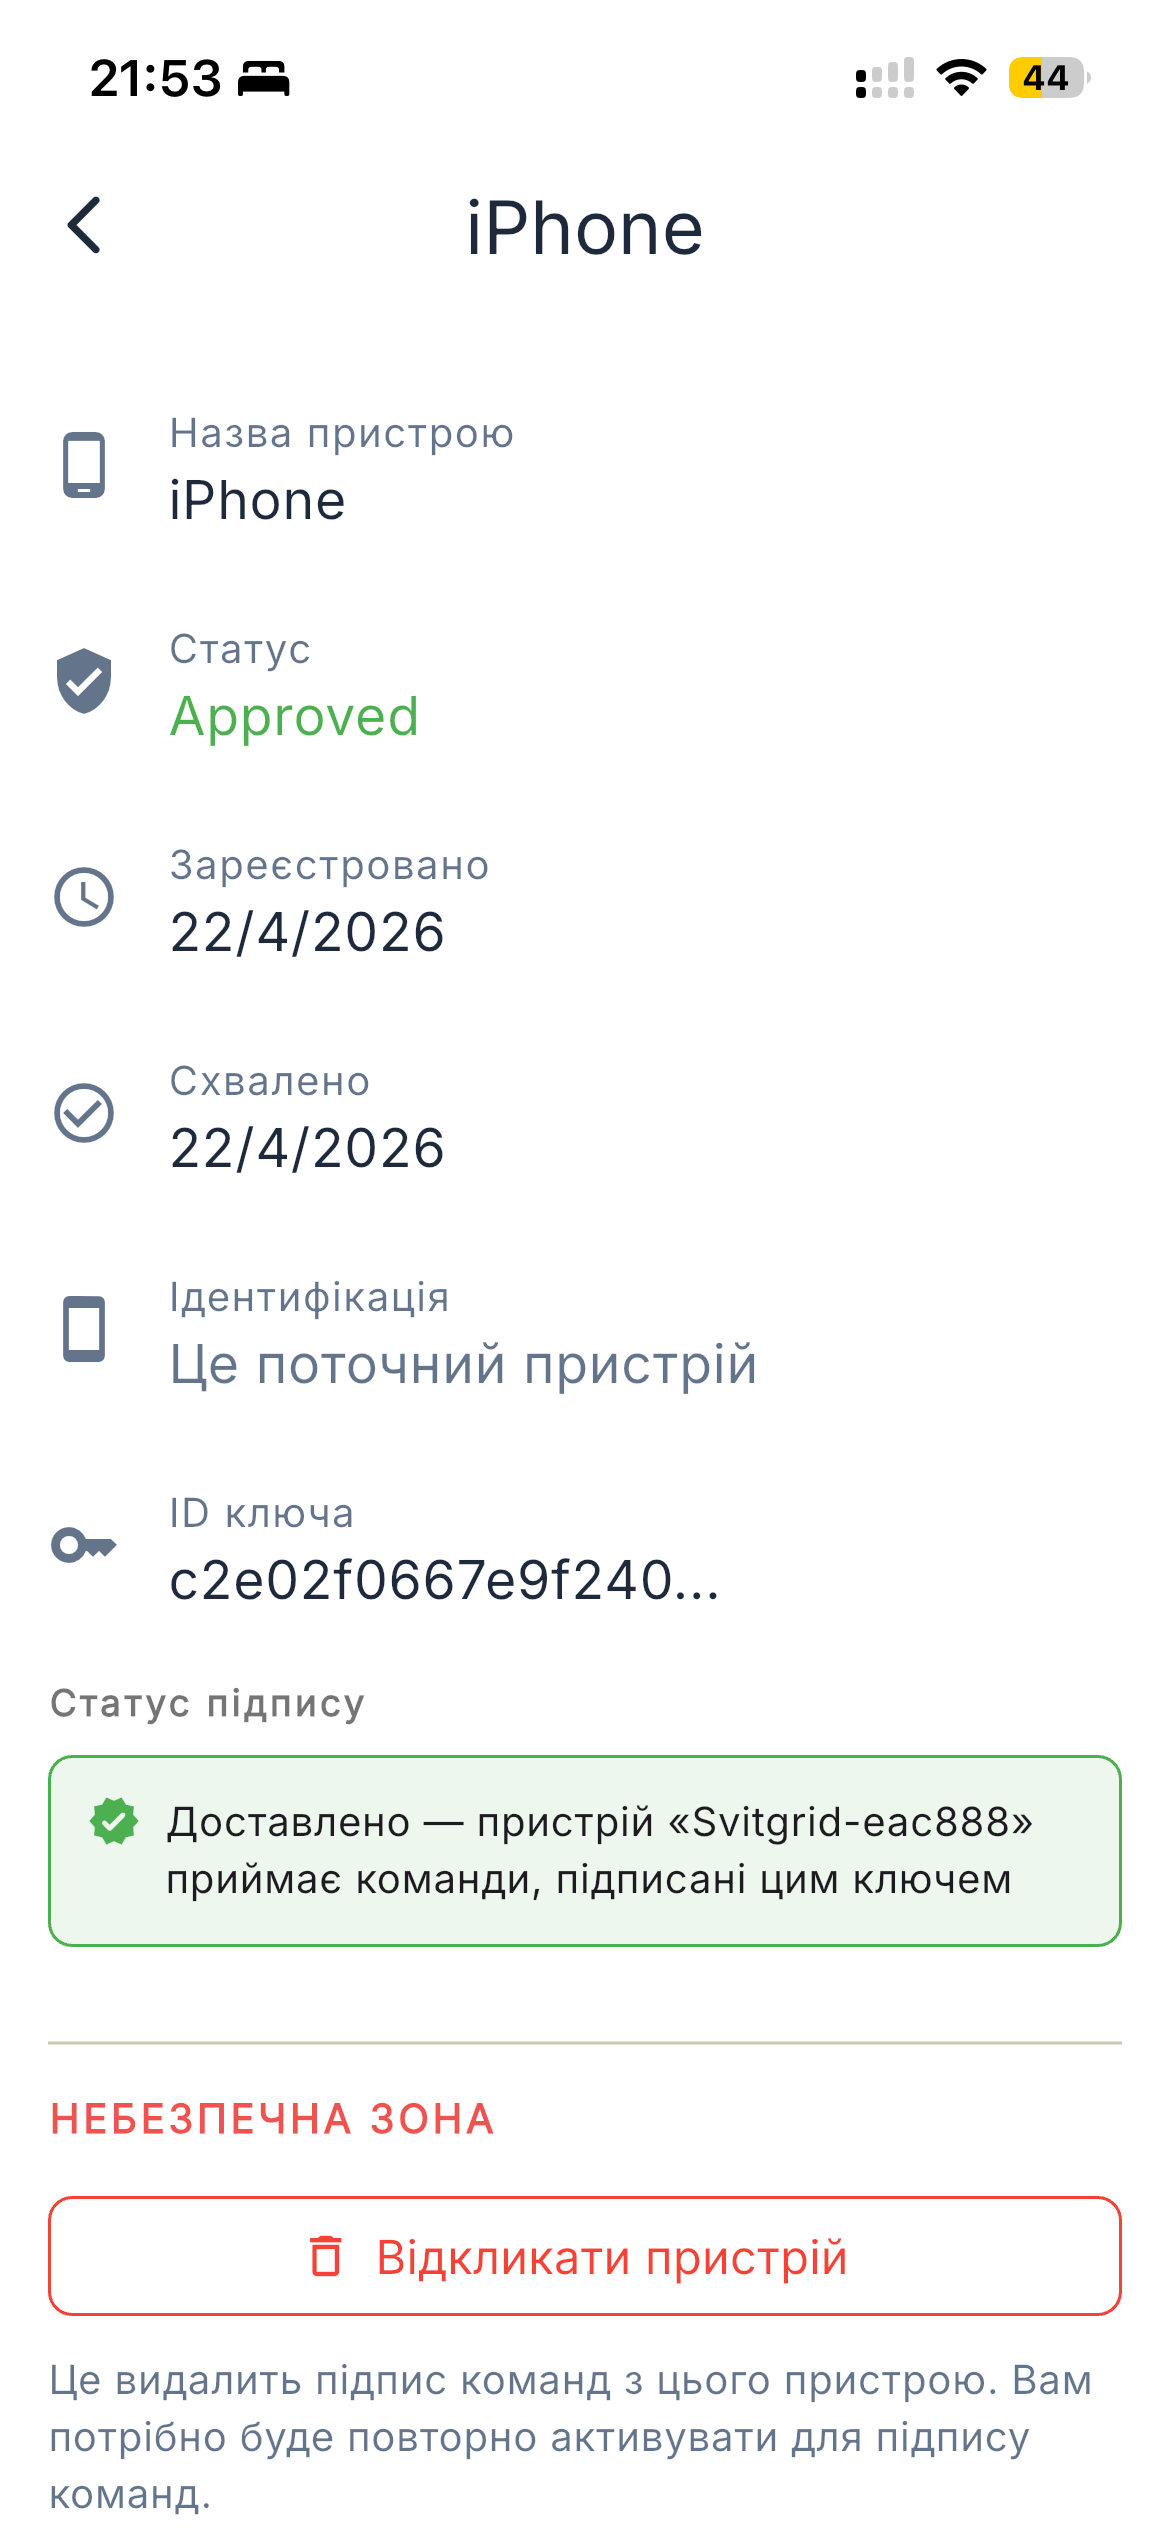
Status, registration date, key ID, and the Edge device this phone signs against
Tap any device for the full record:
- Status — Approved, Pending, or Rejected
- Registered — date the phone first asked for access
- Approved — date the owner approved it
- Key ID — last digits of this phone's signing key
- Signed against — which Edge device the phone signs commands for
Revoking a device
Open the device detail and tap Revoke. The phone immediately stops being able to sign commands; you'd need to re-approve it to use it again. Useful if a phone is lost or sold.
Reset all signing
The list also has a Reset signing action that clears every approved device. Use it if you suspect any phone is compromised — every member needs to re-approve from scratch afterwards.
Inverter Write History
Every command Svitgrid sent to your inverter, grouped by scenario, with old and new register values.
Open Settings → Inverter Settings → Write History. The screen lists every write Svitgrid has made to the inverter — planner schedules, calendar events, your manual changes to grid-charge slots or work mode, anything else that touches a register.
What you see
- Daily quota chip at the top — how many writes have happened today against the daily soft cap. Useful when you suspect the planner is misbehaving and burning through writes.
- Entries grouped by scenario — each calendar event, planner run, or manual change collapses into a single block. Expand to see every
set_*/restore_*command inside. - Per command: register name, old value, new value, status (success / failed / pending), and timestamp.
When this is useful
- Confirming the planner actually ran today (count > 0 + a recent scenario block).
- Diagnosing a misconfigured event: the
set_*shows up but therestore_*failed, leaving the inverter in an unexpected mode. - Showing your installer / inverter dealer exactly what the app changed and when, in writing.
Register Dump (Diagnostics)
Read every Modbus register from the inverter at once — for support, debugging, or reverse-engineering register maps.
Open Settings → Inverter Settings → Run Diagnostics. Svitgrid reads every register defined in the model's register map and shows them in a single table.
Two flavours
| Mode | How | When to use |
|---|---|---|
| Harvester-side | The app reads registers directly from the inverter over your local WiFi. | You're on the same network as the inverter. Faster, no round-trip through the cloud. |
| Edge-side | Svitgrid sends a cloud command to your Edge device; the Edge reads registers and reports them back. | You're away from the inverter network and want to capture a snapshot remotely. |
Svitgrid picks the flavour automatically based on your harvester configuration — the dump tile is only shown if you have at least one harvester (mobile or edge).
What you see
- Every register from the model's map: address, name, raw value (decimal + hex), and scaled value if a scale factor applies.
- A Copy to clipboard button — paste into a Sentry comment, GitHub issue, or email to support.
Battery Advisor
During an outage, see how long your battery will last under different load assumptions.
When the grid drops and the battery is supplying the home, the dashboard shows an outage banner at the top. Tap the banner to open the Battery Advisor.
What you see
- SOC projection chart — current SOC and a projected curve down to your low-battery threshold under the chosen load.
- Load presets — pick from a list of appliances (fridge, router, lights, kettle, …) and the projection updates. Or switch to Custom watts and type a number.
- Estimated time-to-depletion — clear text "Battery will reach X% in HH:MM" with a warning band when the time is short.
When the banner appears
The advisor entry point is conditional. It shows up only when all three are true:
- Grid is detected as off (via the inverter's relay/contactor state — see Dashboard's outage strip).
- The battery is discharging into the home.
- The household has a battery configured.
If any of those is false (no battery, grid is up, or battery is charging from solar), the banner is hidden and the advisor isn't reachable.
Single-Phone Health
A heads-up when your data collection is at risk because everything depends on one phone.
If your household has no Edge device and is being harvested by a single phone, every gap in collection — phone asleep, phone off your home WiFi, phone restarted — leaves a hole in your readings. Svitgrid watches for these gaps and surfaces a Single Phone Status strip on the dashboard when the risk crosses a threshold.
What you see
Tap the strip to open the full screen. It lays out:
- Risk summary — soft or hard alert, depending on how much data has been missing in the last week.
- Affected inverters / harvesters — which ones the gaps are hitting, with a short gap summary per harvester.
- Remediation buttons — Transfer to Edge if you already have one, or Add edge device to start the buying flow / onboarding.
- Dismiss / accept — Owners / Admins can dismiss the alert or accept the risk. Regular Users see read-only.
When the strip appears
Only when the gap-detection logic flags the household as at-risk based on recent collection history. If you have an Edge device or your phone harvester is doing a good job, the strip stays hidden.
PV History
Per-string solar production over time — useful for spotting shading, dirt, or a panel that's behaving differently from its siblings.
On the dashboard, tap one of the PV strings on the energy-flow diagram, then tap Show History.
What you see
- Per-string power curves — PV1 and PV2 (or more, on multi-string inverters) plotted side-by-side for the selected day.
- Granularity toggle — switch between hourly and 15-minute resolution.
- Date picker — scroll backward and forward day by day.
- Advanced panel (optional) — raw register values per string for the chosen sample, for debugging.
When to look
- A roof has shading at certain hours and you want to see which string takes the hit and for how long.
- Comparing two strings that should produce the same — different orientation, dirt on one, or a bad panel will show up here.
- Spotting clipping when one string consistently caps at a value below the others on the brightest hours.
The dashboard's main hourly chart aggregates production across all strings; the PV history view is the only place you see per-string breakdown over time.
Supported Inverters
Full list of compatible inverter models.
Deye
| Model | Type | Phases |
|---|---|---|
| SUN-8K/10K/12K-SG04LP3 | 3-Phase Hybrid | 3 |
| SUN-3K~20K-SG05LP3 | 3-Phase Hybrid | 3 |
| SUN-5K~25K-SG01HP3 (HV) | 3-Phase HV Commercial | 3 |
| SUN-50K-SG01HP3-EU-BM4 | 3-Phase HV Commercial | 3 |
| SUN-5K/6K/8K-SG03LP1 | 1-Phase Hybrid | 1 |
| SUN-3K~8K-SG01LP1 | 1-Phase Hybrid | 1 |
| SUN-10K/12K-SG02LP1 | 1-Phase Hybrid (3 PV strings) | 1 |
| SUN-3K~8K-SG04LP1 | 1-Phase Hybrid | 1 |
| SUN-3.6K~8K-SG05LP1-EU | 1-Phase Hybrid | 1 |
| SUN-12K~16K-SG01LP1 | 1-Phase Hybrid (16K) | 1 |
| SUN-3K/5K/6K-G3 | 1-Phase Hybrid | 1 |
| SUN-5K~8K-SG01LP1-US | US Split-Phase | 2 |
| SUN-G05-P (Grid-Tie String) | Grid-Tie (no battery) | 3 |
| Deye Microinverter (300W–2000W) | Microinverter | 1 |
Sunsynk
| Model | Type | Phases |
|---|---|---|
| Sunsynk 1-Phase (3.6K / 5K / 8K) | 1-Phase Hybrid | 1 |
| Sunsynk 1-Phase 12K | 1-Phase Hybrid | 1 |
| Sunsynk MAX 16K | 1-Phase Hybrid | 1 |
| Sunsynk 3-Phase (8K / 10K / 12K) | 3-Phase Hybrid | 3 |
| Sunsynk 3-Phase 15K | 3-Phase Hybrid | 3 |
Sol-Ark
| Model | Type | Phases |
|---|---|---|
| Sol-Ark 5K (120/240V Split) | US Split-Phase | 2 |
| Sol-Ark 12K (120/240V Split) | US Split-Phase | 2 |
| Sol-Ark 15K Limitless | US Split-Phase | 2 |
| Sol-Ark 18K | US Split-Phase | 2 |
Victron
| Model | Type | Protocol |
|---|---|---|
| MultiPlus-II 48/3000 | 1-Phase Hybrid | Modbus TCP (port 502) |
| MultiPlus-II 48/4000 | 1-Phase Hybrid | Modbus TCP (port 502) |
| MultiPlus-II 48/5000 | 1-Phase Hybrid | Modbus TCP (port 502) |
| MultiPlus-II 48/6500 GX | 1-Phase Hybrid | Modbus TCP (port 502) |
| MultiPlus-II 48/8000 | 1-Phase Hybrid | Modbus TCP (port 502) |
| MultiPlus-II 48/10000 | 1-Phase Hybrid | Modbus TCP (port 502) |
| MultiPlus-II 48/15000 | 1-Phase Hybrid | Modbus TCP (port 502) |
| Quattro-II 48/5000 | 1-Phase Hybrid | Modbus TCP (port 502) |
Profile & Security
Manage your account.
Edit profile
Open Settings → Edit profile to change your display name or email. Email changes require re-verification.
Change password
Settings → Security → Change password. You'll need your current password.
Two-factor authentication
Open Settings → Security → Two-factor authentication. Scan the QR code with an authenticator app (Google Authenticator, 1Password, Authy). After enabling, you'll be asked for a 6-digit code on each new login.
Delete account
Settings → Delete account permanently removes your account and all associated data. This action cannot be undone.
Household Settings
Configure your property — name, country, region, outage group.

All settings live behind the four-tab Settings screen
Household configuration
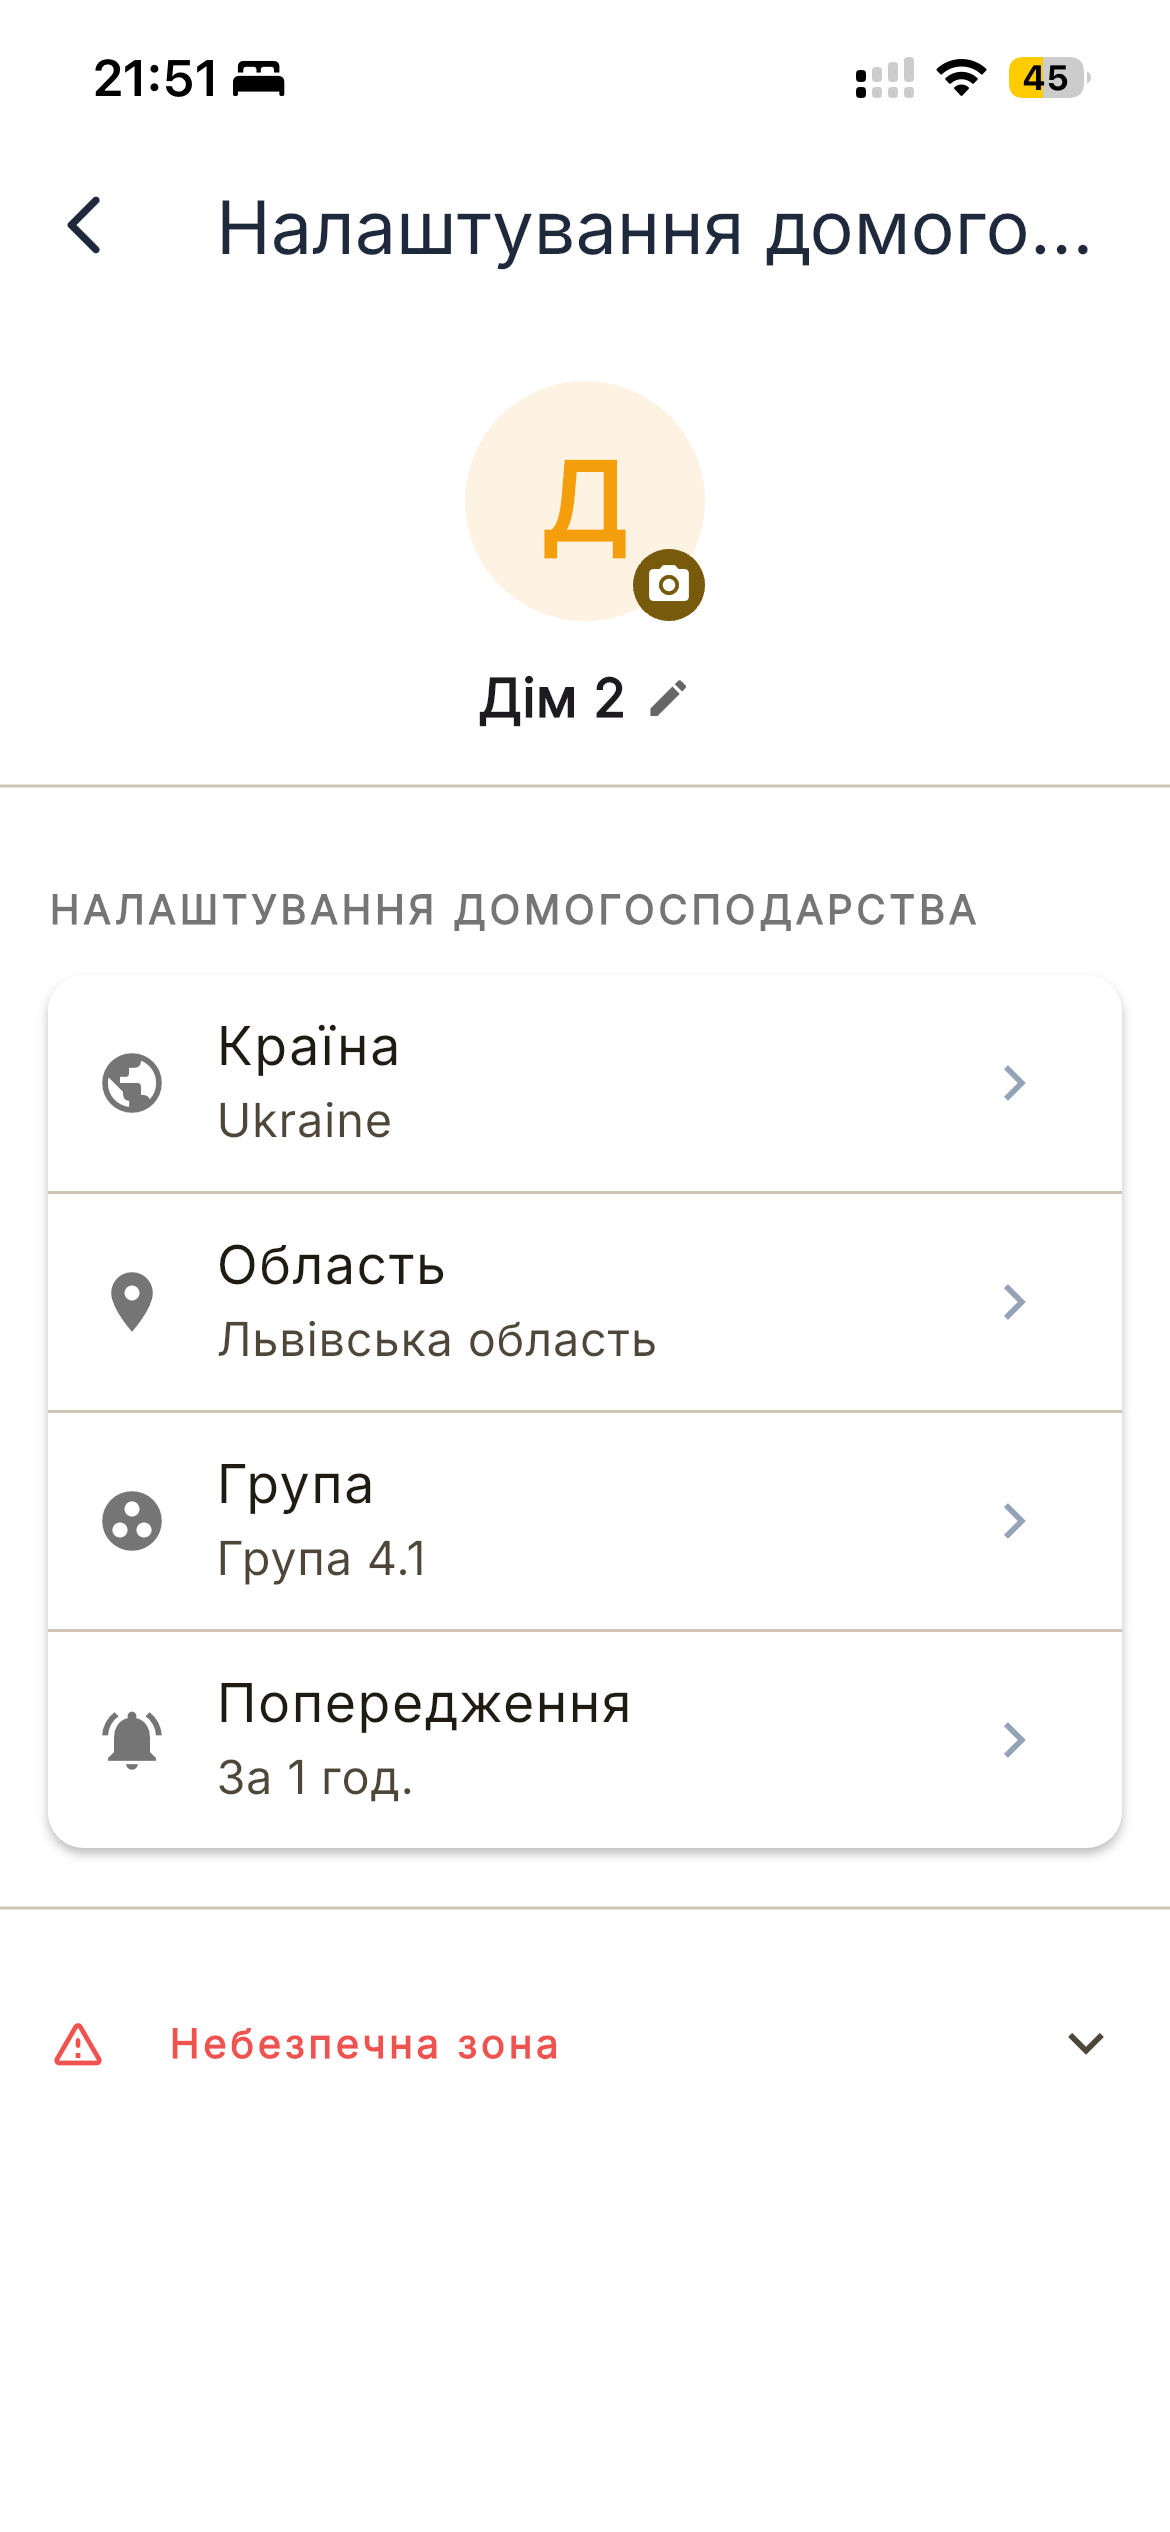
Name, country, region, outage group, low-battery threshold
- Name — display name (e.g., "Home", "Country house")
- Country — selects regional defaults
- Region — your oblast (Ukraine) or state — used by the outage scraper
- Group — your blackout group number from your electricity bill
- Low-battery warning — battery threshold (in hours of remaining backup) that triggers the warning notification
Adding another household
Open Settings → + New household and run the onboarding wizard for the new property. Switch between households using the dropdown at the top of the dashboard.
Renaming a household
Tap the household name at the top of Settings → Household Settings and edit it.
Removing a household
Only the owner can remove a household. Settings → Household Settings → Danger zone → Delete household permanently deletes it and all its energy data.
Electricity Tariff
Tell Svitgrid how you're billed so revenue, savings, and the planner's decisions match reality.
Open Settings → Electricity Tariff. The screen has one pricing-model picker and a different set of fields depending on the model. Pricing model also gates which planning styles and event types are available — for example, Sell to Grid events only appear when the model is Green tariff or DAM (see Creating a Calendar Event).
Pricing model
| Model | When to pick it | What Svitgrid uses it for |
|---|---|---|
| Fixed | You pay a flat rate, a two-zone (day/night), or a three-zone schedule. | Daily-cost calculations. Sell-to-grid revenue is not modelled — the model assumes you don't export. |
| Green tariff | Your meter sells excess solar back at the Ukrainian "Зелений тариф" rate. | Revenue tracking against the year-specific feed-in rate set by NERC (Resolution 2263). Unlocks Sell to Grid events and the "Maximize sell" planner style. |
| Day-Ahead Market (DAM) | You're on a wholesale-market contract — sell price varies hour by hour. | Hourly revenue, planner decisions, and the DAM-prices overlay on the calendar. |
Fixed model fields
- Meter type — Flat, Two-zone, or Three-zone. Picks which rate schedule Svitgrid uses for daily cost.
Green tariff fields
- Commissioning year (2013–2029) — when your installation was commissioned. Determines which year's feed-in rate applies.
- Installed kW (generation) (0–1000 kW, decimal) — your registered installed-generation power. Affects rate tier in some years.
- Supply type — Universal (the household pays the universal-service supplier) or Market (electricity market contract). Drives import-price assumptions.
- Tax status — Individual, Sole Entrepreneur (ФОП), or Legal entity. Determines whether revenue is shown gross or net of tax.
DAM fields
- Sell threshold (default 5.00 UAH/kWh) — the minimum DAM price at which Svitgrid considers it worth selling. Used by event/planner decisions and the DAM-overlay colour.
- Charge threshold (default 3.00 UAH/kWh) — the maximum DAM price at which Svitgrid considers it worth importing to charge the battery.
Seeing DAM prices in the app
With the pricing model set to DAM, the Calendar day view shows a DAM Prices toggle in the collapsible header. Turn it on to colour each hour bar by its DAM price — darker shades = higher price. The toggle is hidden for the other two pricing models.
Members
Share access to a household with family or colleagues, and manage who can change settings or send commands.
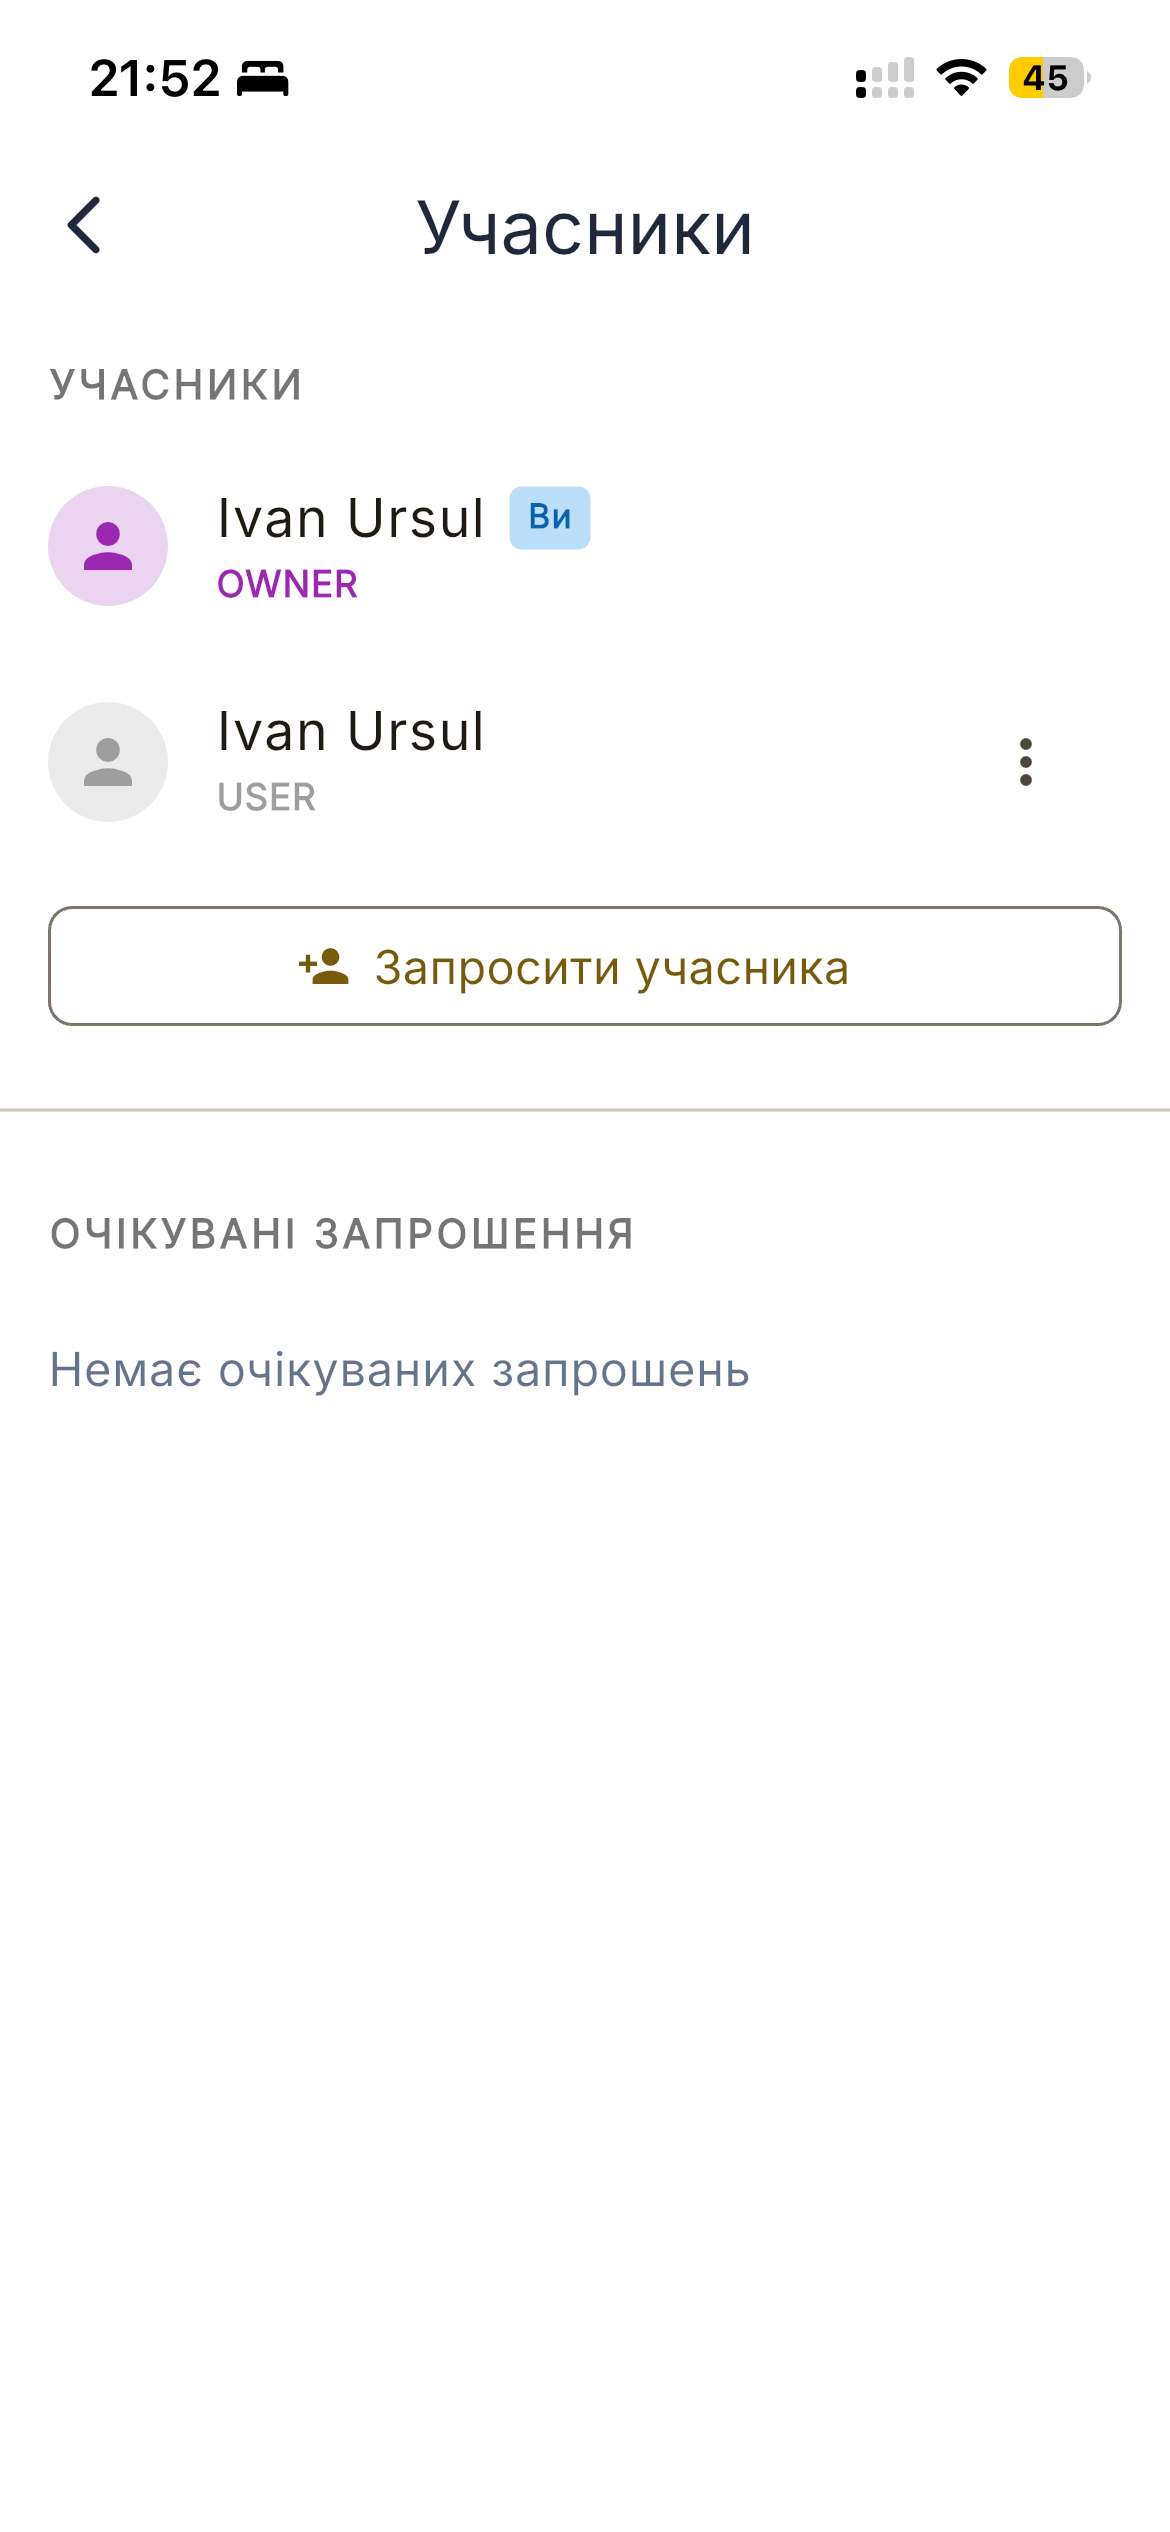
Members list with roles and pending invitations
Inviting a member
- Open Settings → Members.
- Tap Invite member.
- Enter their email address.
- They receive an invitation link by email.
- Once they accept, they appear in the members list with their chosen role.
Roles
| Role | Can do |
|---|---|
| Owner | Everything — view, change settings, invite/remove members, send commands without approval, delete household. Cannot be demoted; each household has exactly one Owner. |
| Admin | Same as Owner except cannot delete the household or change the Owner. Useful for a trusted family member who manages day-to-day settings. |
| User | View-only: dashboard, reports, calendar. Cannot change inverter or household settings. Their phone needs Your-Devices approval before it can sign commands. |
Changing a member's role
Tap the three-dot menu next to a member's name and choose Change role. Owners can promote a User to Admin or demote an Admin back to User. The Owner row has no role-change option — to transfer ownership, you currently have to remove and re-invite (a proper transfer flow is on the roadmap).
Removing a member
Three-dot menu → Remove from household. The member loses access immediately; their personal account and any other households they belong to are unaffected.
Pending invitations
Invitees who haven't accepted yet show up in a separate Pending invitations section below the members list. Each row has an × button on the right — tap it to cancel the invite. There's no resend action today; cancel the old one and send a fresh invite.
Your Devices — command-signing approval
Sending a command to your inverter (planner runs, calendar events, manual writes) requires a signed command. Each phone signs with its own per-device key, so adding a new phone — yours or another member's — needs explicit approval from a phone that's already trusted.
The Owner sees pending devices on the Your Devices screen (Dashboard → tap the household tile → Your Devices, or open it from the Calendar). Pending phones appear as orange cards labelled "Requesting Access" with a device name and a request timestamp.
Per device, the Owner has two buttons:
- Approve (green) — one tap, no biometric prompt. The phone immediately joins the trusted set and can sign commands.
- Deny (red) — the phone's request is rejected; it can re-request later.
Appearance & Language
Customize how the app looks.
Theme
- Light — white background, dark text
- Dark — dark background, light text (easier at night)
- System — follows the phone's system theme
Language
Svitgrid is available in:
- English (EN)
- Ukrainian (UK)
The app defaults to your phone's language. Override it in Settings → Appearance → Language.
Data Quality
Why a dedicated data source matters for accurate solar monitoring.
The problem with phone-only monitoring
If you only use your personal phone to read the inverter, Svitgrid can only collect data while the app is open and your phone is on the same Wi-Fi as the inverter. That creates real gaps:
- You leave home — collection stops the moment you walk out the door
- You close the app — iOS / Android battery rules limit background work
- Your phone sleeps — overnight and idle periods produce zero data
- You switch Wi-Fi — the phone can no longer reach the inverter
How gaps affect you
| What you lose | Why it matters |
|---|---|
| Accurate daily totals | You can't track how much your panels actually generated |
| Peak production windows | You miss when your system performs best (often midday, when you're away) |
| Battery cycle patterns | You can't see overnight discharge or early-morning charge behaviour |
| Grid totals | No way to verify your bill or feed-in tariff revenue |
| Anomaly detection | A problem at 2 am or during work hours goes unnoticed |
| Planner | Without a 24/7 data source, the planner can't run schedules |
The two good options
Option 1 — Svitgrid Edge (recommended)
The Svitgrid Edge is a tiny ESP32-S3 device that plugs into USB-C and runs continuously. It uploads readings every few seconds and runs planner commands. Setup is 5 minutes.
Option 2 — Dedicated phone left at home
An old phone, plugged in, on Wi-Fi, with Svitgrid open works almost as well. Cost: zero. Steps:
- Sign in to Svitgrid on the spare phone with your account
- Approve it under Settings → Your Devices on your main phone
- Disable battery optimization for Svitgrid in the phone's settings
- Leave the app open and the phone plugged into a charger at home
Comparison
| Personal phone | Spare phone left at home | Edge device | |
|---|---|---|---|
| Data coverage | 2–4 h/day | 20–23 h/day | 24/7 |
| Gaps when away | Always | Rare | None |
| Accurate totals | No | Mostly | Yes |
| Overnight data | No | Yes | Yes |
| Planner can run | No | Yes (best-effort) | Yes (recommended) |
| Setup effort | None | Low | Low |
| Cost | Free | Free (reuse old device) | Edge hardware |
How to check your data quality
- Open Energy Charts and look at yesterday's day view
- A complete day shows a smooth solar curve from sunrise to sunset
- Flat lines or missing hours during daylight = data gaps
- The dashboard's data-source indicator shows whether readings come from your phone or the Edge
Terminology & Glossary
Solar-energy and Svitgrid terms explained.
| Term | Definition |
|---|---|
| PV (Photovoltaic) | Solar panels that convert sunlight into electricity. |
| Inverter | Device that converts DC from panels into AC for your home, manages the battery, and connects to the grid. |
| Hybrid Inverter | An inverter that works with both panels and a battery, and can switch between grid-tied and off-grid operation. |
| String | A group of solar panels wired in series. Most homes have 1–3 strings. |
| Data Logger | Wi-Fi module attached to the inverter — also called the "Wi-Fi stick" or "logger stick". |
| SOC | State of Charge — battery level as a percentage (0–100%). |
| kW | Kilowatt — a rate of power right now. Like the speed of a car. |
| kWh | Kilowatt-hour — energy over time. Like the distance the car has driven. |
| Grid Import | Power you bought from the grid. |
| Grid Export | Power you sold back to the grid. |
| Load | Your home's electricity consumption. |
| Self-sufficiency | The percentage of your home's load that came from your own solar/battery. |
| Self-consumption | The percentage of your solar production that you used directly (rather than exported). |
| Solarman V5 | Communication protocol used by Deye / Sunsynk / Sol-Ark data loggers over TCP. |
| Modbus TCP | Communication protocol used by Victron GX devices on TCP port 502. |
| Register | Memory address inside the inverter that holds a value (PV power, SOC, …). Svitgrid reads these. |
| Edge Device | Small dedicated device on your network that polls the inverter 24/7 and uploads to the cloud. |
| Household | A property in Svitgrid with its own inverter, data, and members. |
| Master / Slave | In multi-inverter homes, one is master (accepts commands) and the others are slaves (controlled via the inter-inverter link). |
| Azimuth | Compass direction panels face: 0/360 = North, 90 = East, 180 = South, 270 = West. |
| Tilt | Angle of panels from horizontal. 0 = flat, 90 = vertical wall mount. |
| kWp | Kilowatt-peak — rated panel output under ideal conditions. Used in the forecast. |
| Green Tariff | (Ukraine) Feed-in tariff — homeowners sell excess solar to the grid at a fixed premium rate. |
| Day-Ahead Market | Hourly electricity prices published the day before — used by the planner's "Lower bill" style. |
| BLE | Bluetooth Low Energy — used to pair the Edge during onboarding. |
| GX Device | (Victron) Cerbo GX, Venus GX — controllers that aggregate data from Victron components and expose Modbus TCP. |
Troubleshooting
Common issues and how to fix them.
Can't connect to inverter
Network
- Phone / Edge must be on the same Wi-Fi as the data logger
- Try pinging the inverter IP from another device
- Restart the data logger (unplug the Wi-Fi stick, plug it back in)
- Check whether the router has AP-isolation / client-isolation enabled — it blocks device-to-device traffic
Settings
- Confirm the IP hasn't changed (reserve a DHCP lease in the router)
- Confirm the port (8899 Solarman, 502 Victron)
- Confirm the logger serial
Data shows 0 or no values
- PV power 0 — normal at night or full shade
- All values 0 — connection issue or wrong inverter model selected
- Some values show 65535 — register doesn't exist for this model. Email support.
Edge device not found during scan
- Bluetooth on?
- Location permission granted (required for BLE on Android)?
- Edge in pairing mode (slow blinking LED)?
- Stay within 5 m of the device while scanning
Edge device offline
- LED on?
- Wi-Fi working?
- Did you change your Wi-Fi password? Re-pair the device.
- Try unplugging and reconnecting power
Forecast inaccurate
- Confirm tilt and azimuth per string
- Confirm location pin is in the right place on the map
- Confirm capacity (kWp) matches your actual panels
- Partial shading (trees, buildings) reduces actual production below forecast
- Calibration takes ~7 days of data
Planner didn't run
- Authorization expired? Renew it in Calendar → Planner
- Edge offline? See "Edge device offline" above
- Multi-inverter household? Commands go to master only — confirm it's online
- Daily limit hit? Check command history on the planner event detail screen
App is slow or crashes
- Update from the App Store / Google Play
- Restart the app
- If it persists, email hello@svitgrid.app with device, OS version, and a description
Frequently Asked Questions
Quick answers to common questions.
Is Svitgrid free?
Yes. Svitgrid is free to download and use. No subscriptions, no premium tiers.
Does Svitgrid work without internet?
Phone mode reads the inverter over your local Wi-Fi, so live monitoring works without internet. Historical reports, the planner, the forecast, and remote access need internet.
Does Svitgrid store my data?
If you use the Edge or a dedicated phone, readings go to Google Cloud / Firebase. You can export or delete them at any time.
Can I use Svitgrid with multiple inverters?
Yes. A household supports multiple inverters; one is master and the others are slaves. Svitgrid handles this automatically — you just see one combined dashboard.
Why do I need a data-logger serial number?
The Solarman V5 protocol requires the logger serial to authenticate. Without it the data logger ignores requests. Victron systems don't need a serial.
Can family members see my data?
Only if you invite them via Settings → Members. Each member has their own Svitgrid account.
What's the difference between kW and kWh?
kW is a rate (how fast power is flowing right now — like a car's speed). kWh is a total over time (like distance travelled). Panels producing 4 kW for 2 hours generate 8 kWh.
Why is grid power negative when I export?
Svitgrid follows the inverter's convention: positive grid power = import (buying), negative = export (selling). Reports / charts label them clearly so you don't have to remember the sign.
What does the planner actually do?
Based on your chosen style, the planner builds a daily schedule of inverter modes (charge from grid, sell to grid, lower consumption, …) and sends the corresponding commands to your inverter at the right times. See Calendar & Planner.
Will Svitgrid support Growatt / SMA / Fronius?
We're actively adding more brands. Join the Telegram group (@svitgrid) for updates.
How do I report a bug?
Email hello@svitgrid.app with a description, device model, OS version, and screenshots if possible. You can also report issues in the Telegram group.