
Setting up your system
After you sign in, Svitgrid searches for your inverter, asks how to collect its data, and fills in a one-page summary of your station for you to check.
Setup finds as much as it can by itself. Nothing is added until the last step, and you can change every answer later in the settings.
Setting up a Svitgrid Gateway?
Follow Setting up your Svitgrid Gateway. It covers the same setup with the board, from unpacking to the first reading.
Find
The app searches your home network for the inverter, and searches over Bluetooth for Svitgrid boards and battery monitors. It lists what it found: the inverter, usually by the serial number of its Wi‑Fi logger, and any board or battery monitor nearby.
Untick anything that is not yours, and tap Continue. To search again, tap the search button (↻) beside it.
Keep the phone on your home Wi‑Fi while it searches. If the app finds nothing, it says what to check. See Connecting to your inverter.
How to collect the data
This step appears only when the app found no Svitgrid board. Choose one:
- Use this phone — no hardware. The phone reads the inverter while the app is open and the phone is on the same Wi‑Fi.
- Home Assistant add-on — if you already run Home Assistant. See Home Assistant.
How Svitgrid works compares the collectors.
When the app found a board, the board is the collector, and this step is skipped. The app asks for your Wi‑Fi password instead, to hand it to the board.
Check your station
One page holds everything the app read or assumed:
- Inverter — the model and its name.
- Battery — capacity, chemistry, and the number of packs.
- Solar panels — strings, direction, and tilt. They drive the solar forecast. Approximate values are enough.
- Station — its name and location. The location drives the solar forecast and the outage schedules.
Each row says where its value came from. A row marked confirm is the app's best guess. Tap any row to change it.
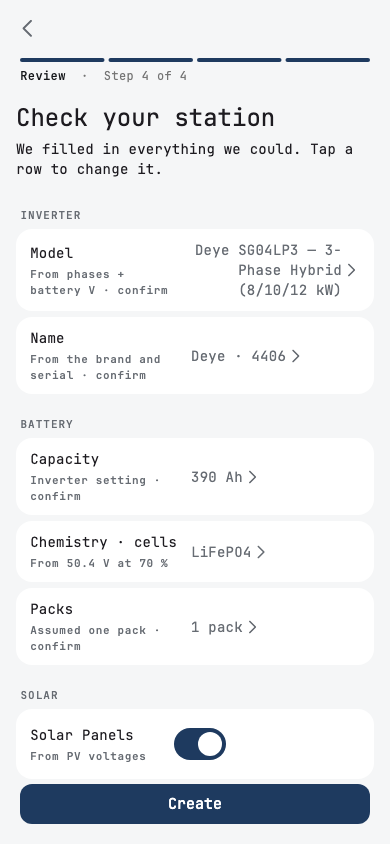
Tap Create.
Creating
The app creates the station, waits for the first reading, and opens your dashboard. This takes about a minute.
If the dashboard stays empty, go straight to Troubleshooting.